

Strawberry Crumble Cheesecake brings together creamy layers of velvety cheesecake, bright strawberry ribbons, and a buttery oat crumble that crackles with every forkful. This vivid mashup of textures and flavors creates a dessert that’s both elegant enough for special occasions and inviting for cozy family gatherings. Follow along to master each stage—from a crisp graham cracker crust to a glossy homemade strawberry compote and that golden crumble on top—so you can serve up a slice of pure happiness.
Key Ingredients
Before we dive into baking, let’s gather the essentials that make this Strawberry Crumble Cheesecake so irresistible.
- 1 1/2 cups (150 g) graham cracker crumbs or digestive biscuit crumbs: Crunchy base that holds the filling and absorb melted butter.
- 2 tbsp granulated sugar: Sweetens the crust and balances the tang of cream cheese.
- 1/4 tsp fine sea salt: Enhances flavors and prevents sweetness from tasting flat.
- 6 tbsp (85 g) unsalted butter, melted: Binds the crumbs into a compact, golden crust.
- 24 oz (680 g) cream cheese, full-fat, at room temperature: The rich, silky foundation of the cheesecake layer.
- 3/4 cup (150 g) granulated sugar: Sweetens the filling without overpowering the berries.
- 1/3 cup (80 ml) sour cream, at room temperature: Adds tang and smooth, creamy texture.
- 1/3 cup (80 ml) heavy cream, at room temperature: Lightens the filling for a velvety mouthfeel.
- 3 large eggs, at room temperature: Provide structure and help set the cheesecake.
- 2 tsp pure vanilla extract: Infuses warm, aromatic flavor.
- 1 tbsp fresh lemon juice: Brightens the cheesecake with a hint of citrus.
- 1 tsp finely grated lemon zest (optional): Adds a fragrant lift to each bite.
- 1 tbsp cornstarch or all-purpose flour: Stabilizes the filling and prevents cracks.
- Pinch of fine sea salt: Balances richness and enhances overall taste.
- 2 1/2 cups (350 g) fresh strawberries, hulled and chopped: The fruity star of the swirled top.
- 1/4 cup (50 g) granulated sugar: Sweetens the strawberry layer to perfection.
- 1 tbsp lemon juice: Helps berries release juice and brightens the compote.
- 2 tsp cornstarch: Thickens the strawberry sauce for neat swirls.
- 2 tbsp water: Creates a smooth slurry for the compote.
- 3/4 cup (95 g) all-purpose flour: Base for the crunchy crumble topping.
- 1/2 cup (50 g) rolled oats (optional but recommended for texture): Adds chew and rustic flair.
- 1/3 cup (70 g) light brown sugar, packed: Brings caramel notes to the topping.
- 1/4 cup (50 g) granulated sugar: Balances the brown sugar’s molasses flavor.
- 1/4 tsp fine sea salt: Enhances the buttery crumble without making it salty.
- 1/2 tsp ground cinnamon (optional): Introduces a warm, spicy accent.
- 6 tbsp (85 g) unsalted butter, cold and cut into small cubes: Creates pea-sized pockets for a tender, crunchy crumble.
- 1/2 tsp vanilla extract: Adds depth and fragrance to the crumble.
- 1 cup (150 g) fresh strawberries, halved or sliced: For a beautiful, fresh garnish.
- Whipped cream for serving: Light, airy topping to complement every forkful.
- Fresh mint leaves: Bright, herbal pop of color and aroma.
How To Make Strawberry Crumble Cheesecake
Let’s walk through each stage of creating this cheesecake masterpiece. From prepping the pan to chilling the final creation, these steps will ensure smooth, crack-free cheesecake, vibrant strawberry ribbons, and a golden, buttery crumble on top.
1. Prepare the pan
Use a 9-inch (23 cm) springform pan. Lightly grease the sides and bottom with butter or non-stick spray, then line the base with parchment paper for easy removal. Wrap the outside tightly with 2–3 layers of heavy-duty aluminum foil to prevent water from seeping in if you opt for a water bath.
2. Make the crust
In a bowl, combine the graham cracker crumbs, sugar, and salt. Pour in the melted butter and stir with a fork until the mixture looks like wet sand. Transfer it into the prepared pan and press firmly into the bottom using the base of a glass or measuring cup. Chill in the fridge for at least 15 minutes, or bake at 350°F (175°C) for 8 minutes for an extra-toasted crunch; let it cool if you bake.
3. Prepare the strawberry layer
In a small saucepan over medium heat, combine chopped strawberries, sugar, and lemon juice. Stir occasionally until berries soften and release juices, about 5–7 minutes. Whisk together cornstarch and water, then stir the slurry into the berries. Cook 1–3 more minutes until glossy and slightly thickened. Remove from heat and cool to room temperature.
4. Make the crumble topping
In a medium bowl, mix flour, rolled oats, brown sugar, granulated sugar, salt, and cinnamon if using. Add cold cubed butter and cut in with your fingertips or a pastry cutter until you see coarse crumbs with pea-sized bits of butter. Drizzle in vanilla extract, toss lightly, and refrigerate to keep the butter cold.
5. Prepare the cheesecake filling
Preheat oven to 325°F (160°C). Beat room-temperature cream cheese on medium until smooth, about 2–3 minutes, scraping the bowl as you go. Add sugar and beat until light and silky. Mix in sour cream, heavy cream, vanilla, lemon juice, lemon zest, cornstarch, and salt on low to medium-low until combined. Add eggs one at a time on low speed, just until each is incorporated. Tap the bowl on the counter to release air bubbles.
6. Assemble the cheesecake
Pour the filling over the chilled crust and smooth the top with an offset spatula. Spoon dollops of cooled strawberry mixture on top, then gently swirl with a knife or skewer to create pockets of fruit without overmixing.
7. Add the crumble
Remove the chilled crumble from the fridge and sprinkle evenly over the swirled cheesecake, leaving small gaps so you can peek at the marble effect. Press gently so it adheres without packing it down.
8. Prepare a water bath (recommended)
Place the foil-wrapped pan in a roasting pan and pour hot water until it reaches halfway up the sides. Be careful not to splash into the cheesecake. Alternatively, set a pan of hot water on a lower rack for added humidity.
9. Bake
Bake at 325°F (160°C) for 60–75 minutes, until edges are set and center wobbles slightly. If the crumble browns too fast, tent with foil loosely.
10. Cool gradually
Turn off the oven, crack the door, and let the cheesecake sit inside for 45–60 minutes. Remove it from the water bath, discard the foil, and cool on a wire rack to room temperature, about 1–2 hours.
11. Chill fully
Cover the cheesecake (still in its pan) and refrigerate for at least 6 hours, ideally overnight, to let flavors meld and texture set.
12. Garnish and serve
Run a thin knife around the edge, release the springform ring, and transfer to a serving plate. Top with fresh strawberry halves, dollops of whipped cream, and mint leaves. Slice with a hot, wiped-dry knife for neat portions.
Serving Suggestions
When it comes to serving, this Strawberry Crumble Cheesecake shines on its own but becomes unforgettable with the right accompaniments. Keep slices chilled until the last moment, then use these ideas to make each plate pop:
- Fresh Berry Medley: Plate each slice with a handful of mixed berries—blueberries, raspberries, or extra strawberries—to amplify the fruity vibe.
- Light Whipped Cream: Spoon a cloud of homemade whipped cream alongside or on top of each piece for a soft, airy contrast.
- Mint Garnish: Tuck a sprig of fresh mint beside the slice to add herbal brightness and a lively green accent.
- Sparkling Beverage: Pair with a cold glass of prosecco or sparkling lemonade to cleanse the palate and balance sweetness.
Tips For Perfect Strawberry Crumble Cheesecake
Every great cheesecake has a few insider tricks to elevate it from delicious to unforgettable. Here are my favorite tips to ensure yours bakes and slices like a dream:
- Chill the cheesecake overnight and slice with a hot, wiped-dry knife for the cleanest, most defined pieces.
- Swap graham crackers for vanilla wafers, speculoos, or digestive biscuits for a unique twist on the crust.
- If fresh strawberries are out of season, use frozen berries straight from the bag—just cook them a few minutes longer.
- Make it ahead! Assemble everything 1–2 days in advance; chilling time deepens the flavor and makes serving stress-free.
- For extra strawberry goodness, double the compote: swirl half into the batter and reserve the rest for spooning over each slice.
How To Store It
Proper storage keeps your cheesecake silky and your crumble crisp. Follow these methods to maintain that just-baked quality:
- Refrigerator: Once fully chilled, cover the cake (in its pan) or slice in an airtight container and store for up to three days.
- Freezer (Whole Cake): Wrap the cheesecake tightly in plastic wrap and a layer of foil. Freeze up to one month; thaw overnight in the fridge before serving.
- Freezer (Individual Slices): Wrap each slice in plastic wrap and foil for grab-and-go dessert moments, keeping them fresh for up to one month.
- Thawing: Always thaw frozen cheesecake in the refrigerator to preserve texture—avoid room-temperature defrosting that can make the crumble soggy.
Frequently Asked Questions
Here are answers to the most common questions about making and serving Strawberry Crumble Cheesecake:
- How can I prevent my cheesecake from cracking during baking and cooling?
Cracking is usually caused by overmixing or a sudden change in temperature. To avoid this, beat the cream cheese and sugar on medium until just smooth, then add the eggs one at a time on low speed so you don’t whip in excess air. Bake your springform pan in a water bath with the outside wrapped in heavy-duty foil to maintain a moist oven environment. When baking is done, turn off the oven and crack the door, letting the cheesecake cool inside for about an hour before removing it. This gradual temperature drop reduces stress on the batter and helps keep the top smooth.
- My graham cracker crust turns out soggy. What can I do to make it crisp and firm?
A soggy crust often means it wasn’t sealed or chilled well enough before filling. After you press the butter-moistened crumbs firmly into the pan, either chill the crust for at least 15 minutes or bake it at 350°F (175°C) for eight minutes, then let it cool completely. Pressing the crumbs down firmly with the base of a glass helps prevent gaps where moisture can seep through. Chilling or prebaking creates a barrier so the cheesecake filling won’t soften the crust.
- The crumble topping keeps sliding off the finished cheesecake. How do I get it to adhere?
The key is keeping the butter in the crumble very cold until you’re ready to top the cake. After cutting the cubes of cold butter into the flour, oats, and sugars, return the mixture to the refrigerator so the butter firms back up. When you sprinkle it over the swirled cheesecake batter, press the crumble very lightly so the pieces nestle into the batter without packing too tightly. As the cheesecake bakes, the butter melts and helps the crumble stick, but starting with chilled topping is essential.
- Can I use frozen strawberries instead of fresh for the strawberry layer?
Yes. You can skip thawing the berries and simply add them frozen to the saucepan with sugar and lemon juice. Cook over medium heat a bit longer—closer to 8–10 minutes—until they release their juices and soften. Then whisk in the cornstarch slurry and continue cooking until the mixture thickens and turns glossy. Let it cool completely before swirling into your cheesecake.
- What’s the best method for slicing clean, neat pieces of cheesecake?
For the tidiest slices, chill the fully set cheesecake in the refrigerator overnight. When you’re ready to cut, warm a sharp chef’s knife under hot water for 10–15 seconds, then dry it thoroughly with a towel. Make each cut in one smooth motion, wiping and reheating the blade between slices. This prevents crumbs and topping from dragging and gives you those perfectly defined layers.
- Is it possible to prepare parts of this cheesecake in advance, and how should I store them?
Absolutely. You can bake or chill the crust up to two days ahead and keep it wrapped airtight in the refrigerator. The strawberry layer can be made a day ahead and stored in a sealed container until cool. The crumble topping can be assembled and refrigerated up to 24 hours before use. Once the cheesecake is baked and fully chilled, cover it and store in the fridge for up to three days. For longer storage, you can freeze the whole cake or cut slices, wrapping each piece tightly in plastic wrap plus a layer of foil; they’ll keep well in the freezer for up to a month.
- Why is my cheesecake filling sometimes too dense or overly puffy around the edges?
A dense center often means the batter was overbeaten after adding the eggs, which breaks down structure and deflates the batter. Always mix the eggs in gently on low speed and stop as soon as they’re incorporated. Puffy, domed edges can result from too much air in the batter or a hotter oven. Using the water bath helps regulate temperature and humidity for even baking. If the edges start to brown or set too quickly, tent the pan loosely with foil for the last 15–20 minutes of baking to slow the top’s rise and give you that signature slight wobble in the center.
What Makes This Special
This Strawberry Crumble Cheesecake stands out because it combines the richness of a classic baked cheesecake with bright, homemade strawberry compote and a delightful oat crumble that crackles in every bite. The swirls of fruit create pockets of tangy sweetness, while the buttery crust and crumble add texture contrast. Its advanced technique—like the water bath and gradual cooling—ensures a smooth, crack-free finish. Print this guide to keep in your recipe box, and don’t be shy about sharing your questions or feedback below if you give it a whirl!
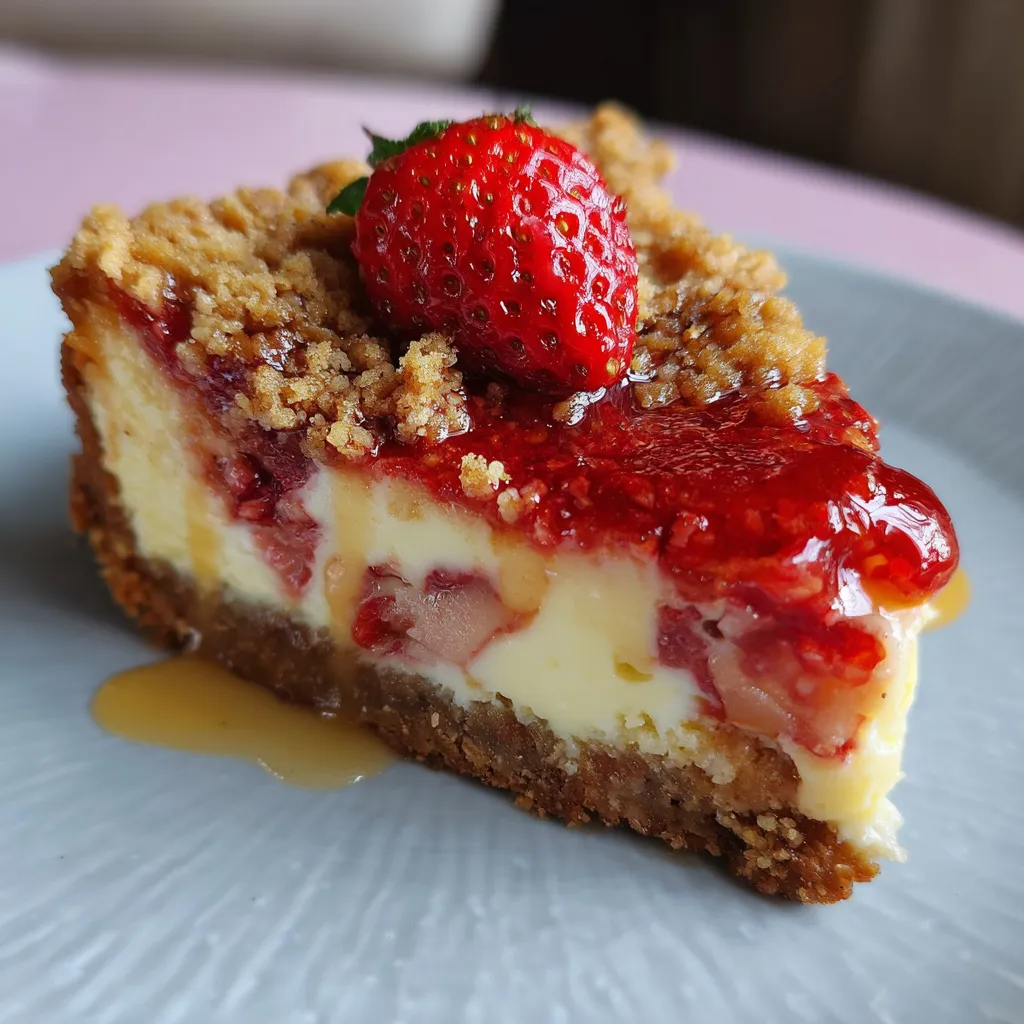

Strawberry Crumble Cheesecake
Description
Creamy layers of velvety cheesecake meet bright strawberry ribbons and a buttery oat crumble that crackles under your fork. Each slice pairs tart-sweet berries with a smooth interior and a golden, crunchy topping.
Ingredients
Instructions
-
Prepare the pan:
-
- Use a 9-inch (23 cm) springform pan.
-
- Lightly grease the sides and bottom with butter or non-stick spray.
-
- Line the bottom with parchment paper for easy removal.
-
- Wrap the outside of the pan tightly with 2–3 layers of heavy-duty aluminum foil to prevent water leakage if using a water bath.
-
Make the crust:
-
- In a mixing bowl, combine graham cracker crumbs, sugar, and salt.
-
- Pour in the melted butter and mix with a fork until all crumbs are evenly moistened and resemble wet sand.
-
- Transfer the mixture to the prepared springform pan.
-
- Press the crumbs firmly into the bottom of the pan using the bottom of a glass or measuring cup to create an even, compact layer.
-
- Chill the crust in the refrigerator for at least 15 minutes while you prepare the filling, or bake at 350°F (175°C) for 8 minutes for a slightly firmer, toasted crust. If baked, allow it to cool while you proceed.
-
Prepare the strawberry layer:
-
- In a small saucepan, combine chopped strawberries, sugar, and lemon juice.
-
- Cook over medium heat, stirring occasionally, until the strawberries release their juices and begin to soften, about 5–7 minutes.
-
- In a small bowl, whisk cornstarch and water until smooth.
-
- Stir the cornstarch slurry into the strawberry mixture.
-
- Continue cooking for 1–3 minutes until the sauce thickens and becomes glossy.
-
- Remove from heat and let it cool to room temperature. It will thicken further as it cools.
-
Make the crumble topping:
-
- In a medium bowl, combine flour, rolled oats, brown sugar, granulated sugar, salt, and cinnamon if using.
-
- Add the cold cubed butter.
-
- Using your fingertips, a pastry cutter, or two forks, cut the butter into the dry ingredients until the mixture looks like coarse crumbs with some pea-sized pieces of butter remaining.
-
- Drizzle in the vanilla extract and toss lightly to combine.
-
- Place the crumble in the refrigerator while you prepare the cheesecake filling so the butter stays cold.
-
Prepare the cheesecake filling:
-
- Preheat the oven to 325°F (160°C).
-
- In a large mixing bowl, beat the room-temperature cream cheese with an electric mixer on medium speed until completely smooth and creamy, about 2–3 minutes. Scrape down the sides and bottom of the bowl.
-
- Add the sugar and beat again until light and smooth, 1–2 minutes more.
-
- Add the sour cream, heavy cream, vanilla, lemon juice, lemon zest (if using), cornstarch, and salt. Beat on low to medium-low speed until combined and silky, scraping the bowl as needed.
-
- Add the eggs one at a time, beating on low speed after each addition just until incorporated. Do not overbeat once the eggs are added, as this can add too much air and cause cracking.
-
- Tap the bowl lightly on the counter a few times to release any large air bubbles.
-
Assemble the cheesecake:
-
- Pour the cheesecake filling over the prepared crust in the springform pan.
-
- Gently smooth the top with an offset spatula or the back of a spoon.
-
- Spoon the cooled strawberry mixture over the top in small dollops, then gently swirl some of it into the cheesecake with a knife or skewer, leaving some thicker patches for bold strawberry pockets.
-
- Do not over-swirl; you want distinct areas of cheesecake and strawberry.
-
Add the crumble:
-
- Take the chilled crumble mixture out of the refrigerator.
-
- Sprinkle it evenly over the top of the strawberry-swirled cheesecake batter, covering most of the surface but leaving small gaps where the strawberry and cheesecake peek through.
-
- Lightly press the crumble down so it adheres to the batter but do not pack it firmly.
-
Prepare a water bath (recommended for smooth texture):
-
- Place the foil-wrapped springform pan in a large roasting pan.
-
- Pour hot water into the roasting pan until it comes halfway up the sides of the springform pan, being careful not to splash water into the cheesecake.
-
- Alternatively, place a separate pan of hot water on a lower oven rack to create steam without directly bathing the cheesecake.
-
Bake:
-
- Bake at 325°F (160°C) for 60–75 minutes.
-
- The edges should look set and slightly puffed, and the center should still have a gentle wobble when you jiggle the pan.
-
- If the crumble is browning too quickly near the end, tent the top loosely with foil.
-
Cool gradually:
-
- Turn off the oven and crack the door open slightly.
-
- Let the cheesecake sit in the oven for 45–60 minutes to cool slowly and reduce the risk of cracks.
-
- Remove the pan from the water bath and carefully remove the foil.
-
- Place the cheesecake on a wire rack and allow it to cool to room temperature, 1–2 hours.
-
Chill fully:
-
- Once at room temperature, cover the cheesecake (still in the pan) and refrigerate for at least 6 hours, preferably overnight.
-
- This time allows the texture to set and the flavors to deepen.
-
Garnish and serve:
-
- Run a thin knife around the edge of the cheesecake to loosen it from the sides of the pan.
-
- Release the springform ring and transfer the cheesecake to a serving plate or cake stand.
-
- Just before serving, top with fresh strawberry halves or slices.
-
- Add small swirls or dollops of whipped cream around the edges or in the center if desired.
-
- Garnish with a few mint leaves for a fresh, vibrant look.
-
- Slice with a sharp knife, wiping the blade clean between cuts for neat slices.
Note
- For the cleanest slices, chill the cheesecake overnight and slice it straight from the refrigerator with a hot, wiped-dry knife.
- You can substitute graham crackers with vanilla wafers, speculoos, or digestive biscuits for a flavor twist.
- If fresh strawberries are out of season, use frozen ones for the cooked layer (no need to thaw; just cook a few minutes longer).
- To make this ahead for an event, prepare 1–2 days in advance; flavors improve with time in the fridge.
- If you prefer a stronger strawberry presence, double the strawberry layer and swirl half into the batter and reserve half for spooning over slices when serving.

