

With Halloween just around the corner, there's something thrilling about transforming classic peanut butter cookies into adorable creepy crawlers. These Peanut Butter Spider Cookies combine the rich, nutty flavor of creamy peanut butter with a playful twist of chocolate candy balls and candy eyeballs, making a dessert that’s both cute and delightfully eerie. The first bite reveals a soft, chewy center surrounded by a lightly crisp edge, as the interplay of granulated and brown sugars delivers a gentle caramel note. Kids and adults alike will find joy in the decorating process: pressing a glossy chocolate candy ball into the warm cookie and then embellishing it with piped chocolate legs and sparkly eyeballs. Each little spider seems to come to life on your baking sheet, sparking giggles and wide-eyed wonder before disappearing into happy, satisfied tummies.
Beyond their spooky appearance, these Peanut Butter Spider Cookies deliver layers of taste and texture that are impossible to resist. The vanilla extract in the dough lends a sweet floral hint that balances the roasted richness of the peanut butter, while a pinch of baking soda ensures each cookie puffs up just right. Once you melt those chocolate chips into a silky decorating gel, piping legs around the chocolate “body” becomes an enchanting ritual—almost magical in its simplicity. As the cookies cool and the chocolate sets, each bite offers a satisfying snap followed by a mellow peanut butter aftertaste. Whether you’re stirring batter with pint-sized helpers or competing over who can make the spookiest spider, these cookies invite creativity, laughter, and fond memories that last long after Halloween night has passed.
KEY INGREDIENTS IN PEANUT BUTTER SPIDER COOKIES
Every memorable treat starts with a few high-quality staples that work together to create amazing flavor and texture. Here’s what you’ll need to turn ordinary pantry items into spider-shaped delights:
- Unsalted Butter
Provides a creamy richness and tender crumb, helping the dough spread evenly and develop slightly crisp edges in the oven. Using unsalted butter lets you control the overall saltiness.
- Creamy Peanut Butter
The star of the show—this binds the dough, contributes nutty flavor, and keeps the cookies soft and chewy. Opt for a smooth variety for the best consistency.
- Granulated Sugar
Adds sweetness and helps create structure, giving the cookies a delicate rise and a touch of crunch around the edges.
- Brown Sugar
Packed with molasses, this lends moisture, makes the cookies extra chewy, and deepens the flavor with subtle caramel undertones.
- Egg
Acts as a binding agent and provides lift, ensuring each cookie holds its shape while remaining moist.
- Vanilla Extract
Infuses a sweet, aromatic note that complements the peanut butter and enhances all the other ingredients.
- All-Purpose Flour
Forms the base of the dough, supplying structure and that classic cookie texture we all love.
- Baking Soda
Helps the cookies spread properly and gives them a light, tender quality without becoming too cakey.
- Salt
Balances sweetness and heightens the nutty flavor, making every bite more dynamic.
- Chocolate Candy Balls
Create the spider’s body with a glossy, crunchy shell and a decadent center—ideal for visual impact and taste.
- Candy Eyeballs
Bring each spider to life with minimal effort; their playful design instantly adds a festive vibe.
- Chocolate Chips
Melted into a smooth decorating gel, they form the spider’s legs and help attach the candy eyeballs securely.
HOW TO MAKE PEANUT BUTTER SPIDER COOKIES
Time to roll up your sleeves and dive into the fun process of making these delightful spiders come to life. Follow these steps to transform your pantry staples into spooky, tasty treats that are perfect for Halloween gatherings or a cozy baking afternoon with family and friends.
1. Preheat your oven to 350°F (175°C). Line a baking sheet with parchment paper or a silicone baking mat to prevent sticking and ensure even baking.
2. In a large mixing bowl, cream together the softened butter, peanut butter, granulated sugar, and brown sugar using an electric mixer. Beat until the mixture is smooth, fluffy, and lightly pale in color.
3. Add the egg and vanilla extract to the creamed mixture. Continue mixing until the ingredients are fully incorporated and the dough has a cohesive, silky texture.
4. In a separate bowl, whisk together the all-purpose flour, baking soda, and salt. This ensures even distribution and prevents clumps.
5. Gradually add the dry ingredients to the wet ingredients, mixing on low speed until just combined. Avoid overmixing—stop as soon as you see no streaks of flour to keep the cookies tender.
6. Use a spoon or cookie scoop to roll tablespoonfuls of dough into balls. Place them on the prepared baking sheet about 2 inches apart to allow for spreading.
7. Bake in the preheated oven for 10–12 minutes, or until the cookie edges are lightly golden brown while the centers remain soft.
8. Remove the cookies from the oven and quickly press a chocolate candy ball into the center of each cookie while they’re still warm. This forms the spider’s body.
9. Let the cookies cool on the baking sheet for a few minutes to set, then carefully transfer them to a wire rack to cool completely.
10. Once cooled, melt the chocolate chips in a microwave-safe bowl in short bursts, stirring until smooth (or prepare your black decorating gel).
11. Create legs around the candy ball by piping lines in curved shapes to imitate spider legs. Use a small bit of melted chocolate or gel to attach two candy eyeballs to each candy ball, completing the spooky-cute spider look.
SERVING SUGGESTIONS FOR PEANUT BUTTER SPIDER COOKIES
When it’s time to share these creepy-cute confections, a thoughtful presentation can take them from fun to fabulous. Whether you’re hosting a Halloween party, packing lunchbox surprises, or staging a spooky dessert table, here are four creative serving ideas that will delight guests of all ages.
- Spooky Dessert Platter
Arrange a cluster of spider cookies on a large, themed platter, adding faux cobwebs and mini pumpkins for effect. Provide small tongs so guests can adorn their treats with extra candy eyeballs or sprinkles.
- Individual Treat Bags
Place one or two spiders in clear cellophane bags, tie with orange and black ribbons, and attach personalized name tags. These make charming party favors or Halloween classroom treats.
- Milk Station
Serve cookies alongside chilled milk shooters in mini glasses. Offer a trio of flavored milks—classic, strawberry, and chocolate—for a playful twist that kids will love dunking their spiders into.
- Tiered Cake Stand Display
Present your cookies on a tiered stand, alternating heights to showcase each spider from every angle. Garnish with edible glitter or lollipops to complete the festive vibe.
HOW TO STORE PEANUT BUTTER SPIDER COOKIES
Keeping your Peanut Butter Spider Cookies fresh and delicious requires a few simple tricks. Proper storage ensures that the cookies maintain their perfect chewiness and that the chocolate decorations don’t smudge or lose their shape. Below are a few easy methods to help you preserve both flavor and festive appearance.
- Room Temperature Airtight Container
Layer cookies in a tightly sealed container with sheets of parchment paper between each to prevent sticking. Store in a cool, dry place away from direct sunlight; they’ll stay fresh for up to five days.
- Refrigeration
Place the cookies in an airtight container and refrigerate for up to one week. Chilling firms up the chocolate legs and candy eyes, making them ideal for packing in lunches or taking on-the-go.
- Freezing
For longer storage, freeze the cookies in a single layer on a baking sheet until firm, then transfer to a freezer-safe bag. Cookies can be frozen for up to three months; simply thaw at room temperature when ready to enjoy.
- Separate Decorations
If you anticipate storing decorated cookies, consider freezing the undecorated cookie bases and adding candy bodies, legs, and eyes after thawing. This prevents the chocolate accents from becoming brittle or smudged.
CONCLUSION
These Peanut Butter Spider Cookies are more than just a fun Halloween treat—they’re a memory-making project that combines playful creativity with mouthwatering flavor. From carefully creaming together the butter and peanut butter to piping on those final, perfectly curved spider legs, every step invites you to slow down and savor the moments spent in the kitchen with loved ones. You’ll find that each cookie delivers a balanced dance of soft chew, sweet molasses undertones, and nutty richness, crowned by the satisfying contrast of a crunchy chocolate candy body. Don’t hesitate to print this article or save it for later reference—having the recipe on hand means you can whip up these spiders at a moment’s notice for impromptu gatherings or last-minute Halloween fun. And if you scroll down a bit, you’ll notice a handy FAQ section below to answer any baking questions you might have.
We’d love to hear how your Peanut Butter Spider Cookies turn out! Did the chocolate legs come out perfectly curved, or did the kiddie decorators surprise you with creative twists? Feel free to leave a comment, question, or feedback if you try this recipe or need help tweaking it to your taste. Whether you’re a seasoned baker or a beginner looking for an easy Halloween project, these cookies promise both giggles and deliciousness—happy baking!
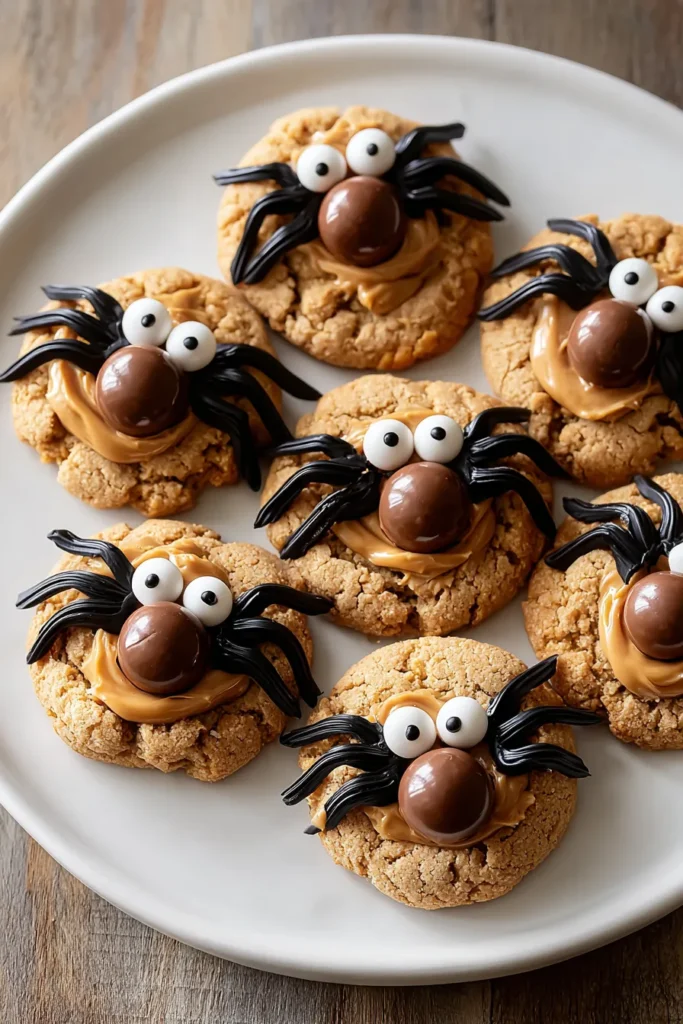

Peanut Butter Spider Cookies
Description
These adorable peanut butter spider cookies are not only a treat for the taste buds but also a fun Halloween activity. Soft, chewy, and filled with chocolatey goodness, they’ll be a hit with kids of all ages!
Ingredients
Instructions
-
Preheat your oven to 350°F (175°C). Line a baking sheet with parchment paper or a silicone baking mat.
-
In a large mixing bowl, cream together the softened butter, peanut butter, granulated sugar, and brown sugar until smooth and fluffy using an electric mixer.
-
Add the egg and vanilla extract to the mixture and blend until fully incorporated.
-
In a separate bowl, whisk together flour, baking soda, and salt.
-
Gradually add the dry ingredients to the wet ingredients, mixing until just combined to form the cookie dough.
-
Roll tablespoonfuls of dough into balls and place them on the prepared baking sheet, spacing them about 2 inches apart.
-
Bake the cookies in the preheated oven for 10-12 minutes, or until the edges are lightly golden brown.
-
Remove the cookies from the oven and quickly press a chocolate candy ball into the center of each cookie while they are still warm.
-
Allow the cookies to cool on the baking sheet for a few minutes before transferring them to a wire rack to cool completely.
-
Once cooled, melt the chocolate chips in a microwave-safe bowl (or use black decorating gel) and create legs around the chocolate candy ball by piping lines in curved shapes.
-
Use a small bit of melted chocolate or decorating gel to attach two candy eyeballs to each chocolate candy ball to complete the spider look.
Note
- These cookies are perfect for Halloween celebrations and are sure to be a hit with kids.
- You can substitute the chocolate candy balls with other round candies if desired.
- For added fun, use different colored candy eyeballs to give each spider a unique appearance.
- Ensure the chocolate is fully set before serving to avoid smudging the spider legs and eyes.

