

There’s something about the way a batch of rich, fudgy red velvet brownies emerges from the oven that instantly makes any kitchen feel like a cozy haven. These indulgent squares boast a velvety texture, marrying intense cocoa notes with a subtle hint of vanilla, all wrapped in a festive, crimson hue. As soon as you slide that 9×13-inch pan out of the oven, the edges crackle ever so slightly, revealing a gooey interior that promises melt-in-your-mouth delight. Whether you’re hosting a casual movie night, celebrating a birthday, or simply craving an easy dessert, these brownies deliver a show-stopping appearance and unforgettable flavor that will have everyone reaching for seconds.
Crafted with beginner-friendly simplicity in mind, this recipe only takes about 15 minutes to prepare, 30 minutes to bake, and a 20-minute rest before cutting—so you can go from mixing bowl to brownie bliss without an all-day commitment. With around 350 calories per serving (based on 16 servings), they strike the perfect balance between indulgent and approachable. The vibrant red color, thanks to a touch of food coloring, transforms a classic chocolate treat into something that feels as special as it tastes. You don’t need to be a pastry chef or pull out your stand mixer—just basic tools, high-quality ingredients, and a dash of enthusiasm to create brownies that look as stunning as they taste.
Each bite of these brownies is a celebration—one moment you’ll catch the rich, deep cocoa dancing on your palate, the next you’ll notice the smooth kiss of vanilla weaving through the sweetness. Unsalted butter, sugar, eggs, and a gentle sift of cocoa powder come together with just the right amount of red coloring to create a striking contrast that’s perfect for any holiday, party, or weekend treat. Despite their decadent flavor, they remain wonderfully approachable for cooks at any skill level, with minimal fuss and maximum payoff. No mixers are required—just whisk by hand, fold the dry ingredients gently, and let the oven work its magic.
Beyond their irresistible taste, these brownies also make a visual centerpiece. You can keep them classic or dress them up with optional cream cheese frosting swirls, white chocolate chips, or a dusting of powdered sugar. Pairing a warm square with a scoop of vanilla ice cream or a dollop of whipped cream takes the experience to the next level, turning a simple dessert into an indulgent affair. Once cooled and cut, these brownies store beautifully in an airtight container for up to four days, giving you enough time to savor every fudgy bite or share them with friends and family until the pan is empty.
KEY INGREDIENTS IN FUDGY RED VELVET BROWNIES
Every great recipe starts with quality components, and these fudgy red velvet brownies are no exception. Each ingredient plays a vital role in creating that signature texture, vibrant color, and balanced sweetness. From the richness of melted butter to the velvety finish of cocoa powder, understanding what each element contributes will help you bake with confidence and accentuate the magic of this dessert.
- Unsalted butter: Provides a rich, creamy base, lending moisture and a tender crumb without adding extra salt.
- Granulated sugar: Sweetens the batter while helping create a chewy, fudgy texture as it melts and caramelizes.
- Eggs: Act as a binding agent and contribute to the structure, giving each brownie its signature chew.
- Vanilla extract: Adds a warm, aromatic note that enhances the cocoa’s depth and complements the red velvet profile.
- Red food coloring: Delivers that festive, eye-catching hue; you can adjust the intensity to suit your style.
- Unsweetened cocoa powder: Infuses deep chocolate flavor and works with the butter to achieve a moist, fudgy interior.
- All-purpose flour: Provides structure, with just enough gluten to hold the batter together without turning it cakey.
- Salt: Balances sweetness and elevates the chocolate notes for a richer flavor experience.
- Baking powder: Offers a subtle lift, ensuring the brownies are neither too dense nor too flat.
HOW TO MAKE FUDGY RED VELVET BROWNIES
When it comes to these brownies, the process is straightforward but requires attention to detail to achieve the ideal fudgy consistency and vibrant color. Follow each step in order, from preheating the oven to cooling the finished squares, and you’ll master the art of mixing melted butter with sugar, folding in sifted dry ingredients, and baking just until a moist crumb remains. Here’s how to bring this recipe to life in your own kitchen:
1. Preheat your oven to 350°F (175°C). Grease a 9×13-inch baking dish and line it with parchment paper, leaving an overhang on two sides so the brownies can be lifted out easily once baked.
2. In a medium saucepan, melt the unsalted butter over medium heat, stirring occasionally until fully liquefied. Once melted, remove the pan from heat and let it cool slightly to prevent cooking the eggs in the next step.
3. Pour the warmed butter into a large mixing bowl. Add the granulated sugar and whisk vigorously until the mixture is smooth and glossy.
4. Crack the eggs into the bowl one at a time, whisking well after each addition. This ensures a silky batter without lumps and helps incorporate air for structure.
5. Stir in the vanilla extract and red food coloring, mixing thoroughly until the color is completely uniform throughout the batter.
6. In a separate bowl, sift together the unsweetened cocoa powder, all-purpose flour, salt, and baking powder. This removes any lumps and aerates the dry ingredients.
7. Gradually fold the sifted dry ingredients into the wet batter with a spatula, using gentle strokes and stopping as soon as no flour streaks remain. Overmixing can lead to dry, cake-like brownies.
8. Pour the batter into the prepared baking dish and use an offset spatula to spread it evenly into the corners for uniform thickness.
9. Bake in the preheated oven for 25 to 30 minutes, or until a toothpick inserted into the center comes out with a few moist crumbs. Watch carefully in the final minutes to avoid overbaking.
10. Allow the brownies to cool in the pan on a wire rack for at least 20 minutes. Use the parchment overhang to lift the brownie slab from the dish, transfer to a cutting board, slice into squares, and serve.
SERVING SUGGESTIONS FOR FUDGY RED VELVET BROWNIES
Presentation plays a key role in elevating how these brownies are received at any gathering. Think beyond a simple bake sheet presentation: consider tiered dessert stands or stylish ceramic platters to showcase the intense red hue against neutral backgrounds. For holiday events, surround the brownies with seasonal decor—sprigs of pine or peppermint candy canes—for a festive flair. When serving on individual plates, crumble a few pieces over fresh whipped cream to create a rich, sculptural look, or drizzle melted white chocolate across the top for an artistic effect. At outdoor picnics or potlucks, offer the brownies as neat squares in mini cupcake liners, allowing guests to grab-and-go without the need for plates or forks. Temperature also matters: a slightly warm brownie feels cozy and comforting, while a chilled square brings a firm, fudgy bite. Pair with hot beverages like rich hot cocoa, spiced chai, or strong espresso to cut through the sugar and highlight the chocolate. Alternatively, for warmer days, serve alongside a cold glass of milk or a tangy fruit smoothie to balance the sugar. Using garnishes like fresh berries, mint leaves, or edible flowers can add texture, color, and a hint of freshness that contrasts beautifully with the dense brownie base. For a modern twist, turn these squares into brownie skewers by threading them on decorative sticks alongside marshmallows or strawberries—perfect for kid-friendly parties. If you want to create an upscale dessert bar, set out small ramekins filled with toppings like chopped nuts, chocolate chips, and cocoa nibs, letting guests customize their brownies. Thicker slices work wonderfully alongside a rich red wine such as a Merlot or Port, bringing out the cocoa’s dark fruit notes. Small finishing touches—a light dusting of powdered sugar or a sprinkle of sea salt flakes—can help balance sweetness and highlight the fudge interior. No matter the occasion, these serving ideas ensure your fudgy red velvet brownies become the star of the show.
- Top each brownie with a swirl of cream cheese frosting and a dusting of cocoa powder for a classic red velvet twist that balances tangy and sweet.
- Serve warm alongside a scoop of vanilla ice cream or a dollop of fresh whipped cream, letting the melting ice cream mingle with the fudgy crumbs for a creamy contrast.
- Arrange the brownies on a wooden board or dessert platter, and garnish with fresh berries like raspberries or strawberries to add a burst of acidity and a pop of color.
- Offer mini brownie bites in decorative cupcake liners for parties or potlucks. Pair with shot glasses of hot coffee or espresso for a perfectly portioned entertainment idea.
HOW TO STORE FUDGY RED VELVET BROWNIES
After all the effort to bake these decadent red velvet brownies, you’ll want to store them properly to maintain that moist, fudgy texture and vivid color for as long as possible. Whether you plan to enjoy them over the next few days or freeze portions for future cravings, keeping air and moisture at bay is key. The ideal environment for storing is a cool, dry place, away from direct sunlight, which can fade the red hue and dry out the crumb. Depending on your timeline, you can choose room temperature, refrigeration, or freezing methods. Each approach has its advantages and minor trade-offs, from preserving softness to extending shelf life up to several weeks. Using airtight containers, proper layering, and careful wrapping ensures no unwanted odors or humidity sneak in, while retaining just enough breathing room to prevent sogginess. If you plan to share these brownies as gifts, proper storage techniques also make packaging easier and prevent them from shifting out of shape. Below are my top tips for storing fudgy red velvet brownies so every bite stays as luscious as the day you baked them.
- Room Temperature Storage: Place cooled brownies in an airtight container. Layer the squares between sheets of parchment or wax paper to prevent sticking. Store at room temperature for up to 2 days for peak fudginess.
- Refrigeration: If you need to extend freshness, keep the brownies in an airtight container in the fridge for up to 5 days. Chilling firms the texture slightly, giving them a denser chew.
- Freezing: For long-term storage, wrap individual brownie squares tightly in plastic wrap, then place them in a freezer-safe bag or container. Freeze for up to 3 months. Thaw at room temperature or gently warm in the microwave before serving.
- Single-Serve Wrapping: Pre-portion brownies and wrap each square in parchment paper or plastic wrap. This method keeps brownies fresh, makes grab-and-go snacking easy, and prevents crumbs from migrating.
CONCLUSION
From the very first velvety bite of these fudgy red velvet brownies to the last lingering crumb, this recipe brings together rich cocoa, a hint of vanilla, and an unforgettable pop of color. We began with quality, simple ingredients—unsalted butter, granulated sugar, eggs, vanilla extract, red food coloring, cocoa powder, flour, salt, and baking powder—and walked through each step, emphasizing techniques like whisking diligently, sifting dry ingredients, and folding gently to achieve that perfect fudgy interior. We explored creative serving suggestions—from cream cheese frosting swirls and ice cream pairings to classy dessert boards and brownie skewers—and covered essential storage tips for room temperature, refrigeration, and freezing. Whether you’re a baking novice or a seasoned home cook, this guide equips you with everything needed to bake a stunning tray of brownies that will impress at any occasion. Feel free to print this article and save it for your recipe binder or digital archive, and remember that you can find a helpful FAQ below if any questions arise about ingredients, substitutions, or timing.
I hope this complete article helps you feel confident in creating and sharing these luscious red velvet squares. If you decide to try the recipe, I’d love to hear how it turned out—did the color pop? Was the texture ultra-fudgy? Please leave any comments, questions, or feedback below. Your tips and experiences not only help me refine the recipe but also support fellow bakers on their brownie-making journey. Happy baking!
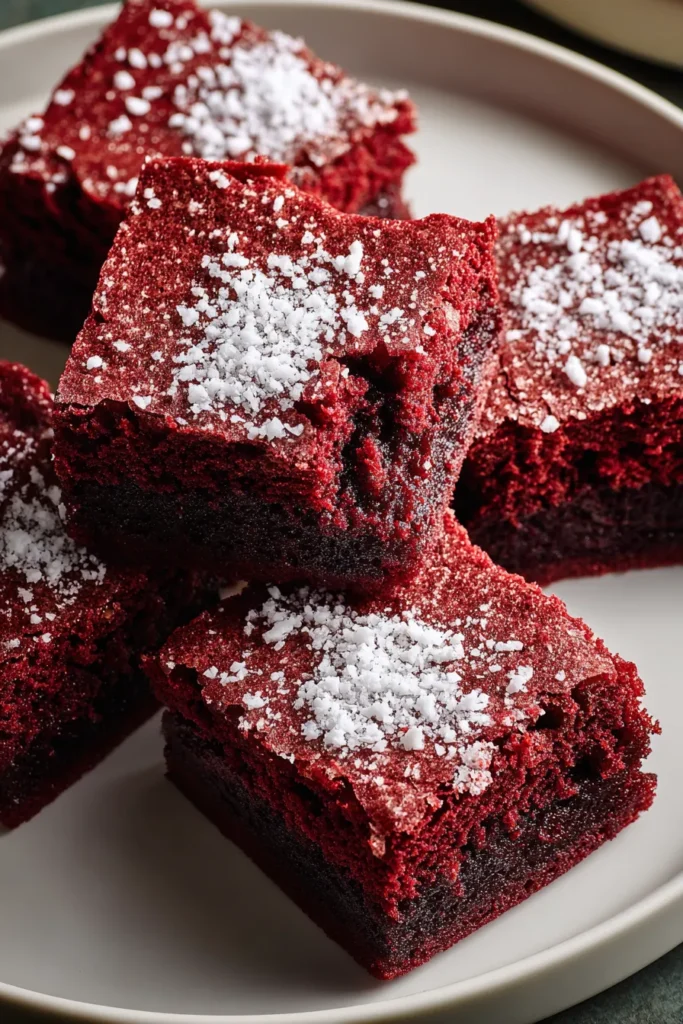

Fudgy Red Velvet Brownies
Description
These fudgy red velvet brownies are a delightful blend of rich cocoa and a hint of vanilla, boasting a vibrant red color that makes every bite a feast for both the eyes and the palate.
Ingredients
Instructions
-
Preheat your oven to 350°F (175°C). Grease a 9x13-inch baking dish and line it with parchment paper, leaving some overhang on the sides for easier removal later.
-
In a medium saucepan, melt the butter over medium heat, stirring occasionally until fully liquified. Once melted, remove from heat and allow to cool slightly.
-
In a large mixing bowl, combine the melted butter and sugar, whisking until fully incorporated.
-
Add the eggs, one at a time, whisking well after each addition to ensure a smooth mixture.
-
Stir in the vanilla extract and red food coloring, mixing until the color is uniform throughout the batter.
-
Sift the cocoa powder, all-purpose flour, salt, and baking powder together in a separate bowl. Gradually fold these dry ingredients into the wet ingredients, being careful not to overmix. Stir until just combined.
-
Pour the batter into the prepared baking dish, spreading it evenly with a spatula.
-
Bake for 25 to 30 minutes, or until a toothpick inserted into the center comes out with a few moist crumbs. Be cautious not to overbake for fudgy brownies.
-
Allow the brownies to cool in the pan on a wire rack for at least 20 minutes. Use the parchment overhang to lift the brownies from the pan and transfer them to a cutting board.
-
Once cooled completely, cut the brownies into squares and serve.
Note
- For a more vibrant red hue, you can add an additional teaspoon of food coloring as desired.
- You can top the brownies with cream cheese frosting for a traditional red velvet touch.
- Store these brownies in an airtight container at room temperature for up to 4 days.
- Adding finely chopped white chocolate or chocolate chips to the batter can enhance the flavor and texture.
- These brownies pair excellently with a scoop of vanilla ice cream or a dollop of whipped cream for an indulgent treat.

