

Custard Pear Pie is the kind of dessert that transforms simple ingredients into something extraordinary. As you slice into its golden, flaky crust, you’ll discover tender pear slices suspended in a rich, creamy custard that practically melts on your tongue. Each bite delivers a subtle sweetness balanced by a gentle hint of warm cinnamon and a touch of vanilla that lingers like a fond memory. Whether you’re seeking a comforting finale to a cozy family dinner or an impressive homemade treat for a special celebration, this pie has you covered. The tender fruit and velvety filling nestle perfectly in a buttery crust, creating layers of delightful textures and flavors. Its visual appeal—pear slices arranged in a spiral or rustic scatter—invites admiration, while its luscious taste keeps everyone coming back for more.
Beyond just being a show-stopping dessert, this Custard Pear Pie is amazingly easy to prepare. In just 15 minutes of hands-on prep, you’ll have your pears peeled, cored, and nestled in an unbaked crust, ready for a velvety custard bath. Then, 50 minutes in a preheated 375°F (190°C) oven brings everything together, followed by a 30-minute rest to allow the filling to fully set. At around 380 calories per slice (based on 8 slices), you can indulge mindfully, sharing generous portions without guilt. As a beginner-friendly recipe, it’s perfect for bakers of any skill level—no fancy techniques required. I still remember the first time I presented this pie at a small gathering: compliments flew, forks dove in, and before I knew it, the platter was empty. It’s a recipe that encourages smiles, conversation, and that warm, satisfied feeling only homemade pie can deliver.
KEY INGREDIENTS IN CUSTARD PEAR PIE
Before we dive into the baking fun, let’s gather our key ingredients. Each one plays a vital role in building layers of flavor and texture—from the crisp, flaky shell to the sweet, juicy fruit and the silky custard that ties it all together.
- Unbaked pie crust: A flaky pastry base that provides the perfect structure for holding the custard and pears. Its buttery layers become golden and crisp during baking, creating an irresistible contrast to the creamy filling.
- Ripe pears: Sweet, tender fruit that offers natural juiciness and a delicate flavor. When peeled, cored, and sliced, these pears become the star of the show, adding a soft texture that complements the custard.
- Lemon juice: A bright, acidic touch that prevents the pear slices from browning and enhances their natural sweetness. It adds a subtle zing that keeps the flavors fresh.
- Heavy cream: The backbone of the custard, contributing a rich, velvety texture and indulgent mouthfeel. It balances the fruit’s juiciness and helps the filling set properly.
- Eggs: Acting as a binding agent, eggs thicken and stabilize the custard as it bakes. They ensure a smooth, custardy consistency without being runny.
- Granulated sugar: Sweetens the custard just enough to highlight the pears’ natural flavors. It also aids in browning, giving the pie top a lovely golden hue.
- Vanilla extract: Infuses the custard with a warm, aromatic depth. This classic flavor note rounds out the sweetness beautifully.
- Ground cinnamon: A whisper of spice that adds warmth and complexity. Cinnamon pairs seamlessly with pears, creating that cozy, comforting vibe.
- Salt: Enhances and balances the overall sweetness, ensuring every flavor note shines through.
- Unsalted butter: Melted and drizzled over the top, butter introduces an extra layer of richness and helps achieve a gently browned surface.
HOW TO MAKE CUSTARD PEAR PIE
With your ingredients assembled, it’s time to follow a straightforward series of steps that will result in a gorgeous, mouthwatering pie. From preheating the oven to letting the finished dessert rest, each part of the process ensures the perfect balance of textures and flavors.
1. Preheat your oven to 375°F (190°C). Position a rack in the center so the pie bakes evenly. Allow the oven to reach full temperature before you slide the pie in—this ensures a crisp crust.
2. Place the sliced pears in a large bowl and drizzle them with lemon juice to prevent browning. Toss gently to coat every slice, so they stay fresh and vibrant in color.
3. Arrange the pear slices evenly in the unbaked pie crust, creating a pattern or rustic scatter. Make sure they lie flat and slightly overlap for a beautiful presentation.
4. In a medium mixing bowl, whisk together the heavy cream, eggs, sugar, vanilla extract, cinnamon, and salt until the mixture is smooth and well combined. This is your silky custard base.
5. Pour the custard mixture over the pears in the pie crust, taking care to cover each slice. The liquid should fill the gaps and nearly reach the top of the crust.
6. Drizzle the melted butter over the top of the custard and pears for added flavor and a glossy finish.
7. Place the pie on a baking sheet to catch any spills, and bake in the preheated oven for 45 to 50 minutes, or until the custard is set around the edges and the top is lightly browned.
8. Allow the pie to cool to room temperature on a wire rack before serving. This resting period lets the custard fully set, ensuring clean slices and a luscious texture.
SERVING SUGGESTIONS FOR CUSTARD PEAR PIE
Once your Custard Pear Pie has cooled and set, it’s time to think about presentation and pairings that elevate every slice. Serving this dessert can be just as much fun as baking it: whether you prefer a classic pairing or a playful twist, these suggestions will help you shine at any gathering.
- Serve each slice warm with a generous scoop of vanilla ice cream. The contrast between the hot custard and cold ice cream creates a heavenly temperature play that guests will adore.
- For a chilled dessert experience, refrigerate the pie for at least an hour before slicing. Top with a dollop of whipped cream and a sprinkle of extra cinnamon for a refreshing finish.
- Drizzle rich caramel sauce over each slice and garnish with a light dusting of powdered sugar. The gooey sweetness of caramel enhances the pears’ natural flavor and adds a luxurious touch.
- Offer a side of toasted pecans or walnuts for crunch. Serve them in small bowls alongside the pie so everyone can sprinkle as much nutty goodness as they like.
HOW TO STORE CUSTARD PEAR PIE
Proper storage is key to keeping your Custard Pear Pie tasting fresh and flavorful for days to come. Whether you have leftovers to preserve or you’re making the pie ahead of time, these tips will help you maintain its texture and taste.
- Short-term room temperature: Cover the cooled pie loosely with aluminum foil or a clean kitchen towel and leave it on the counter for up to 2 days. This method keeps the crust tender but still slightly flaky.
- Refrigeration: Place the pie in an airtight container or wrap it tightly with plastic wrap and store it in the fridge for up to 3 days. Chilled slices have a firmer texture and can be enjoyed cold or gently reheated.
- Freezing whole pie: Wrap the entire cooled pie in plastic wrap, then cover with a layer of aluminum foil. Freeze for up to 1 month. Thaw overnight in the refrigerator before serving.
- Freezing individual slices: Cut the pie into portions, wrap each slice in plastic wrap, and place them in a freezer-safe bag. This makes for easy grab-and-go servings—just thaw slices in the refrigerator when you’re ready to enjoy.
CONCLUSION
This Custard Pear Pie recipe brings together the tender sweetness of ripe pears, the silky richness of homemade custard, and the comforting warmth of cinnamon in a flaky, golden crust. Perfect for beginner bakers, it only requires 15 minutes of prep time, 50 minutes of baking, and a 30-minute rest—yet delivers a show-stopping dessert that feels lovingly crafted. With approximately 380 calories per slice, you can savor each bite mindfully and share this easy pie recipe with family and friends on any occasion. Be sure to print this article and save it for later, so you’ll always have the instructions and tips at your fingertips. You can also find a FAQ below to answer any lingering questions and ensure your pie turns out perfectly every time.
If you give this Custard Pear Pie a try, I’d love to hear how it turns out! Leave your comments, questions, or feedback below—whether you arranged the pears in a spiral, added a dash of nutmeg, or served it with whipped cream. Your stories and tips might inspire fellow home cooks to take their own pieces of pie to the next level. Happy baking, and may every slice bring warmth and joy to your table.
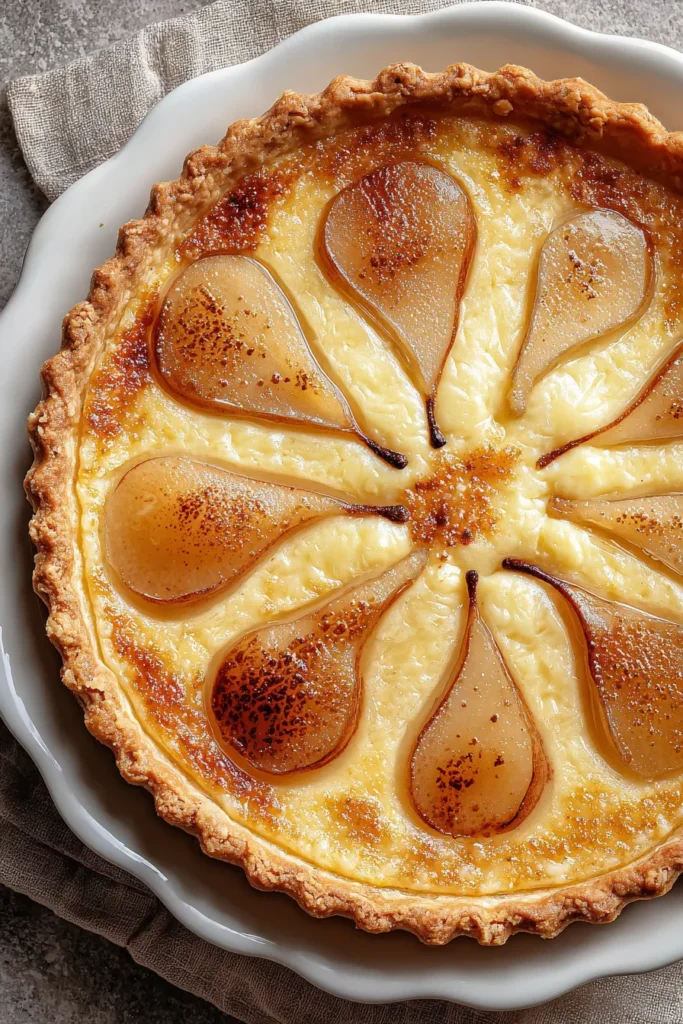

Custard Pear Pie
Description
Experience the delightful harmony of creamy custard and tender pears, perfectly baked in a flaky crust. This pie is a sweet, comforting treat for any occasion.
Ingredients
Instructions
-
Preheat your oven to 375°F (190°C).
-
Place the sliced pears in a large bowl and drizzle them with lemon juice to prevent browning. Toss gently to coat.
-
Arrange the pear slices evenly in the unbaked pie crust.
-
In a medium mixing bowl, whisk together the heavy cream, eggs, sugar, vanilla extract, cinnamon, and salt until well combined.
-
Pour the custard mixture over the pears in the pie crust, ensuring everything is evenly covered.
-
Drizzle the melted butter over the top of the custard and pears for added flavor.
-
Place the pie on a baking sheet to catch any spills and bake in the preheated oven for 45 to 50 minutes, or until the custard is set and the top is lightly browned.
-
Allow the pie to cool to room temperature before serving to ensure the custard is fully set.
Note
- Pears should be ripe yet firm to maintain shape during baking.
- This pie can be served warm or chilled, depending on your preference.
- A dash of nutmeg can be added for an extra layer of flavor.
- For a decorative touch, consider arranging the pear slices in a spiral pattern.
- Serve with a dollop of whipped cream or vanilla ice cream for added indulgence.

