

Easter Birds Nest Cookies are the perfect playful Easter treat, combining crunchy chocolate-peanut butter nests crowned with candy eggs. These crispy nests blend creamy peanut butter, rich melted chocolate, and crunchy corn flakes for a burst of sweet and salty goodness in every bite. Ready in under an hour and requiring no baking, they’re an ideal activity for a cozy afternoon or a fun addition to any holiday dessert table. Give them a try—your friends and family will be chirping for more!
Key Ingredients
To whip up these adorable Easter Birds Nest Cookies, you only need a handful of pantry staples that come together in minutes:
- 100 grams unsalted butter: Provides richness and helps bind the peanut butter and chocolate for a smooth, glossy coating.
- 3/4 cup creamy peanut butter: Adds nutty depth and a creamy texture that clings perfectly to the corn flakes.
- 1 cup semisweet chocolate chips: Melts into a sweet, velvety base that holds the crunchy flakes together.
- 4 cups corn flakes: Forms the nest’s crispy backbone, giving each bite a delightful crunch.
- 24 small candy-coated chocolate eggs: The festive finishing touch, nestling snugly in each cookie for an Easter-perfect presentation.
How To Make Easter Birds Nest Cookies
Creating these nests is as simple as melting, mixing, and chilling—no oven required! You’ll melt your butter, peanut butter, and chocolate together, then fold in corn flakes before shaping each portion into a charming little nest. Once chilled and firm, all that’s left is to tuck in the candy eggs for an extra pop of color. Follow these steps for irresistibly cute and crunchy nests every time:
1. Line a baking sheet with parchment paper or wax paper to prevent sticking and make cleanup a breeze.
2. In a medium saucepan over low heat, combine the unsalted butter, creamy peanut butter, and semisweet chocolate chips, stirring constantly until the mixture is completely smooth and glossy.
3. Remove the pan from heat and gently stir in the corn flakes, folding carefully so each flake is evenly coated without breaking them up.
4. Drop heaping spoonfuls of the mixture onto the prepared baking sheet, then use the back of the spoon to shape each into a nest, creating a small well in the center.
5. Transfer the tray to the refrigerator and chill for at least 30 minutes, or until the nests are firm to the touch.
6. Once set, place three candy-coated chocolate eggs into the center of each nest, pressing them in gently to secure.
7. Serve immediately or keep in an airtight container until you’re ready to enjoy these festive treats.
Serving Suggestions
These Easter Birds Nest Cookies are as versatile as they are adorable. Whether you’re styling a dessert table or packing them for a picnic, here are some fun ideas to showcase your nests:
- Easter Platter Display: Arrange the nests on a decorative platter lined with green paper grass to mimic a real bird’s nest scene.
- Milk Pairing: Serve alongside a cold glass of milk to balance the rich chocolate-peanut butter flavors and keep little hands happy.
- Gift Box Favors: Place three nests in a clear cellophane bag tied with pastel ribbon for charming party favors that guests will love.
- White Chocolate Drizzle: Melt white chocolate into a piping bag and lightly drizzle over the nests before chilling for an extra festive touch.
Tips For Perfect Easter Birds Nest Cookies
Perfecting these nests is all about achieving the right texture and flavor balance. Here are some friendly pointers to ensure your cookies turn out just right:
- For a nut-free alternative, substitute sunflower seed butter for the peanut butter.
- Add a pinch of sea salt when melting the chocolate for a richer flavor.
- Store the nests in an airtight container at room temperature for up to three days.
- You can melt white chocolate instead of semisweet and top with pastel sprinkles for a festive twist.
How To Store It
Keeping these nests fresh and crunchy is easy with the right storage methods. Follow these tips to maintain their texture and flavor:
- Room Temperature: Store in a single layer inside an airtight container at room temperature for up to three days, avoiding stacking to prevent breakage.
- Refrigeration: In warmer climates, keep nests in the fridge to stop the chocolate from softening; allow them to come to room temperature before serving.
- Freezing: Freeze unfilled nests on a baking sheet until solid, then transfer to a freezer-safe container. Thaw at room temperature and press in candy eggs just before serving.
- Layer Protection: If you must stack nests briefly, separate layers with parchment paper to prevent them from sticking or crushing.
Frequently Asked Questions
Ready to troubleshoot? Here are answers to the most common Easter Birds Nest Cookies queries:
- How long does it take to prepare these Easter Birds Nest Cookies?
It takes about 20 minutes to prepare the recipe, including melting the butter, peanut butter, and chocolate chips, gently stirring in the corn flakes, and shaping each nest on the baking sheet. You’ll then need to chill the nests for at least 30 minutes before adding the candy-coated eggs.
- Can I make the nests ahead of time for a party or event?
Yes. You can prepare the nests up to 24 hours in advance. After chilling until firm, store them in an airtight container at room temperature. Add the candy-coated chocolate eggs just before serving to ensure they look fresh and vibrant.
- What’s the best way to store the finished nests to keep them crisp?
Store the nests in a single layer in an airtight container at room temperature. Avoid stacking them to prevent crushing. They will stay crisp for up to three days. If your kitchen is very warm, you can keep them in the refrigerator, but allow them to come to room temperature before serving for optimal texture.
- How can I adapt this recipe for someone with a peanut allergy?
Substitute sunflower seed butter for the peanut butter on a one-to-one basis. Sunflower seed butter melts similarly and has a mild flavor that complements the chocolate. For extra flavor, you can add a pinch of sea salt when melting the ingredients, just as you would with the original recipe.
- My mixture is too runny and the nests won’t hold their shape. What should I do?
Make sure you’re melting over low heat to avoid thinning the mixture too much. After removing from heat, let the mixture sit for a minute to thicken slightly, then gently fold in the corn flakes. If it’s still too loose, add an additional half cup of corn flakes, fold gently, and try shaping again.
- Can I freeze these nests if I want to make them well in advance?
Yes. Freeze the unfilled nests in a single layer on a baking sheet until solid, then transfer them to a freezer-safe container. When you’re ready to serve, thaw at room temperature and press in three candy-coated chocolate eggs. They will keep in the freezer for up to one month.
- Are there any tips for shaping uniformly sized nests?
Use a small cookie scoop or a tablespoon to portion out equal amounts of the mixture. Press each portion gently into the back of the spoon or a small muffin liner on the baking sheet to form a well in the center. This ensures consistent sizes and makes the nests look professional and uniform.
What Makes This Special
These Easter Birds Nest Cookies combine no-bake simplicity with eye-catching charm, making them a standout on any dessert table. The mix of creamy peanut butter, melty chocolate, and crispy corn flakes creates a delightful textural contrast that’s hard to resist. Plus, the candy-coated eggs nestle in like tiny treasures, adding a playful pop of color. Whether you’re hosting a spring gathering or looking for a fun activity, these cookies deliver a fuss-free yet festive experience. Feel free to print this article and save it for later—then come back and share your own tips, questions, or egg-cellent feedback below!
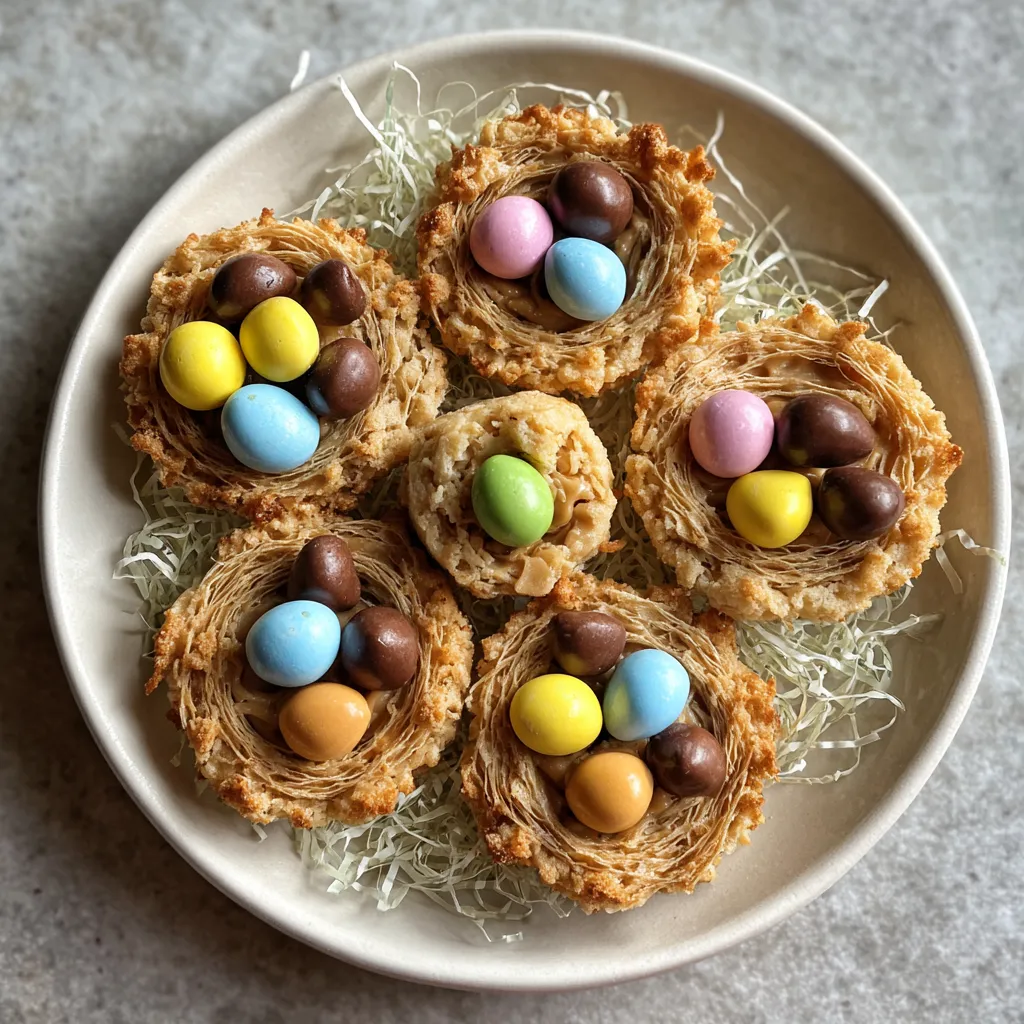

Easter Birds Nest Cookies
Description
These crispy nests combine creamy peanut butter, rich melted chocolate, and crunchy corn flakes. Topped with colorful candy eggs, they offer a playful blend of flavors and textures that's ready in under an hour.
Ingredients
Instructions
-
Line a baking sheet with parchment paper or wax paper.
-
In a medium saucepan over low heat, melt the butter, peanut butter, and chocolate chips, stirring until smooth.
-
Remove the pan from heat and gently stir in the corn flakes until they are evenly coated.
-
Drop spoonfuls of the mixture onto the prepared baking sheet, then use the back of the spoon to shape each into a nest with a well in the center.
-
Transfer the tray to the refrigerator and chill for at least 30 minutes, or until the nests are firm.
-
Once set, place three candy-coated chocolate eggs into the center of each nest.
-
Serve immediately or store in an airtight container until ready to enjoy.
Note
- For a nut-free alternative, substitute sunflower seed butter for the peanut butter.
- Add a pinch of sea salt when melting the chocolate for a richer flavor.
- Store the nests in an airtight container at room temperature for up to three days.
- You can melt white chocolate instead of semisweet and top with pastel sprinkles for a festive twist.

