

There is something undeniably magical about the holiday season that calls for a dessert as vibrant as the festivities themselves. This Christmas Red Velvet Cheesecake is the ultimate showstopper, combining a moist, cocoa-infused cake base with a silky, tangy cheesecake layer that simply melts in your mouth. It is the perfect marriage of two classic favorites, dressed up in a stunning red hue that screams holiday cheer. Whether you are hosting a grand dinner or looking for a special treat to share with loved ones, this recipe promises to impress and satisfy every sweet tooth at your table.
Key Ingredients
To build this two-layer masterpiece, you will need a combination of standard baking staples and fresh dairy products. The magic happens when the cocoa interacts with the buttermilk and vinegar notes, creating that distinct flavor profile, while the red coloring transforms the batter into a festive visual treat.
- 1 and 1/2 cups all-purpose flour: This provides the sturdy structure needed to support the rich cheesecake layer above it.
- 1 cup granulated sugar: Adds the perfect amount of sweetness to balance the tang of the buttermilk and cocoa.
- 1/2 cup unsweetened cocoa powder: Delivers that subtle, classic chocolate note essential to any true red velvet recipe.
- 1 tsp baking soda: Acts as the leavening agent to ensure the cake rises beautifully and stays light.
- 1/2 tsp salt: Enhances the flavors of the chocolate and vanilla so they really pop.
- 1 and 1/2 cups vegetable oil: Ensures the cake layer remains incredibly moist and tender for days.
- 1 cup buttermilk, at room temperature: Provides the necessary acidity to activate the baking soda and tenderize the gluten.
- 3 large eggs: These bind the batter together and add richness to the cake structure.
- 2 tbsp red food coloring: Creates the iconic, vivid red hue that makes this dessert so festive.
- 1 tsp vanilla extract: Adds a warm, aromatic background flavor to the cake layer.
- 1 package (8 oz) cream cheese, softened: The tangy, creamy foundation for the luxurious second layer.
- 1/2 cup powdered sugar: Sweetens the cheesecake layer smoothly without leaving a grainy texture.
- 1/4 cup sour cream: Adds an extra dimension of tanginess and creaminess to the cheesecake mixture.
- 1 tsp vanilla extract (for the cheesecake layer): Infuses the creamy layer with a sweet, floral aroma.
- 1 cup heavy whipping cream: Whipped up fresh, this creates a light, airy topping to finish the dessert.
- Optional: festive sprinkles or chocolate curls for decoration: Adds a final touch of holiday sparkle and texture.
How To Make Christmas Red Velvet Cheesecake
Creating this double-layer beauty might look intimidating, but I promise it is surprisingly straightforward. You are essentially baking a classic cake base first, letting it cool, and then topping it with a quick cheesecake batter for a second trip to the oven. It is a labor of love that rewards you with distinct textures in every bite. Just remember to handle the batter gently and keep an eye on your oven timing to ensure both layers come out perfectly moist and set.
1. Preheat your oven to 350°F (175°C). Thoroughly grease the bottom and sides of a 9-inch springform pan and set it aside to ensure easy removal later.
2. In a large mixing bowl, combine the flour, granulated sugar, cocoa powder, baking soda, and salt. Whisk these dry ingredients together until they are thoroughly mixed and free of lumps.
3. In a separate bowl, add the vegetable oil, buttermilk, eggs, red food coloring, and 1 tsp of vanilla extract. Whisk vigorously until the mixture is smooth and well-combined.
4. Gradually pour the wet ingredients into the dry ingredients, mixing until they are just combined. Be very careful not to overmix, as this can make the cake tough.
5. Pour the vibrant red velvet batter into the prepared springform pan, using a spatula to smooth the top so it bakes evenly.
6. Bake in the preheated oven for 25-30 minutes, or until a toothpick inserted in the center comes out clean. Remove the cake from the oven and allow it to cool completely in the pan before proceeding.
7. While the cake bakes and cools, prepare the cheesecake layer. In a mixing bowl, beat the softened cream cheese until it is completely creamy and smooth.
8. Add the powdered sugar, sour cream, and 1 tsp of vanilla extract to the cream cheese. Mix until everything is well combined and the texture is silky.
9. Once the red velvet cake has cooled, pour the cheesecake batter directly over the top of the cake in the springform pan, spreading it out evenly to the edges.
10. Bake the cheesecake layer for an additional 30-35 minutes, or until it is set but still slightly jiggly in the center. Remove from the oven and let it cool at room temperature, then refrigerate for at least 4 hours (or overnight) to fully set.
11. Before serving, whip the heavy cream in a separate bowl until soft peaks form. Spread the whipped cream generously over the top of the chilled cheesecake for a luxurious finish.
12. Decorate with festive sprinkles or chocolate curls if desired to make it party-ready.
Serving Suggestions
Presentation is everything during the holidays, and this cake deserves a spotlight on your dessert table. Because the red and white layers are so striking on their own, you don't need to be a professional pastry chef to make it look gourmet. A few simple touches can elevate the experience, turning a delicious slice into a memorable event for your guests. Here is how to serve this treat with style.
- Use a White Platter: Serve the cheesecake on a white pedestal stand or plate. The stark white background contrasts beautifully with the vivid red cake layer, making the colors pop even more for photos and presentation.
- Warm Your Knife: To get those chef-quality clean cuts through the cheesecake and cake layers, run your knife under hot water and wipe it dry before every single slice. This prevents the layers from smearing into each other.
- Pair with Warm Beverages: The rich, cool creaminess of the cheesecake pairs exceptionally well with a hot cup of freshly brewed coffee or a dark hot chocolate, balancing the temperature and sweetness perfectly.
- Add Fresh Garnish: For a pop of color and freshness, garnish the side of each plate with a sprig of fresh mint or a few raspberries. This adds a natural element that complements the red and white theme.
Tips For Perfect Christmas Red Velvet Cheesecake
We all want that "wow" factor without the stress, right? Over the years, I've learned that patience really is the secret ingredient here. Allowing the cake to cool properly prevents the cheesecake layer from seizing, and letting it set in the fridge ensures that velvety texture we all crave. Here are a few specific tips from my kitchen notes to yours to help you nail this recipe on the first try.
- Plan Ahead: This cheesecake is best made a day ahead to allow the flavors to meld and the texture to set perfectly. The waiting time really makes a difference in the final firmness.
- Get Creative with Color: Experiment with different types of food coloring for a unique twist. Gel food coloring often provides a more intense red without adding extra liquid to the batter.
- Leftovers are Gold: Leftover cheesecake can be stored in the refrigerator for up to five days, and honestly, I think it tastes even better on day two as the moisture redistributes.
- The Adult Version: Consider pairing with a sweet dessert wine for a special holiday treat. A nice Port or a sweet Riesling complements the cocoa and tangy cream cheese beautifully.
How To Store It
If you are lucky enough to have leftovers, you want to keep that cheesecake layer creamy and the cake moist. Dairy-based desserts can pick up fridge odors easily, so proper storage is key to enjoying a slice a few days later. Here is exactly how to keep your holiday dessert tasting fresh until the very last bite.
- Use an Airtight Container: Place any leftover slices in a sealed airtight container or a cake carrier with a locking lid. This prevents the cheesecake from absorbing savory smells from other food in your fridge.
- Refrigerate Immediately: Because of the cream cheese and heavy cream, this cake needs to be kept cold. Store it in the refrigerator for up to five days to ensure it stays safe to eat and maintains its structure.
- Protect the Surface: If you have cut into the cake but it is still on the pan base, gently press a piece of plastic wrap or wax paper against the cut sides of the cake to keep the red velvet layer from drying out.
Frequently Asked Questions
I know trying a new baking recipe can bring up a few questions, especially when layers are involved! Here are the most common questions I get about making this festive treat, along with the specific answers based on the recipe data to keep you on the right track.
- Q: Is it recommended to prepare this cheesecake in advance?
A: Yes, the recipe notes state that this cheesecake is best made a day ahead. This allows the flavors to meld together and ensures the texture sets perfectly. Additionally, the instructions require refrigerating the cheesecake for at least 4 hours or overnight to fully set before serving.
- Q: What are the visual cues to determine when each layer is finished baking?
A: For the red velvet cake layer, you should bake it for 25 to 30 minutes or until a toothpick inserted into the center comes out clean. For the second baking phase with the cheesecake layer, bake for an additional 30 to 35 minutes until the mixture is set but remains slightly jiggly in the center.
- Q: What type of pan should be used and how do I prepare it?
A: This recipe specifically requires a 9-inch springform pan. You must grease both the bottom and the sides of the pan before pouring in the batter to ensure the cake can be easily removed later.
- Q: Do I need to let the red velvet cake layer cool before adding the cheesecake batter?
A: Yes, step 6 instructs you to remove the red velvet cake from the oven and allow it to cool completely in the pan. You should only pour the cheesecake batter over the cake once it has finished cooling.
- Q: How long can I store the leftover cheesecake?
A: According to the recipe notes, leftover cheesecake can be stored in the refrigerator for up to five days. Ensure it is covered properly to maintain freshness.
What Makes This Special
Why settle for just cookies when you can have this Vivid red cake meets creamy cheesecake masterpiece? It works because it satisfies the chocolate lovers and the cheesecake fanatics simultaneously—basically, it is the holiday peace treaty we all need. Plus, that red color is festive enough to make Santa jealous of your baking skills. Do yourself a favor and save this recipe for later or print it out right now before the holiday chaos begins. I would absolutely love to hear how yours turned out! Drop a comment below if you try it, or let me know if you have any questions while you are mixing up a storm.
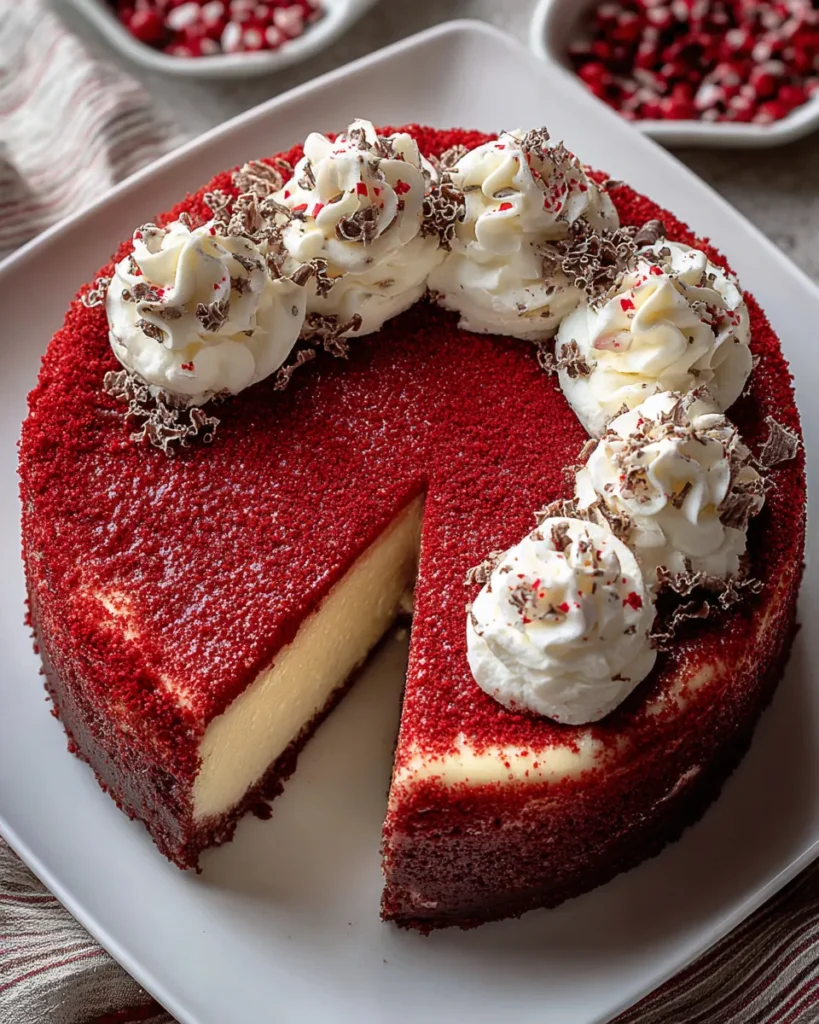

Christmas Red Velvet Cheesecake
Description
Moist red velvet cake forms the base for a silky, tangy cheesecake layer topped with fresh whipped cream. A showstopping centerpiece perfect for your holiday table.
Ingredients
Instructions
-
Preheat your oven to 350°F (175°C). Grease the bottom and sides of a 9-inch springform pan and set aside.
-
In a large mixing bowl, combine the flour, granulated sugar, cocoa powder, baking soda, and salt. Whisk until thoroughly mixed.
-
In another bowl, add the vegetable oil, buttermilk, eggs, red food coloring, and 1 tsp of vanilla extract. Whisk until smooth and well-combined.
-
Gradually add the wet ingredients to the dry ingredients, mixing until just combined. Be careful not to overmix.
-
Pour the red velvet batter into the prepared springform pan, smoothing the top with a spatula.
-
Bake in the preheated oven for 25-30 minutes, or until a toothpick inserted in the center comes out clean. Remove from the oven and allow to cool completely in the pan.
-
While the cake bakes, prepare the cheesecake layer. In a mixing bowl, beat the softened cream cheese until creamy and smooth.
-
Add the powdered sugar, sour cream, and 1 tsp of vanilla extract to the cream cheese. Mix until well combined and smooth.
-
Once the red velvet cake has cooled, pour the cheesecake batter over the top of the cake in the springform pan, spreading it out evenly.
-
Bake the cheesecake layer for an additional 30-35 minutes, or until it is set but slightly jiggly in the center. Remove from the oven and let it cool at room temperature, then refrigerate for at least 4 hours (or overnight) to fully set.
-
Before serving, whip the heavy cream in a separate bowl until soft peaks form. Spread the whipped cream over the top of the chilled cheesecake for a luxurious finish.
-
Decorate with festive sprinkles or chocolate curls if desired.
Note
- This cheesecake is best made a day ahead to allow the flavors to meld and the texture to set perfectly.
- Experiment with different types of food coloring for a unique twist.
- Leftover cheesecake can be stored in the refrigerator for up to five days.
- Consider pairing with a sweet dessert wine for a special holiday treat.

