

Holiday baking is my absolute favorite time of year, but sometimes we need a break from rolling and cutting endless shapes. These Christmas Cookie Bars are the perfect solution, offering all the chewy goodness of a classic cookie without the extra hassle. Packed with white chocolate and festive candies, they are a total crowd-pleaser that comes together in just one pan. I love whipping these up for impromptu gatherings or just a cozy night in, and I know you will fall in love with how easy and delicious they are.
Key Ingredients
To get that perfect chewy texture and festive look, you need the right balance of staples and holiday treats. Here is everything you need to grab from your pantry to get started.
- 2½ cups all-purpose flour: Provides the structure for the bars, ensuring they hold their shape while remaining soft.
- 1 teaspoon baking powder: Acts as a leavening agent to help the bars rise slightly and become fluffy.
- ½ teaspoon baking soda: Works with the sugars to encourage spreading and browning for that perfect golden color.
- ½ teaspoon salt: Balances the sweetness of the sugars and chocolate, enhancing the overall flavor profile.
- 1 cup unsalted butter, softened: Adds richness and moisture, creating a tender crumb and buttery taste.
- 1 cup granulated sugar: Sweetens the bars and helps create crisp edges for a delightful texture contrast.
- 1 cup packed brown sugar: Adds moisture and a deep molasses flavor, contributing to the chewiness of the blondies.
- 2 large eggs: Act as a binder to hold the ingredients together and add richness to the dough.
- 2 teaspoons vanilla extract: Infuses the batter with a warm, aromatic flavor that complements the chocolate.
- 1 cup holiday-themed sprinkles: Adds a pop of color and festive fun to every bite of the bars.
- 1 cup white chocolate chips: Melts into creamy pockets of sweetness that pair perfectly with the vanilla base.
- 1 cup red and green M&M's (or similar holiday candy): Provides a satisfying crunch and bursts of chocolate in a festive color palette.
How To Make Christmas Cookie Bars
Making these cookie bars is incredibly straightforward, which is why they are one of my go-to recipes during the busy holiday season. Instead of scooping dozens of individual cookies, we are simply making a thick, buttery batter and pressing it all into a single pan. The process involves creaming the butter and sugars to build a light foundation, then gently folding in our festive mix-ins. It is a quick method that yields thick, chewy squares bursting with creamy white chocolate and crunchy candies. You will love how your kitchen smells while these bake to golden perfection.
1. Start by preheating your oven to 350°F (175°C). Then, grease a 9×13 inch baking pan or line it with parchment paper for easy removal later on.
2. In a medium bowl, whisk together the flour, baking powder, baking soda, and salt until fully blended. Set this mixture aside.
3. In a large mixing bowl, using an electric mixer, cream together the softened butter, granulated sugar, and brown sugar until the mixture becomes light and fluffy, about 2-3 minutes.
4. Add the eggs, one at a time, mixing well after each addition. Then stir in the vanilla extract until well combined.
5. Gradually add the dry ingredients to the butter mixture, mixing on low speed until the flour is just incorporated. Be careful not to overmix.
6. Fold in the holiday sprinkles, white chocolate chips, and M&M's with a spatula until evenly distributed throughout the batter.
7. Spread the cookie mixture evenly into the prepared baking pan, smoothing the top with a spatula.
8. Bake in the preheated oven for 25-30 minutes, or until the edges are golden brown and a toothpick inserted into the center comes out clean.
9. Remove the baking pan from the oven and allow the cookie bars to cool in the pan for about 15 minutes. Then, transfer them to a wire rack to cool completely.
10. Once cooled, cut the bars into squares and serve them. Enjoy!
Serving Suggestions
These bars are fantastic on their own, but dressing them up can turn a simple treat into a showstopping dessert. Whether you are hosting a formal holiday dinner or just setting out a snack tray for a movie marathon, the right presentation makes all the difference. I love playing around with temperature and toppings to enhance the textures. Since these blondies are sturdy yet soft, they hold up well to various serving styles. Here are a few of my favorite ways to share these festive treats with loved ones.
- Warm and A La Mode: Serve a square slightly warm and top it with a generous scoop of vanilla bean ice cream; the melting cream against the chewy bar creates an irresistible hot and cold contrast.
- Holiday Gift Boxes: Stack the cooled squares in decorative tins lined with festive parchment paper and tie them with a red ribbon for a homemade gift that friends and neighbors will adore.
- Cookie Platter Centerpiece: Arrange the bars on a large platter surrounded by candy canes and fresh mint leaves, creating a colorful and inviting display for your holiday party buffet.
- Dipped in Chocolate: For an extra indulgent touch, dip half of each bar into melted dark chocolate and let it set, adding a layer of sophistication and richness to the sweet treat.
Tips For Perfect Christmas Cookie Bars
Even though this recipe is beginner-friendly, a few little tricks can ensure your baking experience is completely stress-free. I always find that knowing how to adapt a recipe to what you have on hand makes cooking so much more enjoyable. These bars are incredibly forgiving, allowing you to get creative or just stick to the basics depending on your mood. Plus, knowing how to keep them fresh means you can enjoy the fruits of your labor for days. Here are some helpful notes to keep in mind as you bake your way through the holidays.
- Customize Your Mix-ins: Don't feel limited to just candy; these bars can be customized with your favorite mix-ins like chopped nuts, dried fruits, or different types of chocolate to suit your taste.
- Proper Storage: To keep that soft texture, store the cookie bars in an airtight container at room temperature for up to one week.
- Versatile Occasions: These treats are incredibly versatile and are perfect for holiday parties, gifting to teachers or neighbors, or simply enjoying at home with a warm cup of cocoa!
How To Store It
Nobody wants their hard work to go to waste, so storing these bars correctly is key to maintaining that wonderful chewy texture. The sugar content helps keep them moist, but air is the enemy here. Whether you are prepping them in advance for a big event or just trying to save leftovers from a family gathering, a little care goes a long way. I personally love having a stash ready on the counter for quick snacking. Here is exactly how to keep your cookie bars tasting fresh.
- Room Temperature Storage: Place the fully cooled bars in an airtight container or a resealable plastic bag and keep them on the counter for up to one week to maintain their chewiness.
- Freezing for Later: Wrap individual bars tightly in plastic wrap and then place them in a freezer-safe bag; they can be frozen for up to three months and thawed at room temperature when cravings strike.
- Layering with Parchment: If you need to stack the bars in a container to save space, place a sheet of parchment paper between the layers to prevent them from sticking together or damaging the toppings.
Frequently Asked Questions
I know that even with the best recipes, questions pop up while you are standing in the kitchen. To help you bake with total confidence, I have gathered the most common questions I get about these festive bars.
- Q: How do I know when the Christmas Cookie Bars are finished baking?
A: You should bake the bars for 25 to 30 minutes at 350°F (175°C). They are ready when the edges turn golden brown and a toothpick inserted into the center comes out clean.
- Q: What is the best way to store these cookie bars and how long will they last?
A: You should store the cut cookie bars in an airtight container kept at room temperature. According to the recipe notes, they will remain fresh for up to one week.
- Q: Can I substitute the white chocolate chips and M&M's with other ingredients?
A: Yes, the recipe notes indicate that these bars can be customized. While the instructions call for holiday sprinkles, white chocolate chips, and M&M's, you can swap these for your favorite mix-ins such as nuts, dried fruits, or different types of chocolate.
- Q: Do I need to let the bars cool down completely before cutting them?
A: Yes, proper cooling is essential. You should allow the cookie bars to cool in the pan for about 15 minutes after removing them from the oven, then transfer them to a wire rack to cool completely before cutting them into squares.
- Q: Why is it important to cream the butter and sugars together?
A: Creaming the softened unsalted butter with the granulated and packed brown sugar for 2 to 3 minutes allows the mixture to become light and fluffy. This step creates the base texture for the cookie batter before adding the eggs and dry ingredients.
- Q: What size baking pan is required for this recipe?
A: This recipe is designed for a 9×13 inch baking pan. You should grease the pan or line it with parchment paper prior to adding the batter to ensure the bars can be easily removed once baked.
What Makes This Special
There is honestly nothing better than a recipe that delivers maximum holiday cheer with minimal cleanup. These Christmas Cookie Bars are the lazy baker's dream, giving you all that cookie dough flavor without the rolling pin workout. They are chewy, buttery, and packed with enough sugar to power Santa's sleigh for the whole night. Make sure to print this article or save it to your bookmarks because you are going to want to make these every single year. If you whip up a batch, please drop a comment below and let me know how they turned out or what fun mix-ins you used!

Christmas Cookie Bars
Description
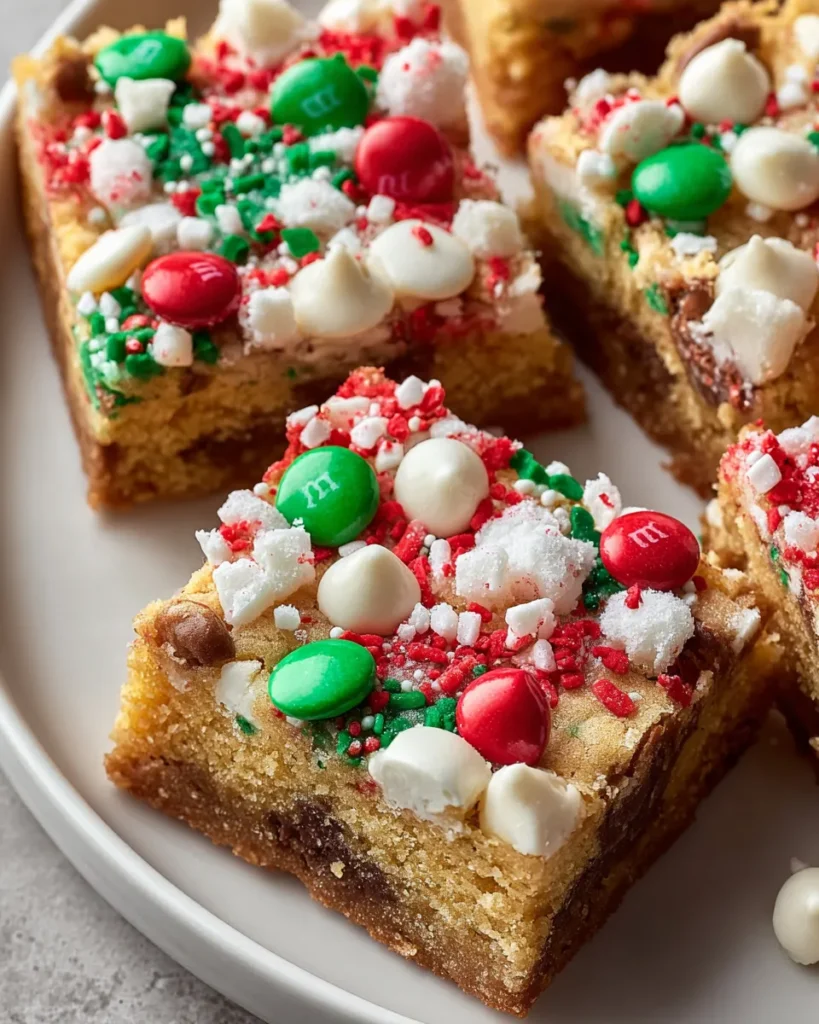
Thick, chewy squares bursting with creamy white chocolate and crunchy holiday candies offer a mess-free alternative to traditional cookies. The golden edges give way to a soft, buttery center speckled with festive red and green sprinkles.
Ingredients
Instructions
-
Preheat your oven to 350°F (175°C). Grease a 9x13 inch baking pan or line it with parchment paper for easy removal.
-
In a medium bowl, whisk together the flour, baking powder, baking soda, and salt. Set this mixture aside.
-
In a large mixing bowl, using an electric mixer, cream together the softened butter, granulated sugar, and brown sugar until the mixture becomes light and fluffy, about 2-3 minutes.
-
Add the eggs, one at a time, mixing well after each addition. Then stir in the vanilla extract until well combined.
-
Gradually add the dry ingredients to the butter mixture, mixing on low speed until the flour is just incorporated. Do not overmix.
-
Fold in the holiday sprinkles, white chocolate chips, and M&M's with a spatula until evenly distributed throughout the batter.
-
Spread the cookie mixture evenly into the prepared baking pan, smoothing the top with a spatula.
-
Bake in the preheated oven for 25-30 minutes, or until the edges are golden brown and a toothpick inserted into the center comes out clean.
-
Remove the baking pan from the oven and allow the cookie bars to cool in the pan for about 15 minutes. Then, transfer them to a wire rack to cool completely.
-
Once cooled, cut the bars into squares and serve them. Enjoy!
Note
- These bars can be customized with your favorite mix-ins like nuts, dried fruits, or different types of chocolate.
- Store the cookie bars in an airtight container at room temperature for up to one week.
- These are perfect for holiday parties, gifting, or simply enjoying with a warm cup of cocoa!

