

Crisp, buttery, and bursting with sweet-tart apple goodness, these Apple Crisp Bars are the perfect treat for any time you need a little homemade comfort. Every bite delivers tender slices of apples coated in warm cinnamon and nutmeg, enveloped by a golden oat and brown sugar crust. You get that satisfying crunch from old-fashioned oats and the gentle sweetness of brown sugar melded with the mellow richness of unsalted butter. The balance of flavors feels like a cozy afternoon chat with a close friend, where nothing matters except the simple joy of delicious baking. Whether you’re craving a sweet snack with your afternoon tea or planning a dessert table for a gathering, these bars are so crowd-pleasing you’ll find yourself smiling with every forkful. Plus, they have that irresistible aroma that fills your kitchen with cozy fall vibes (even if you’re baking in July!).
What makes this recipe truly shine is how approachable it is—even if you’re just starting out in the kitchen. Labeled as Beginner difficulty, you don’t need any fancy tools or advanced techniques to pull off these bars. In about 20 minutes of prep time and 45 minutes in the oven, you’ll have a 9×13-inch pan full of golden goodies that rest for just 15 minutes before cutting into perfect squares. Each bar clocks in at roughly 250 calories, making them an easy grab-and-go option or an indulgent finale to a home-cooked meal. Best of all, they store beautifully, so you can bake once and enjoy throughout the week. Are you ready to dive in and satisfy that sweet tooth?
KEY INGREDIENTS IN APPLE CRISP BARS
Before we roll up our sleeves and get baking, let’s talk about what makes these bars so special. Every ingredient has a role to play, from building a sturdy crust to adding that signature sweet-tart pop of apple. With these pantry staples in place, you’re well on your way to baking bliss.
- All-purpose flour
Provides the structural base for both crust and topping. It binds the oat mixture into a tender crumb and gives the bars their classic, cake-like texture.
- Granulated sugar
Adds sweetness to both the crust and the apple filling. It helps balance the tartness of the apples and aids in caramelization as the bars bake.
- Light brown sugar
Contributes depth of flavor with its hint of molasses. It keeps the oat topping moist and golden while delivering that irresistible caramel note.
- Old-fashioned oats
Creates texture and crunch in the topping. These hearty oats hold their shape, offering a nutty flavor that complements the soft apples beneath.
- Baking soda
Acts as a gentle leavening agent, ensuring the crust puffs up just enough for a tender yet firm crumb.
- Salt
Enhances the sweetness and balances the rich buttery and sugary flavors throughout the bars.
- Unsalted butter
Binds the dry mixture into crumbs and imparts a rich, creamy taste. When melted, it helps achieve a perfectly golden crust.
- Apples
The star of the show! Tart varieties like Granny Smith hold up well when baked, offering juicy, tender slices that contrast beautifully with the crunchy topping.
- Lemon juice
Keeps the apple slices from browning and adds a bright zing that sharpens the overall flavor profile.
- Ground cinnamon
Infuses the filling with warm spice, pairing perfectly with the natural sweetness of the apples.
- Ground nutmeg
Provides a hint of earthy warmth, rounding out the spice blend in the apple mixture.
- Cornstarch
Thickens the apple juices as they bake, ensuring the filling holds together nicely when you cut the bars.
HOW TO MAKE APPLE CRISP BARS
Baking these bars is as straightforward as it gets. You’ll create a crisp, buttery crust, layer on a spiced apple filling, then finish with a crunchy oat topping. Follow these steps, and you’ll be slicing into golden squares in no time.
1. Preheat your oven to 350°F (175°C). Prepare a 9×13-inch baking dish by greasing it lightly or lining it with parchment paper for easy removal.
2. In a medium bowl, mix together the flour, granulated sugar, light brown sugar, old-fashioned oats, baking soda, and salt until evenly combined.
3. Stir in the melted unsalted butter, tossing with a spatula until the mixture crumbles into small clusters.
4. Press half of this crumbly mixture into the bottom of your prepared baking dish, forming a uniform crust layer.
5. In a large bowl, toss the thinly sliced peeled apples with lemon juice, ground cinnamon, ground nutmeg, granulated sugar, and cornstarch until the slices are evenly coated.
6. Spread the apple mixture in an even layer over the crust, making sure each corner is covered.
7. Sprinkle the remaining oat mixture over the apples, then gently press down to help it adhere.
8. Bake for 40–45 minutes, until the topping is a deep golden brown and the apple filling bubbles lightly at the edges.
9. Remove from the oven and let cool completely in the pan on a wire rack—this helps the filling set so you get clean squares.
10. Cut into bars and serve on their own or top with a scoop of vanilla ice cream for extra indulgence.
SERVING SUGGESTIONS FOR APPLE CRISP BARS
Once these bars have cooled, you have endless ways to present and enjoy them. Whether you’re serving a crowd or indulging solo, a few simple accompaniments take these delicious squares to the next level.
- Classic Ice Cream Pairing
Place a warm bar on a dessert plate and top with a generous scoop of vanilla ice cream. The contrast between warm apples and cold ice cream creates a dreamy flavor and temperature balance.
- Whipped Cream Dollop
Add a cloud of freshly whipped cream flavored with a touch of vanilla extract. The light, airy cream complements the chewy oat topping without overpowering the bars.
- Caramel Drizzle
Warm some salted caramel sauce and drizzle it in a thin ribbon across each bar. The sweet-salty notes elevate the natural caramelization in the oat topping.
- Cheese Platter Addition
Include the bars on a cheese board alongside aged cheddar or Gouda. The sharp, tangy cheeses contrast beautifully with the warm spices and sweet fruit.
HOW TO STORE APPLE CRISP BARS
Maintaining the perfect texture and flavor of these bars is all about proper storage. With a few simple guidelines, you can keep them fresh, moist, and ready to enjoy for days or even weeks.
When storing at room temperature, place cooled bars in an airtight container layered with parchment paper. They’ll stay fresh for up to 3 days—perfect for quick snacks.
- Refrigeration
For a longer shelf life of up to 5 days, cover the bars with plastic wrap or store in an airtight container in the fridge. This helps maintain the crisp topping without becoming soggy.
- Freezing
Flash-freeze individual squares on a baking sheet, then transfer them to a zip-top freezer bag. Store for up to 3 months. Thaw at room temperature or warm gently in a low oven.
- Vacuum Sealing
If you have a vacuum sealer, package bars in individual portions. This removes air and prevents freezer burn, extending freshness while retaining flavor and texture.
CONCLUSION
What started as a simple idea—a crunchy oat crust layered with spiced apples—has transformed into a dessert bar that’s as versatile as it is delicious. We’ve walked through every detail, from the core ingredients like all-purpose flour, old-fashioned oats, and tart apples, to step-by-step instructions that make the whole process a breeze. Whether you’re a beginner baker or a seasoned pro, these apple crisp bars deliver consistent success: warm, sweet, and comforting squares that everyone will love. Don’t forget that these bars aren’t just for fall; they bring cozy, nostalgic goodness any time of year. Feel free to print this article, save it in your recipe binder, or bookmark it for all your future baking adventures. You can also scroll down to find a helpful FAQ below for quick tips and troubleshooting.
I hope you have as much fun making and eating these bars as I do! If you try the recipe, let me know how it turns out. Do you have any tweaks—maybe extra spices or a sprinkle of nuts on top? If you have questions about technique, oven temperatures, or swapping ingredients, drop your thoughts in the comments. Your feedback helps me refine future recipes and ensures our baking community stays inspired. Happy baking, and may your kitchen always be filled with sweet aromas and good company!
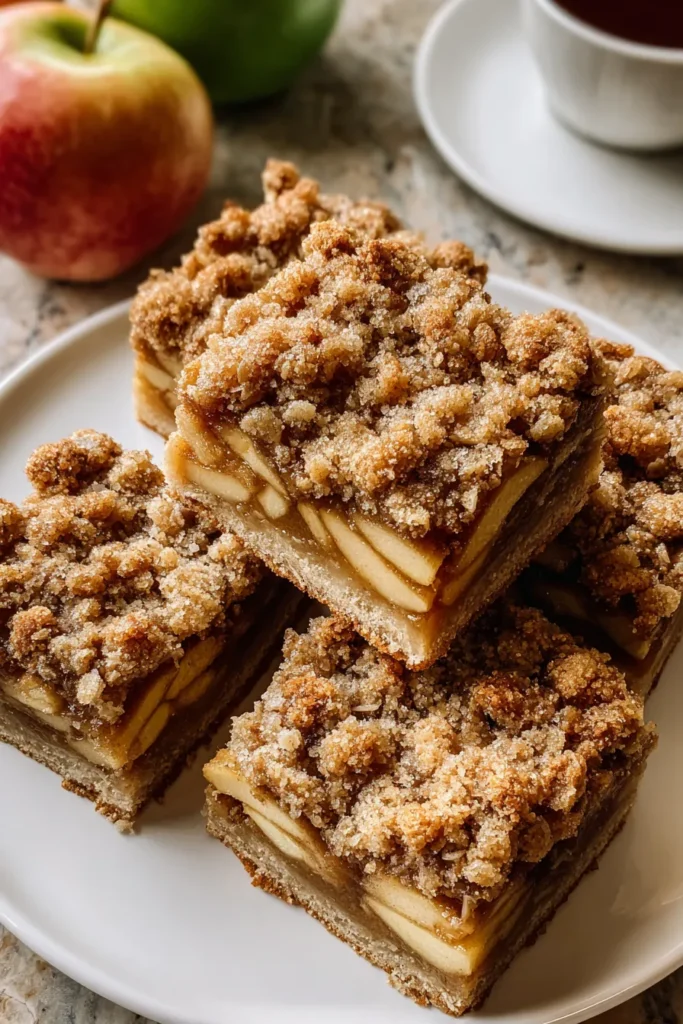

Apple Crisp Bars
Description
These Apple Crisp Bars feature tender apples topped with a crunchy oat and brown sugar crust. Perfect for dessert or a sweet snack with a scoop of ice cream!
Ingredients
Instructions
-
Preheat your oven to 350°F (175°C). Grease a 9x13-inch baking dish or line it with parchment paper.
-
In a medium bowl, mix together the flour, 1/2 cup granulated sugar, brown sugar, oats, baking soda, and salt.
-
Stir in the melted butter until the mixture is crumbly.
-
Press half of the mixture into the bottom of the prepared baking dish to form the crust.
-
In a large bowl, toss the apple slices with the lemon juice, cinnamon, nutmeg, 1/3 cup granulated sugar, and cornstarch until the apples are evenly coated.
-
Spread the apple mixture evenly over the crust in the baking dish.
-
Sprinkle the remaining oat mixture over the apples, pressing it down gently.
-
Bake in the preheated oven for 40-45 minutes or until the topping is golden brown and the apples are tender.
-
Allow the bars to cool completely in the pan on a wire rack before cutting them into squares.
-
Serve the bars as is, or with a scoop of vanilla ice cream for a delightful dessert.
Note
- Granny Smith apples are a great choice for this recipe due to their tartness and firmness.
- Feel free to add nuts such as chopped pecans or walnuts to the topping for extra crunch.
- You can store the bars in an airtight container at room temperature for up to 3 days.
- Substitute gluten-free flour and oats for a gluten-free version of these bars.

