

Nothing brightens up a sunny afternoon like a burst of fresh lemon and raspberry sweetness dancing on your taste buds. These tangy raspberry lemon bars are more than just a dessert—they’re a celebration of summer in every bite. With a buttery crust that crumbles perfectly under your fork and a zesty lemon filling that tingles on the tongue, this recipe strikes the perfect balance between sweet and tart. As someone who loves filling my kitchen with the hum of an active oven and the promise of a delicious reward, I can’t think of a better way to spend a weekend baking than whipping up these vibrant bars.
Every time I slice into a square of these bars, I’m transported back to carefree backyard gatherings and lazy Sunday picnics. The bright pink raspberries peek through the sun-kissed yellow lemon custard, creating a dessert that’s as stunning to look at as it is to eat. Whether you’re a seasoned home cook tackling an intermediate recipe or a baking newbie eager to learn, this recipe walks you through each step in under 25 minutes of prep, 45 minutes of baking, and a 1-hour rest that builds anticipation. Yielding 16 decadent servings at just about 250 calories each, these bars are a sweet and tangy treat you’ll want to make again and again.
KEY INGREDIENTS IN TANGY RASPBERRY LEMON BARS
Every sensational recipe relies on a handful of ingredients that elevate simple elements into something extraordinary. In these lemon bars, each component plays a starring role—whether it’s creating the foundation of a tender crust or giving the filling its irresistible zing. Here’s a closer look at the key players you’ll need:
- unsalted butter
Provides a rich, creamy base for the crust. When melted and combined with sugar and flour, it helps achieve a tender, crumbly texture that contrasts beautifully with the smooth filling.
- granulated sugar
Sweetens both the crust and the filling, balancing the tart lemon juice. It also helps the crust meld together and gives the custard-like lemon layer a silkier finish.
- vanilla extract
Adds a subtle warmth and depth of flavor to the crust, elevating this simple base into something reminiscent of Oreo meets shortbread.
- salt
Enhances the sweetness and tang of the other ingredients, ensuring your taste buds don’t miss out on the nuanced flavors.
- all-purpose flour
The backbone of both the crust and the filling. It gives structure and body, making sure each bar holds its shape when you slice into it.
- fresh raspberries
Bring bright, juicy pops of berry goodness to every bite. Their natural acidity and slight sweetness complement the lemon filling perfectly.
- cornstarch
Helps the raspberries hold their shape and prevents the berry juices from soaking into the crust, keeping your bars neat and picturesque.
- eggs
Act as a binder in the filling, creating that custardy, set layer that wobbles just slightly when fully baked but holds firm when sliced.
- lemon juice
The star of the show in the filling, offering tangy freshness and that zingy lemon punch you crave.
- lemon zest
Intensifies the citrus notes, releasing fragrant oils that amplify the lemony aroma and flavor.
- powdered sugar
A final dusting that adds a delicate sweetness and makes each bar look like a masterpiece, perfect for sprinkling just before serving.
HOW TO MAKE TANGY RASPBERRY LEMON BARS
Time to roll up your sleeves and dive into the layers of buttery crust, silky lemon custard, and plump raspberries. Follow these detailed steps to create a dessert bursting with flavor, color, and that sense of pride only homemade baking can bring.
1. Preheat your oven to 350°F (175°C). Line a 9×13-inch baking dish with parchment paper, leaving an overhang on two sides. This makes lifting out the bars a breeze once they’re fully set.
2. In a medium bowl, combine the melted butter, granulated sugar, vanilla extract, and salt. Stir until everything is smoothly blended and fragrant.
3. Gradually fold in the all-purpose flour until the mixture forms a soft, cohesive dough. It should hold together when pressed between your fingers.
4. Press the dough evenly into the bottom of the prepared baking dish, creating a uniform layer. Use a fork to prick the surface—this little trick prevents air pockets and bubbling as it bakes.
5. Bake the crust for 18–20 minutes, or until it’s lightly golden brown around the edges. Remove from the oven and let it cool slightly while you prepare the filling.
6. In a clean bowl, gently toss the fresh raspberries, the reserved granulated sugar, and the cornstarch. This coating helps the berries stay plump and prevents their juices from bleeding into the crust.
7. In another mixing bowl, whisk together eggs, the larger portion of granulated sugar, all-purpose flour, lemon juice, and lemon zest. Whisk until the mixture is smooth and pale yellow.
8. Carefully pour the egg-lemon mixture over the slightly cooled crust, spreading it evenly with a spatula. Then scatter the sugar-coated raspberries on top in an artful layer.
9. Return the baking dish to the oven and bake for 22–25 minutes, or until the filling is set in the center and starts to take on a hint of golden color around the edges.
10. Allow the bars to cool completely at room temperature, then transfer them to the refrigerator for at least 1 hour to firm up.
11. Use the parchment overhang to lift the chilled slab out of the pan. Slice into 16 squares and dust generously with powdered sugar before serving.
SERVING SUGGESTIONS FOR TANGY RASPBERRY LEMON BARS
These vibrant bars are a showstopper on any dessert table, but the fun doesn’t stop at slicing. The way you present and serve these treats can elevate your gathering from delightful to unforgettable. Whether you’re hosting a Sunday brunch, an afternoon tea, or just craving a cool, fruity pick-me-up, these serving ideas will help you make the most of each bite. Imagine setting out a platter that dazzles with color, offering a mix of textures and flavors that not only taste delicious but look like they belong in a fancy café. You’ll love experimenting with different presentations: pairing them with complementary flavors, layering them with whipped cream for a triflesque effect, or adding playful garnishes that make your guests ooh and ahh. Keep reading for easy yet elegant ways to serve your tangy raspberry lemon bars, ensuring every slice is as much a feast for the eyes as it is for the palate.
- Create a berry medley display: Arrange the lemon bars alongside fresh raspberries and lemon slices on a white platter. The pop of red and yellow makes for an eye-catching dessert station.
- Pair with herbal tea or sparkling water: Balance the bars’ zingy sweetness by serving them with a pot of chamomile tea or a chilled glass of bubbly water infused with mint and cucumber.
- Make individual mini trifles: Layer crumbled lemon bar pieces with whipped cream and extra raspberries in small glass cups. These bite-sized treats are perfect for parties.
- Finish with edible flowers: Garnish each square with a tiny viola or marigold petal. Not only do they look stunning, but edible flowers also add a delicate floral note.
HOW TO STORE TANGY RASPBERRY LEMON BARS
After all that baking, you want these bars to stay as fresh, tangy, and visually appealing as the moment they came out of the oven. Proper storage is key to maintaining both flavor and texture—whether you’re keeping them for tomorrow’s lunchboxes or planning to serve them later in the week. These bars store beautifully but will lose their trademark firmness if subjected to too much moisture or air. In this section, we’ll explore different methods to keep your bars tasting bright and looking pristine. You’ll learn how to prevent the crust from becoming soggy, how to freeze them for extended shelf life, and how to revive chilled bars to room-temperature perfection. With these tips in your back pocket, you can confidently bake a batch ahead of time and know they’ll be just as irresistible whenever you’re ready to indulge.
- Refrigerate in an airtight container: After dusting with powdered sugar, place the bars in a single layer or separate layers with parchment paper. Seal tightly and store for up to 5 days.
- Freeze for long-term storage: Wrap individual bars in plastic wrap, then place them in a freezer-safe bag. Freeze for up to 2 months. Thaw overnight in the refrigerator before serving.
- Protect the crust: If you notice any moisture pooling in the container, layer a piece of parchment paper between the bars and the lid to absorb extra humidity.
- Bring to room temperature: Before serving chilled bars, let them sit out for 20 minutes. This restores their ideal texture and enhances the lemon aroma.
CONCLUSION
Baking these tangy raspberry lemon bars is more than just following a recipe—it’s an invitation to create a moment of joy in your kitchen. From the first steps of melting butter and whisking fresh lemon juice to the final flourish of powdered sugar dusting, every action builds toward a dessert that’s bursting with bright flavor and vibrant color. With 25 minutes of hands-on prep, 45 minutes of baking, and an hour of cooling, you’re rewarded with 16 perfectly balanced bars that hit 250 calories each. Whether you’re an experienced baker or someone looking to expand their recipe collection, the intermediate-level steps are clear, approachable, and absolutely worth the effort.
Feel free to print and save this article for your next baking adventure—you’ll find that having a visual roadmap makes the process even more fun. You can also scroll down to the FAQ section for any lingering questions. If you try this recipe or need clarification on any of the steps, I’d love to hear from you in the comments. Your feedback, tips, or personal twists on this tangy treat are always welcome. Happy baking, and may your kitchen be filled with the bright flavors of lemon and raspberry all season long!
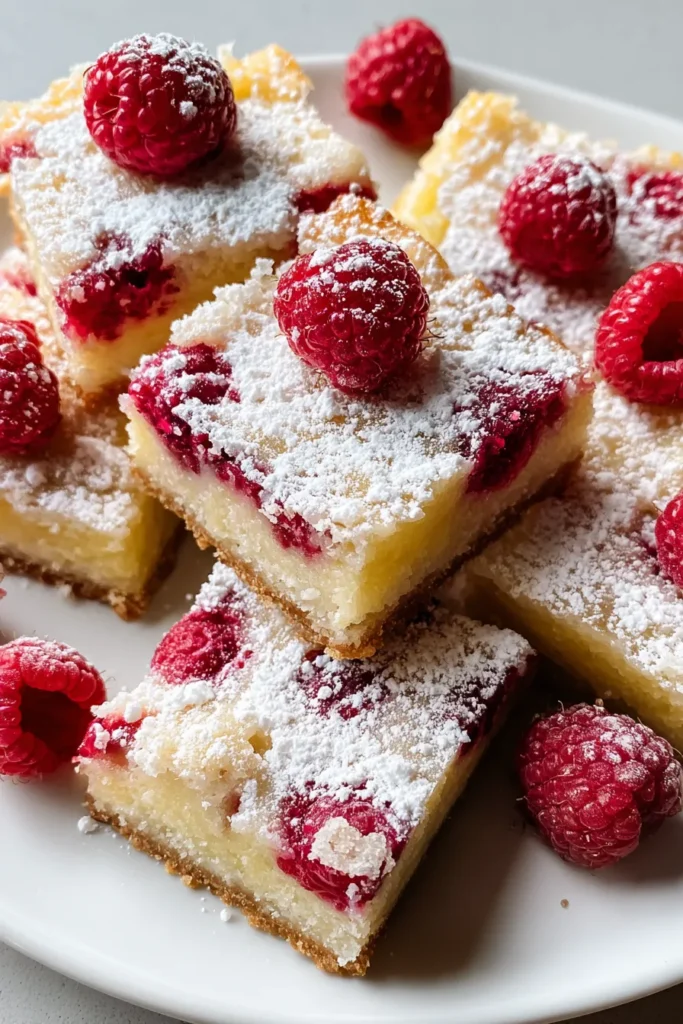

Tangy Raspberry Lemon Bars
Description
These tangy raspberry lemon bars combine a buttery crust with a zesty lemon filling and sweet raspberries, creating a refreshing dessert that’s simply irresistible.
Ingredients
Instructions
-
Preheat your oven to 350°F (175°C). Line a 9x13-inch baking dish with parchment paper, leaving some overhang for easy removal.
-
To prepare the crust, combine the melted butter, 1/2 cup sugar, vanilla extract, and salt in a medium-sized bowl. Stir in 2 cups of flour until the mixture forms a soft dough.
-
Press the dough evenly into the bottom of the prepared baking dish. Prick the surface with a fork to prevent bubbling.
-
Bake the crust in the preheated oven for 18-20 minutes, or until lightly golden brown. Remove and set aside to cool slightly.
-
In a separate bowl, gently toss together the raspberries, 1/4 cup sugar, and cornstarch. Set aside.
-
In another mixing bowl, whisk together the eggs, 1 1/2 cups sugar, 2 tablespoons flour, lemon juice, and lemon zest until smooth.
-
Pour the egg mixture over the slightly cooled crust, then evenly distribute the raspberry mixture over the top.
-
Return the baking dish to the oven and bake for 22-25 minutes, or until the filling is set and slightly golden around the edges.
-
Allow the bars to cool completely at room temperature, and then refrigerate for at least 1 hour to set firmly.
-
Once chilled, lift the bars from the baking dish using the parchment overhang. Slice into squares and dust with powdered sugar before serving.
Note
- Fresh raspberries work best, but you could substitute with frozen ones. Make sure to thaw and drain them first.
- For an extra tangy flavor, consider adding a teaspoon of lemon extract to the filling.
- These bars can be stored in the refrigerator for up to 5 days but are often best enjoyed within the first couple of days.
- If you prefer a less sweet treat, reduce the sugar in the filling by 1/4 cup.

