

Strawberry Earthquake Cake brings together a moist vanilla crumb, a delightful cream cheese and jam filling, and bursts of fresh strawberry for a treat that’s as fun to make as it is to eat. With velvety whipped cream crowning each slice and juicy berries for a pop of color, you’ll find every bite is a party for your taste buds. Dive in and discover why this berry-packed dessert deserves a spot at your next gathering!
Key Ingredients
Let’s take a look at the building blocks for our Strawberry Earthquake Cake—simple pantry staples and fresh berries come together to create layers of flavor and texture.
- 2 cups all purpose flour: Provides the cake’s light, tender crumb and structure.
- 1 1/2 cups granulated sugar: Sweetens the cake and helps it brown beautifully.
- 1 tablespoon baking powder: Leavens the batter for a fluffy rise.
- 1/2 teaspoon salt: Balances sweetness and enhances all the flavors.
- 1/2 cup unsalted butter softened: Adds rich moisture and a silky texture.
- 3/4 cup milk: Keeps the cake tender and adds necessary moisture.
- 3 large eggs: Bind ingredients and contribute to a light, airy crumb.
- 2 teaspoons vanilla extract: Infuses warm, sweet aroma into the cake.
- 1 pint fresh strawberries chopped: Bursts of fruity freshness throughout the filling.
- 8 ounces cream cheese softened: Creates a tangy, creamy layer that seeps into the cake.
- 1/2 cup powdered sugar: Sweetens and smooths the cream cheese mixture.
- 1/2 cup strawberry jam: Provides rich, intense strawberry flavor for drizzling.
- 1 cup heavy whipping cream: Whips into a cloud-like topping.
- 2 tablespoons powdered sugar: Sweetens the whipped cream without weight.
- 1 teaspoon vanilla extract: Enhances the whipped cream with subtle warmth.
- 1/2 cup sliced strawberries for garnish: Adds a fresh, decorative finish on top.
How To Make Strawberry Earthquake Cake
Let’s roll up our sleeves and create those signature “earthquake” craters that let our cream cheese and jam fillings sink in perfectly. Follow each step for a flawless build of cake, filling, chilling, and topping—your patience will be rewarded with a spectacular berry cascade!
1. Preheat oven to 350 degrees F and grease a 9×13 inch baking pan.
Ensure every corner and edge is coated with butter or nonstick spray so the cake releases cleanly.
2. In a large bowl whisk together the flour, granulated sugar, baking powder, and salt.
This dry mix will give even leavening and sweetness throughout your batter.
3. In a separate bowl beat the softened butter, milk, eggs, and vanilla extract until smooth.
Cream these until the mixture is silky and pale, ensuring good aeration.
4. Stir the wet ingredients into the dry ingredients until just combined.
Mix gently to avoid overworking the gluten—you want a tender cake.
5. Pour the batter into the prepared pan and bake for 25 to 30 minutes, or until a toothpick inserted in the center comes out clean.
Check at 25 minutes to prevent over-baking and maintain moisture.
6. While the cake bakes, beat the cream cheese and 1/2 cup powdered sugar until smooth.
Keep the mixture lump-free for easy spreading.
7. Warm the strawberry jam in a small saucepan until pourable, then stir in the chopped strawberries.
Heat gently so the jam loosens without burning.
8. Remove the hot cake from the oven and use the handle of a wooden spoon to poke holes evenly across the surface.
Press down until you feel the pan’s resistance, spacing holes about 1–2 inches apart.
9. Spread the cream cheese mixture over the warm cake, pushing it into the holes.
This ensures creamy pockets within every bite.
10. Drizzle the strawberry jam and chopped strawberry mixture evenly over the cake.
Let it cascade into those holes for maximum flavor infusion.
11. Refrigerate the cake for at least 2 hours to allow the flavors to meld.
Chilling firms up the filling and makes slicing much neater.
12. In a cold bowl whip the heavy whipping cream with 2 tablespoons powdered sugar and 1 teaspoon vanilla extract until soft peaks form.
Beat just until the cream holds shape but is still fluffy.
13. Spread the whipped cream over the chilled cake and top with the sliced strawberries.
Arrange berries for a pretty finish that hints at the layers below.
Serving Suggestions
After all that delicious chilling, it’s time to serve your Strawberry Earthquake Cake in style. Here are four ideas to make each slice shine:
- Chilled Slices on a Dessert Plate: Use a warmed knife for clean cuts, then serve each piece on a white plate to highlight the vibrant reds.
- With a Drizzle of Extra Jam: Warm a spoonful of strawberry jam and swirl it around the plate for an artistic touch.
- Garnished with Fresh Mint: Tuck a mint sprig beside each slice to add a refreshing aroma and pretty green contrast.
- Paired with Sparkling Rosé or Lemonade: The effervescence of rosé or tart lemonade complements the cake’s sweetness and creamy textures.
Tips For Perfect Strawberry Earthquake Cake
Nailing this dessert is all about technique and timing, so here are a few friendly pointers to help your cake come out spectacular every time.
- Use the handle of a wooden spoon or a skewer to create deep holes for maximum filling absorption.
- For best texture, use fresh strawberries, or thaw and drain frozen berries to avoid excess moisture.
- Extend the chilling time overnight for a more pronounced flavor infusion.
- To achieve clean slices, wipe a sharp knife under hot water and dry it between cuts.
How To Store It
Proper storage will keep your Strawberry Earthquake Cake tasting just as fresh as the day you made it. Follow these methods to preserve its flavor and texture:
- Refrigerate Covered: Wrap the entire pan with plastic wrap or place cake slices in an airtight container to prevent drying.
- Individual Portions: Store single slices wrapped in parchment and then foil to avoid squishing the whipped cream.
- Short-Term Freezing: Freeze unfrosted cake base for up to one month; thaw overnight in the fridge before filling.
- Serve Chilled: Always return leftovers to the fridge and enjoy cold, as the chilled cream cheese and whipped topping taste best when cold.
Frequently Asked Questions
Here are quick answers to the questions we hear most often about this berry-packed delight:
- Q: How long does it take to prepare and finish the Strawberry Earthquake Cake?
The total time is about 3½ to 4 hours, including prep, baking, chilling, and final topping.
- Q: Can I use frozen strawberries instead of fresh ones?
Thoroughly thaw, drain, and pat them dry before using to avoid excess moisture.
- Q: Why is it important to refrigerate the cake for at least two hours?
Chilling lets the cream cheese and jam sink into the cake and helps the whipped cream set.
- Q: What’s the best way to create the holes in the cake for maximum filling absorption?
Press a wooden spoon handle or skewer firmly into the warm cake in a grid pattern until you feel the pan.
- Q: How do I get clean, attractive slices when serving?
Dip a sharp knife in hot water, wipe it dry, then slice, repeating between cuts.
- Q: How should I store leftovers and how long will they keep?
Cover tightly and refrigerate; consume within 3–4 days for the best taste and texture.
- Q: Can I prepare any components the day before to save time?
Yes—bake the cake, poke holes, and mix fillings ahead, then assemble just before serving.
What Makes This Special
Strawberry Earthquake Cake is a joyful mash-up of textures and tastes—light vanilla cake, tangy cream cheese, fruit-filled jam, and whipped cream all in one slice. Its playful “earthquake” method creates flavor explosions with every mouthful, making it perfect for spring gatherings, potlucks, or a simple weekend treat. Don’t forget to print this recipe and save it for later—you’ll want to whip it up again and again. Drop a comment or question below if you give it a try or need a hand shaking up your own baking adventure!
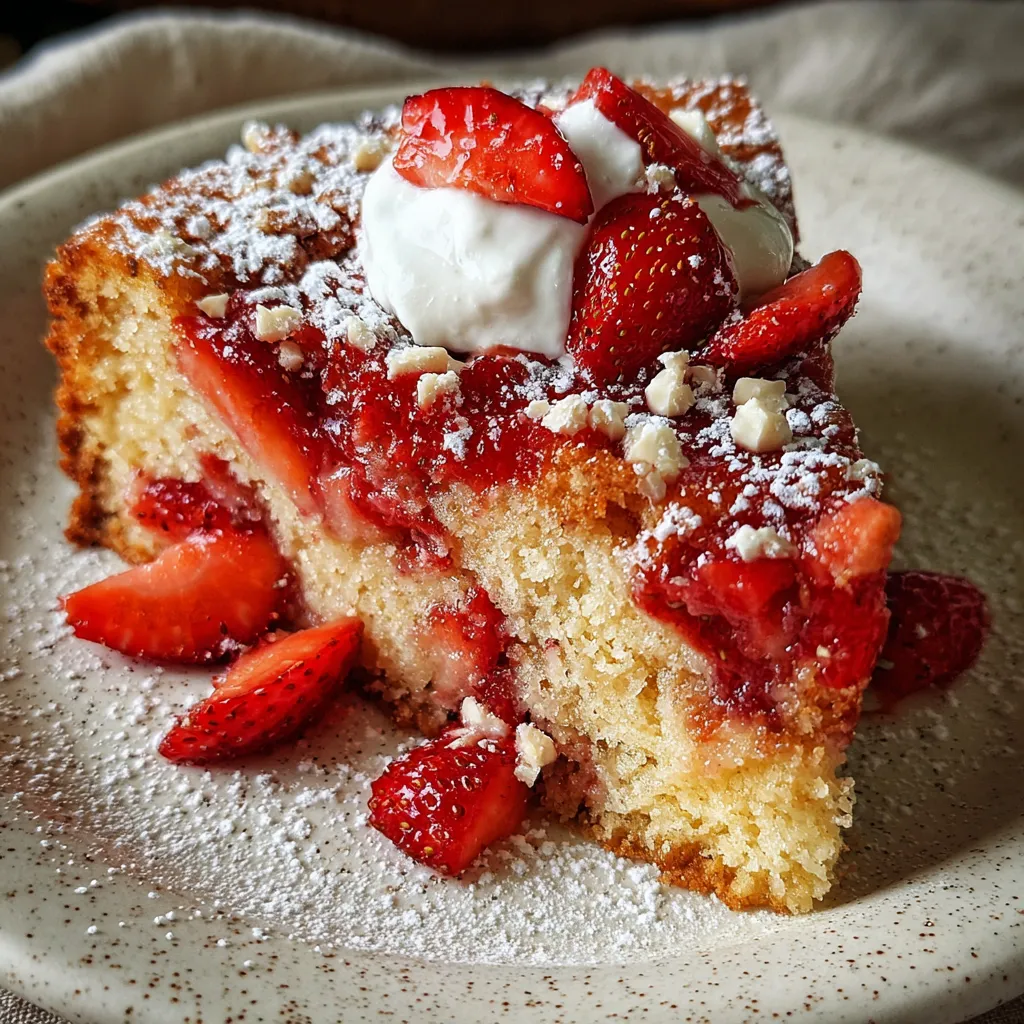

Strawberry Earthquake Cake
Description
Every slice oozes sweet strawberry jam and velvety cream cheese, nesting in a light vanilla crumb. A cloud of whipped cream and fresh berries adds a cool, juicy finish that melts in your mouth.
Ingredients
Instructions
-
Preheat oven to 350 degrees F and grease a 9x13 inch baking pan.
-
In a large bowl whisk together the flour, granulated sugar, baking powder, and salt.
-
In a separate bowl beat the softened butter, milk, eggs, and vanilla extract until smooth.
-
Stir the wet ingredients into the dry ingredients until just combined.
-
Pour the batter into the prepared pan and bake for 25 to 30 minutes, or until a toothpick inserted in the center comes out clean.
-
While the cake bakes, beat the cream cheese and 1/2 cup powdered sugar until smooth.
-
Warm the strawberry jam in a small saucepan until pourable, then stir in the chopped strawberries.
-
Remove the hot cake from the oven and use the handle of a wooden spoon to poke holes evenly across the surface.
-
Spread the cream cheese mixture over the warm cake, pushing it into the holes.
-
Drizzle the strawberry jam and chopped strawberry mixture evenly over the cake.
-
Refrigerate the cake for at least 2 hours to allow the flavors to meld.
-
In a cold bowl whip the heavy whipping cream with 2 tablespoons powdered sugar and 1 teaspoon vanilla extract until soft peaks form.
-
Spread the whipped cream over the chilled cake and top with the sliced strawberries.
Note
- Use the handle of a wooden spoon or a skewer to create deep holes for maximum filling absorption.
- For best texture, use fresh strawberries, or thaw and drain frozen berries to avoid excess moisture.
- Extend the chilling time overnight for a more pronounced flavor infusion.
- To achieve clean slices, wipe a sharp knife under hot water and dry it between cuts.

