

Strawberry Crunch Cheesecake Tacos are a playful twist on dessert, where crispy tortilla shells cradle a velvety cheesecake filling, dusted with a bright strawberry crunch and dotted with fresh berry slices. Golden, sugar-kissed tortillas are filled with airy, whipped cream cheese perfection, then crowned with freeze-dried strawberry bites and crunchy cornflakes that burst with juicy sweetness. Whether you’re chasing the perfect snack or an easy party treat, this recipe will delight every sweet tooth.
Key Ingredients
Before you get started, let’s gather the essentials that give these tacos their sweet crunch and creamy center.
- 6 piece flour tortilla: Provides the crisp, golden taco shell that holds the creamy filling.
- 2 tablespoon unsalted butter, melted: Helps the tortillas crisp up and gives a rich, buttery taste.
- 2 tablespoon granulated sugar: Sweetens and caramelizes on the tortillas for a crunchy sweet shell.
- 8 ounce cream cheese, softened: Forms the silky base of the cheesecake filling.
- 1/2 cup powdered sugar: Lightly sweetens the cream cheese without adding grainy texture.
- 1 teaspoon vanilla extract: Adds warm, aromatic flavor to the cheesecake mixture.
- 1/2 cup heavy whipping cream: Whipped to stiff peaks for an airy, mousse-like filling.
- 1/2 cup freeze-dried strawberries, crushed: Delivers intense strawberry flavor and a dry crunch.
- 1/2 cup cornflakes, crushed: Contributes a light, crispy texture to the topping.
- 1 cup fresh strawberries, sliced: Provides juicy, bright garnish and a fresh flavor contrast.
How To Make Strawberry Crunch Cheesecake Tacos
Turning simple ingredients into a showstopping dessert taco combines a bit of baking, some whipping, and playful assembly. You’ll bake flour tortillas into crisp shells, whip up a smooth, cloud-like cheesecake filling, and top everything with a strawberry-cornflake crunch for texture. Follow these steps carefully to perfect your baking, whipping, and folding skills, and get ready to assemble a dessert that looks as amazing as it tastes.
1. Preheat the oven to 350°F and arrange the flour tortillas on a clean baking sheet in a single layer. This ensures even heat distribution for golden shells.
2. Using a pastry brush, coat both sides of each tortilla with melted butter, then sprinkle granulated sugar evenly to guarantee a sweet, crunchy surface after baking.
3. Bake for 6 to 8 minutes, flipping the tortillas halfway through until they’re lightly golden and crisp. Immediately drape each one over a rolling pin or taco mold to shape the taco shells before they cool completely.
4. In a medium bowl, beat the softened cream cheese, powdered sugar, and vanilla extract with an electric mixer until the mixture is completely smooth and creamy, scraping the sides of the bowl as needed.
5. In a separate chilled bowl, whip the heavy whipping cream to stiff peaks, which means the whipped cream should stand straight up when you lift the beaters.
6. Gently fold the whipped cream into the cream cheese mixture using a spatula, preserving the airy texture without deflating the filling.
7. Transfer the cheesecake mixture to a piping bag or use a spoon to fill each cooled taco shell generously, ensuring an even layer of sweet filling.
8. In a small bowl, combine the crushed freeze-dried strawberries and crushed cornflakes to create the signature strawberry crunch topping.
9. Sprinkle the strawberry-cornflake mixture evenly over the filled tacos, then top with fresh strawberry slices and serve immediately for maximum crunch and flavor.
Serving Suggestions
These Strawberry Crunch Cheesecake Tacos make for a vibrant dessert centerpiece, perfect for sharing with friends or enjoying solo. The contrast between the crispy sugar-kissed shells and the silky filling pairs beautifully with fresh berries or drizzles. Whether you’re hosting a summer brunch, a backyard barbecue, or a cozy movie night, these tacos are sure to impress. Let your creativity run wild as you mix and match toppings or presentation styles to suit any occasion.
- Chilled Serving: Place the assembled tacos in the fridge for 10 minutes before serving to let the cheesecake filling set and intensify its creamy texture.
- Extra Berry Garnish: Serve alongside a bowl of fresh strawberry slices or mixed berries to add a tangy contrast and elevate the color palette.
- Chocolate Drizzle: Warm some dark or milk chocolate, drizzle over the filled tacos, and let it set for a chocolate twist that complements the strawberry crunch.
- Party Platter Display: Arrange the tacos in a decorative tray, garnishing with mint leaves and edible flowers for a festive presentation at gatherings.
Tips For Perfect Strawberry Crunch Cheesecake Tacos
Nailing the perfect Strawberry Crunch Cheesecake Tacos is all about timing and a few clever tweaks. From crisp shells to creamy filling, each component shines when handled just right. Make sure to follow the baking time precisely so the tortillas transform into sturdy taco vessels. When whipping your cream, aim for firm peaks without overbeating, and gently fold to keep that light, airy texture. With a few friendly pointers below, you’ll take these tacos from delicious to downright unforgettable every single time.
- The taco shells are best eaten the same day to retain maximum crispness.
- For a chocolate twist, drizzle melted chocolate over the filling before adding the crunch.
- The cheesecake filling can be prepared ahead and refrigerated for up to 24 hours.
- Swap cornflakes for crushed graham crackers for a different texture.
How To Store It
Keeping your Strawberry Crunch Cheesecake Tacos fresh is simple when you store each component correctly. Unassembled shells, cheesecake filling, and crunch topping all have their own sweet spots to maintain texture and flavor. With a few easy steps, you’ll avoid soggy shells, stale toppings, or watery filling, so every taco is as crisp and luscious as the first bite. Use the suggestions below to extend their life and keep that strawberry crunch popping in every mouthful.
- Tortilla Shells: Store unfilled baked shells at room temperature in an airtight container for up to one day to preserve crispness. Avoid any moisture.
- Cheesecake Filling: Transfer the filling to an airtight container and refrigerate for up to 24 hours. Let it come to working temperature before folding in whipped cream.
- Crunch Topping: Keep the freeze-dried strawberry and cornflake mix in a sealed jar at room temperature up to two days to maintain its crunch.
- Assembled Tacos: If you must assemble in advance, refrigerate for no longer than two hours and serve promptly, as the shells will soften over time.
Frequently Asked Questions
Got questions? Here are answers to the most common queries about making and storing these dessert tacos so you can whip them up with confidence and serve perfect batches every time.
- How can I prevent the tortilla shells from becoming soggy?
Make sure to brush both sides of each tortilla evenly with melted butter and sugar before baking. Bake at 350°F for 6 to 8 minutes, flipping once halfway through, until they’re lightly golden and crisp. Cool them draped over a rolling pin or taco mold, and fill them just before serving. Any leftover assembled tacos will soften quickly, so it’s best to fill and serve immediately for maximum crunch.
- Can I prepare any components in advance?
Yes. You can mix the cheesecake filling up to 24 hours ahead. Store it in an airtight container in the refrigerator. When you’re ready to serve, whip the heavy cream to stiff peaks, fold it into the chilled filling, and then pipe or spoon it into freshly baked shells. The strawberry-cornflake crunch topping can also be combined a few hours ahead and kept in a sealed container at room temperature.
- What can I use if I don’t have freeze-dried strawberries?
If you can’t find freeze-dried strawberries, substitute with finely chopped dehydrated strawberries or even finely chopped fresh strawberries tossed with a teaspoon of sugar to remove excess moisture. Stir in immediately before serving so the topping stays crisp. Alternatively, crushed toasted nuts or graham cracker crumbs mixed with a pinch of cinnamon make a tasty crunch element.
- How should I store any leftover filling or shells?
Unfilled baked shells should be stored at room temperature in an airtight container for up to one day to retain crispness. The cream cheese filling can be stored separately in the refrigerator for up to 24 hours. Do not assemble the tacos ahead of time, as the moisture from the filling will soften the shells. Reheat shells lightly in a 350°F oven for a few minutes if they lose crispness.
- Can I swap out the cornflakes for another cereal or base?
Absolutely. Cornflakes lend a light, airy crunch, but you can replace them with crushed graham crackers for a sweeter, more biscuit-like texture. If you prefer a nutty element, finely chopped toasted almonds or pecans work well. Just ensure whatever substitute you choose is crushed to a consistent size so it coats the filling evenly.
- How do I know when the whipped cream has reached stiff peaks?
Whip the heavy cream in a chilled bowl with cold beaters at medium-high speed. You’ll see soft peaks form first—when the cream droops off the beaters. Continue whipping until the peaks stand straight up when you lift the beaters without curling over. Be careful not to overbeat, or the cream will become grainy and start turning into butter.
- Is there a way to make these tacos gluten-free?
Yes. Swap the flour tortillas for gluten-free tortillas or gluten-free taco shells of a similar shape. Follow the same brushing, sugaring, and baking steps to crisp them. Ensure any substitute cereal or crackers used in the topping are certified gluten-free. The rest of the ingredients—cream cheese, sugar, cream, and strawberries—are naturally gluten-free.
What Makes This Special
There’s something undeniably fun about Strawberry Crunch Cheesecake Tacos that makes sweet teeth grin from ear to ear. The sugary taco shell meets whipped cheesecake filling in a mashup of textures you never knew you needed—until now! A dusting of freeze-dried strawberry and cornflake crunch adds zing, while fresh berry slices keep it light and bright. Whether you’re aiming to wow at potlucks or just craving a whimsical weekend treat, these dessert tacos deliver on taste and novelty. Feel free to print this page and stash it in your recipe box—you’ll want to revisit these treats soon. Drop a comment below with your tweaks or questions; I can’t wait to hear how you customize them!
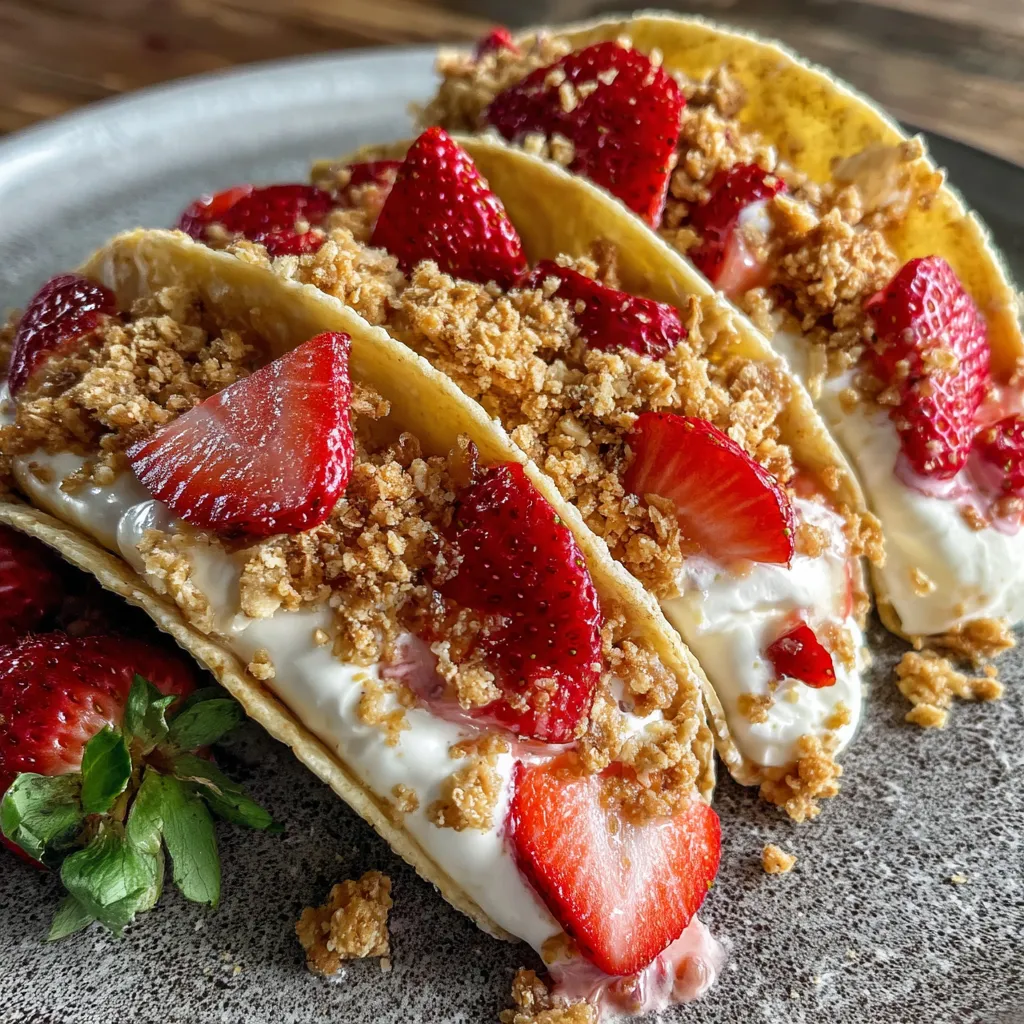

Strawberry Crunch Cheesecake Tacos
Description
Golden, sugar-kissed tortilla shells are filled with silky cream cheese whipped to airy perfection, then crowned with crunchy strawberry bits and fresh slices that burst with juicy sweetness.
Ingredients
Instructions
-
Preheat the oven to 350°F and place the tortillas on a baking sheet.
-
Brush both sides of each tortilla with melted butter and sprinkle sugar evenly over them.
-
Bake for 6 to 8 minutes until lightly golden, flipping once halfway through, then drape over a rolling pin or taco mold to cool into a shell shape.
-
In a medium bowl, beat the softened cream cheese, powdered sugar, and vanilla extract until smooth and creamy.
-
In a separate bowl, whip the heavy cream to stiff peaks and gently fold it into the cream cheese mixture.
-
Spoon or pipe the cheesecake filling into each cooled taco shell.
-
In a small bowl, mix the crushed freeze-dried strawberries and crushed cornflakes for the crunch topping.
-
Sprinkle the strawberry crunch mixture over the filled tacos.
-
Top with fresh strawberry slices and serve immediately.
Note
- The taco shells are best eaten the same day to retain maximum crispness.
- For a chocolate twist, drizzle melted chocolate over the filling before adding the crunch.
- The cheesecake filling can be prepared ahead and refrigerated for up to 24 hours.
- Swap cornflakes for crushed graham crackers for a different texture.

