

Spooky Halloween Marble Cake is the epitome of festive fun for your fall celebrations! This devilishly delightful dessert combines the classic flavors of moist vanilla and rich chocolate with vibrant swirls of orange and black, evoking the playful spookiness of Halloween night. Each slice reveals a mesmerizing pattern that looks like something out of a haunted bakery, yet it’s surprisingly simple to pull off, even for a baking novice. Recruiting a few eager helpers—whether little ghouls, goblins, or grown-up pals—turns the baking process into a festive ritual. You’ll rush through preheating the oven, measuring ingredients, and mixing batters, all the while giggling at the sight of your kitchen turning into a Halloween color laboratory. When the timer dings, you’ll be rewarded with a gorgeously marbled cake, boasting a tender crumb and a light mouthfeel, accentuated by the sweet undertones of vanilla that perfectly complement the earthy depth of cocoa. Whether you serve it at a spooky soiree, a family movie marathon, or simply as an indulgent treat for yourself, this cake is bound to become a seasonal superstar that tantalizes the taste buds and paints smiles across every dessert lover’s face. In between swirling the batters, you can sneak in a few candy eyeballs or sprinkle edible glitter to amplify the haunts. The clean lines of black and orange contrasted with creamy vanilla cream will make your dessert table look straight out of a Halloween magazine spread. Even the simplest dusting of powdered sugar can turn each slice into a ghostly spectacle, ready to vanish before anyone notices a stitch of guilt. Plus, this cake bakes up evenly in just over half an hour, so you won’t spend your entire day chained to the stove. And after it’s cooled, the scent of sweet butter, vanilla, and cocoa wafts through your home, hinting at the festive delight that awaits each forkful. Trust me, Spooky Halloween Marble Cake is the kind of recipe you’ll bookmark each year, ready to bring a colorful burst of fun to every autumn gathering!
Embracing the simplicity of a beginner-friendly recipe, this cake proves that you don’t need professional pastry skills to create something truly show-stopping. The combination of airy butter and sugar whipped until light and fluffy ensures the cake’s texture melts on the tongue, while the swirls of chocolate and vanilla create contrasting pockets of flavor that keep every bite exciting. As you slice into the marbled pattern, each forkful offers a luxurious balance of sweetness and a gentle cocoa bite, clocking in at about 340 calories per slice. You can customize the spookiness by choosing your favorite frostings—perhaps a rich dark chocolate ganache drizzled over the edge or a tangy orange cream cheese frosting piped into cobweb patterns. For a no-fuss finish, scatter candy corn, edible skeleton hands, or candy eyeballs right before serving; these simple touches instantly transform it into a Halloween centerpiece that guests won’t resist photographing and devouring. Whether you’re crafting a classroom treat for kids, a potluck contribution, or a comforting dessert for a family movie marathon, this cake adapts flawlessly. With minimal prep time, straightforward steps, and pantry-friendly ingredients, Spooky Halloween Marble Cake guarantees sweet success—no tricks, all treat.
KEY INGREDIENTS IN SPOOKY HALLOWEEN MARBLE CAKE
Every unforgettable cake starts with quality ingredients that each play a unique role in delivering taste, texture, and visual appeal. For this Spooky Halloween Marble Cake, we’ve selected staples that work in harmony to produce its tender crumb, lofty rise, and striking color contrasts. From the sturdy framework of flour and leavening agents to the creamy richness of butter and eggs, here’s what you need to create this festive masterpiece:
- All-purpose flour
Provides the structural base of the cake, giving it body and a light, tender crumb when properly combined with leaveners.
- Baking powder
Acts as the leavening agent, releasing carbon dioxide during baking to help the cake rise and maintain a soft, fluffy texture.
- Salt
Enhances and balances the sweetness of the cake, sharpening the overall flavor and reinforcing the butter and chocolate notes.
- Unsalted butter
Contributes richness, moisture, and a tender crumb; be sure it’s at room temperature to blend smoothly with sugar for optimal aeration.
- Granulated sugar
Sweetens the batter and helps create a light, airy texture when creamed with butter, trapping tiny bubbles that expand when baked.
- Large eggs
Provide structure, moisture, and richness; the proteins in eggs help set the cake as it bakes, ensuring it holds its shape.
- Vanilla extract
Infuses the cake with aromatic warmth and depth, complementing both the vanilla and chocolate components.
- Whole milk
Adds moisture and fat for a tender crumb, while its liquid consistency helps dissolve dry ingredients and bind the batter.
- Orange and black gel food coloring
Delivers vibrant, concentrated hues without altering the cake’s consistency, turning a simple marble design into a spooky spectacle.
- Unsweetened cocoa powder
Intensifies the chocolate portion of the batter, creating deep black marbling when combined with black food coloring and adding rich cocoa flavor.
HOW TO MAKE SPOOKY HALLOWEEN MARBLE CAKE
Baking this cake is an adventure in color and flavor, guiding you through simple techniques that yield a show-stopping result. Whether you’re a seasoned baker or just starting out, these steps will help you achieve the perfect marbled effect and a delightfully moist cake.
1. Preheat your oven to 350°F (175°C) and grease and flour a 9×13-inch cake pan to ensure easy release after baking.
2. In a medium bowl, whisk together the flour, baking powder, and salt. Set aside to keep the leavening agents evenly distributed.
3. In a large mixing bowl, beat the butter on medium speed until creamy. Gradually add the sugar and continue beating until the mixture is light and fluffy, about 3–4 minutes.
4. Add the eggs one at a time, beating well after each addition. Stir in the vanilla extract until fully incorporated.
5. Gradually add the flour mixture to the butter mixture, alternating with the milk—start and end with the flour mixture. Mix until just combined, avoiding overmixing for a tender cake.
6. Divide the batter evenly among three bowls. Color one portion with orange gel food coloring and another with black gel food coloring. Leave the third portion uncolored.
7. To make the black batter darker, add the cocoa powder into it and mix thoroughly until the color is distributed evenly.
8. Drop spoonfuls of each batter color randomly into the prepared cake pan to create a marbled effect. Use a knife or skewer to gently swirl the batters together without overblending.
9. Bake in the preheated oven for 30–35 minutes, or until a toothpick inserted into the center of the cake comes out clean.
10. Allow the cake to cool in the pan for about 10 minutes, then turn it out onto a wire rack to cool completely before slicing.
SERVING SUGGESTIONS FOR SPOOKY HALLOWEEN MARBLE CAKE
Once your Spooky Halloween Marble Cake has cooled completely, it’s time to unleash your inner pastry artist and present it in a way that matches its hauntingly beautiful swirls. A well-thought-out presentation can elevate this cake from simply delicious to absolutely legendary. Start with a clean, white cake stand that allows the bold orange and black marbling to shine against a blank canvas. If you’re feeling extra daring, opt for a slate or dark wooden board to intensify the contrast, making those colors pop even more vividly. Before slicing, warm your knife under hot water and wipe it dry; this simple trick helps you achieve clean, precise cuts that reveal the perfect marbled pattern. The moment you place each slice on its own plate, consider sprinkling a light dusting of powdered sugar or edible glitter along the edges for a ghostly shimmer. Those delicate sparkles catch the candlelight and add an ethereal touch to any Halloween gathering. For an adult-friendly twist, pair servings with a dollop of lightly spiked whipped cream or a small spoonful of spiced caramel sauce. And if you’re hosting a party with themed beverages, line up shot glasses filled with velvet black cocoa or orange-spiced cider alongside each slice. Whether you’re hosting a haunted house party, an office potluck, or a cozy family movie night, these serving ideas ensure your cake looks as sensational as it tastes, transforming every bite into a festive experience that will linger in your guests’ memories long after the final crumb is gone.
- Clean Presentation
Use a bright white cake stand or a dark wooden board to make the orange and black marbling pop. Warm your knife before slicing for picture-perfect, clean edges.
- Powdered Sugar Shimmer
Lightly dust each slice with powdered sugar or edible glitter. The delicate shimmer catches candlelight for an eerily elegant look.
- Themed Toppings
Scatter candy corn, gummy worms, or plastic spiders around the plate edge. Tiny decorations add instant Halloween flair without overpowering the cake’s texture.
- Cozy Beverage Pairings
Serve alongside hot cocoa, spiced cider, or a creamy pumpkin latte. The warm drinks complement the cake’s chocolate and vanilla notes perfectly.
HOW TO STORE SPOOKY HALLOWEEN MARBLE CAKE
Storing Spooky Halloween Marble Cake properly is essential to preserve its moist texture and vibrant hues. Whether you’re saving extra slices for later indulgence or preparing the cake a day ahead of your celebration, these care techniques maintain that fresh-from-the-oven taste. Each environment—room temperature, chilled, or frozen—presents advantages. At room temperature, the standard airtight wrapping keeps everything soft and ready to serve right away. If you plan to enjoy the cake over several days, refrigeration slows down moisture loss but requires careful wrapping to prevent the cake from picking up any chilly fridge odors. Meanwhile, freezing portions is a lifesaver if you want to stock up and pull out individual slices at a moment’s notice. Follow these methods to make sure your cake stays as spectacular as the day you baked it:
- Room Temperature Storage
Wrap the cake tightly in plastic wrap and place it in an airtight container. Store at room temperature for up to 2–3 days, keeping it away from direct sunlight and heat sources.
- Refrigeration
Cover the cake with plastic wrap and aluminum foil to lock in moisture and prevent fridge odors. Refrigerate for up to 5 days, then bring to room temperature before serving for the best texture.
- Freezing
Slice the cake into individual portions, place them on a baking sheet to flash freeze, then wrap each slice in plastic wrap and store in a freezer-safe bag. Freeze for up to 1 month. Thaw overnight in the refrigerator.
- Separate Frosting and Garnish
If you’ve topped the cake with icing or decorative elements, store the frosting in a separate covered container and reapply just before serving to maintain crisp decorations.
CONCLUSION
With this Spooky Halloween Marble Cake recipe in your baking repertoire, you’re equipped to conjure a dessert that’s equal parts dramatic and delectable. We’ve walked through every detail—from whisking together simple pantry staples to mastering the art of vibrant marbling with orange and black gel food coloring. You now know how to structure the cake base with all-purpose flour, baking powder, and salt; how to introduce richness through butter, sugar, eggs, and milk; and how to achieve that hauntingly beautiful swirl using cocoa powder as your secret weapon for deep black hues. The detailed instructions ensure even novice bakers can confidently preheat the oven, mix the batters, alternate additions for a tender crumb, and swirl the colors for maximum visual impact. We’ve also explored creative serving touches—whether you choose a crisp white cake stand, a dusting of powdered sugar ghosts, candy toppings, or perfectly paired beverages—and expert storage tips to keep every slice fresh and scrumptious until the final crumb disappears. Feel free to print this article and save it for later; a handy FAQ section below is ready to answer any extra questions that may arise.
Bringing this cake to life in your kitchen is bound to spark smiles and compliments from friends, family, and anyone lucky enough to indulge in a slice. I’d love to hear how your spooky baking adventure unfolded: Did your orange and black swirls turn out as enchanting as you hoped? Have you discovered fun toppings or presentation tricks of your own? Drop a comment if you have questions about ingredients, techniques, or any step along the way—every baker’s insight enriches our community’s shared passion for festive treats. And if you run into any hiccups, don’t hesitate to ask for troubleshooting tips; I’m here to help you perfect every bite. Your feedback and stories bring this recipe to life, and I can’t wait to see how you put your own spin on this hauntingly delicious masterpiece!
Keywords: Halloween cake, marble cake, spooky dessert, festive baking, chocolate cake, colorful recipes
Difficulty Level: Beginner
Course Type: Dessert
Preparation Time: 30 minutes
Cooking Time: 35 minutes
Rest Time: 10 minutes
Calories: 340 per slice (based on 12 slices)
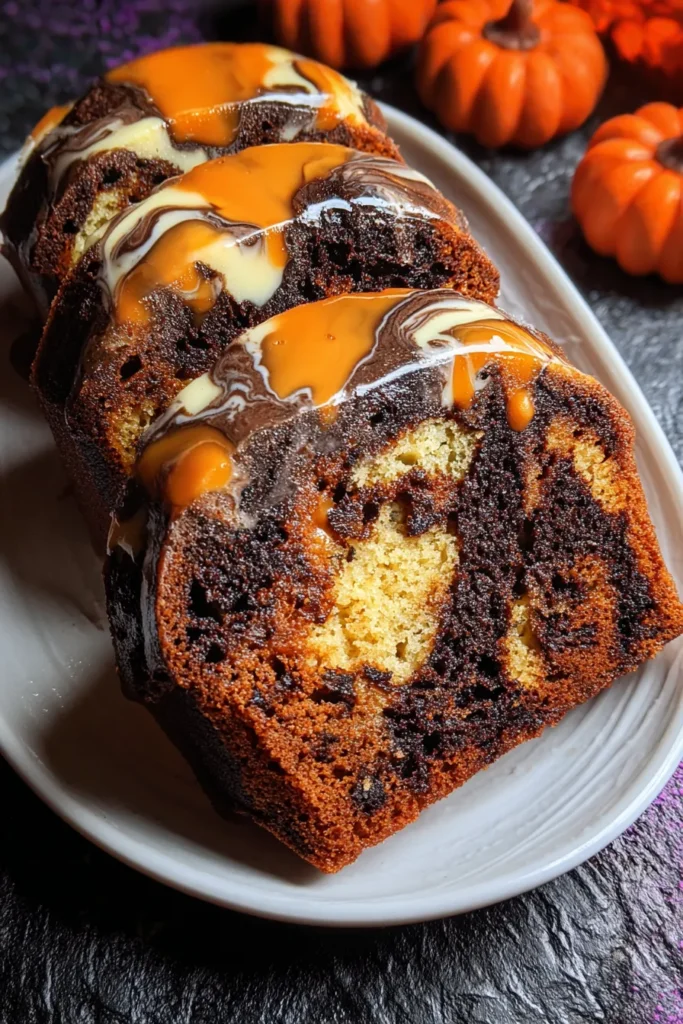

Spooky Halloween Marble Cake
Description
This vibrant marble cake blends rich chocolate and festive orange batter for a delightful flavor experience. Perfectly moist and visually striking, it's a must-have for your Halloween celebrations!
Ingredients
Instructions
-
Preheat your oven to 350°F (175°C). Grease and flour a 9x13-inch cake pan.
-
In a medium bowl, whisk together the flour, baking powder, and salt. Set aside.
-
In a large mixing bowl, beat the butter on medium speed until creamy. Gradually add the sugar and continue to beat until light and fluffy, for about 3-4 minutes.
-
Add the eggs one at a time, beating well after each addition. Stir in the vanilla extract.
-
Gradually add the flour mixture to the butter mixture, alternating with the milk, starting and ending with the flour mixture. Mix until just combined.
-
Divide the batter evenly among three bowls. Color one portion with orange gel food coloring and another with black gel food coloring. Leave the third portion uncolored.
-
To make the black batter darker, you can add the cocoa powder into it. Mix thoroughly until the color is distributed evenly.
-
Drop spoonfuls of each batter color randomly into the prepared cake pan to create a marbled effect. Use a knife or skewer to gently swirl the batters together.
-
Bake in the preheated oven for 30-35 minutes, or until a toothpick inserted into the center of the cake comes out clean.
-
Allow the cake to cool in the pan for about 10 minutes, then turn it out onto a wire rack to cool completely.
Note
- Use gel food coloring for more vibrant colors without altering the batter consistency.
- The cake can be frosted with a spooky-themed or your favorite frosting for a more festive touch.
- Feel free to add Halloween decorations on top like candy corn or edible eyeballs.
- Perfect for a Halloween party, this cake adds a pop of color and fun to your dessert table.

