

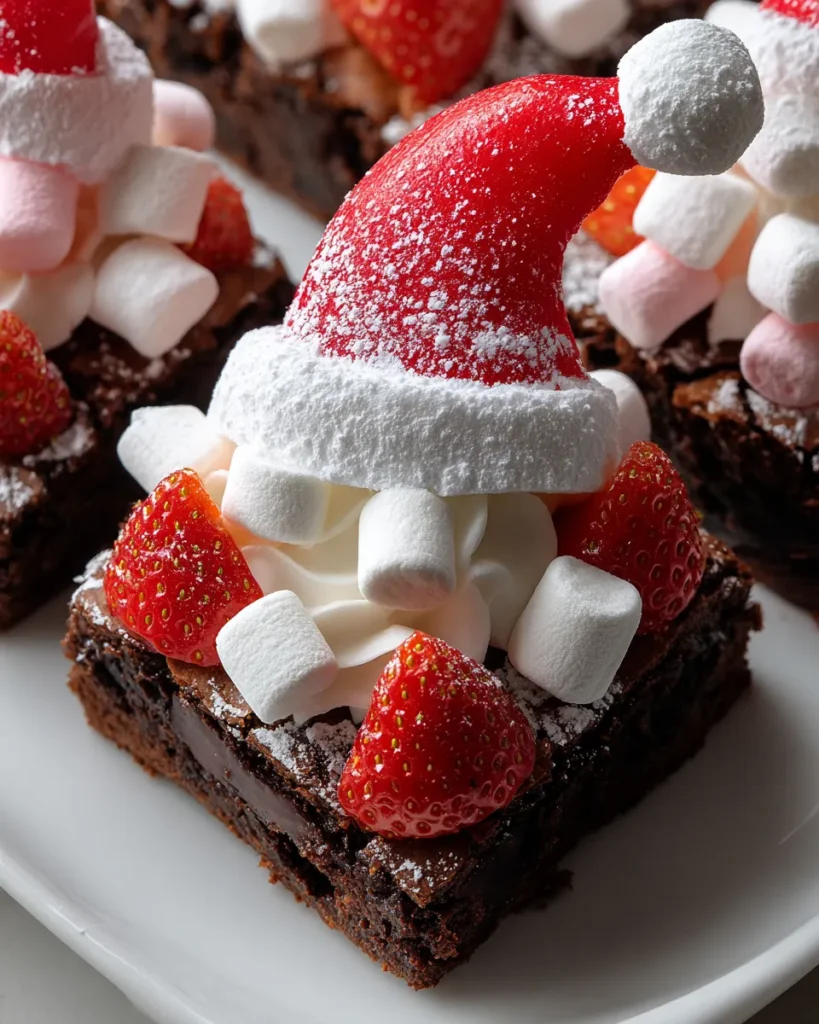
Making holiday treats that look as good as they taste is one of my absolute favorite things about the Christmas season. These Santa Hat Christmas Brownies are the perfect solution when you want something festive without spending hours in the kitchen. By turning simple chocolate squares into adorable hats using fresh strawberries and a sweet vanilla glaze, you get a dessert that screams holiday cheer. I honestly can’t wait for you to whip these up; they are guaranteed to bring a smile to everyone’s face and disappear from the dessert table in seconds!
Key Ingredients
Gathering your supplies is the first step to holiday baking success, and the beauty of this recipe lies in its simplicity. You likely have most of the pantry staples ready to go, meaning your main task is grabbing the fresh fruit to create that iconic Santa look. Here is everything you need to get started:
- 1 box of brownie mix (plus ingredients required on the package, usually oil, eggs, and water): This serves as the sturdy and chewy chocolate base for your hats.
- 1 cup of powdered sugar: The primary ingredient for your smooth glaze that provides sweetness and structure.
- 2-3 tablespoons milk: Used to thin the sugar into a spreadable frosting consistency.
- 1 teaspoon vanilla extract: Adds a classic aromatic flavor to the white frosting layer.
- Red food coloring (optional for more vibrancy): A few drops can be added to the frosting if you want a pinkish hue, though white creates a classic trim look.
- Strawberries (fresh, medium-sized, with green tops intact): These provide the bright red shape of the hat and a refreshing fruity crunch.
- Mini marshmallows (or larger ones cut in half for the pom-pom): The essential finishing touch that acts as the fluffy ball on the tip of the hat.
- Piping bag or a zip-lock bag with the corner cut off for frosting: A helpful tool to apply the frosting neatly, though a knife works too.
How To Make Santa Hat Christmas Brownies
Creating these festive bites is a straightforward process that combines baking with a little bit of arts and crafts. The process is divided into two main parts: baking the fudgy base and then assembling the adorable strawberry hats on top. It is important to have a little patience while the brownies cool, as this ensures your frosting stays put and your hats don't slide off. Once you get into the rhythm of decorating, you will have an entire army of Santa hats ready in no time.
1. Preheat your oven to the temperature indicated on the brownie mix box and prepare your baking pan according to package instructions, which usually involves greasing it or lining it with parchment paper for easy removal.
2. In a large mixing bowl, combine the brownie mix with the required ingredients such as oil, eggs, and water. Mix everything according to the package instructions until well combined, ensuring no lumps remain in the batter.
3. Pour the smooth brownie batter into the prepared baking pan, using a spatula to spread it evenly into the corners.
4. Bake the brownies in the preheated oven for the time recommended on the box, usually around 20-30 minutes. You can perform a toothpick test for doneness by inserting a toothpick into the center; it should come out clean or with a few moist crumbs attached.
5. Once baked, remove the brownies from the oven and let them cool completely in the pan on a wire rack to ensure they set properly.
6. While the brownies are cooling, prepare the frosting. In a medium bowl, combine the powdered sugar, milk, vanilla extract, and a few drops of red food coloring (if using). Mix until smooth and the desired consistency is achieved; it should be thick but spreadable.
7. Once the brownies are cool, cut them into squares or rectangles, approximately 2×2 inches in size.
8. For each brownie, use a knife or spatula to spread a thin layer of the frosting on top, which will act as the glue for your strawberry and marshmallow.
9. Top each frosted brownie with a strawberry, placing it pointy side up, to form the main body of the "hat."
10. Place a mini marshmallow or the cut half of a larger marshmallow at the base of the strawberry, right on top of the frosting, to resemble the fluffy pom-pom of a Santa hat.
11. Repeat the process for each brownie square until all of them are decorated.
12. Serve immediately or store in an airtight container in the refrigerator until you are ready to enjoy these festive treats.
Serving Suggestions
Presenting these adorable treats is almost as fun as eating them. Because they are so visually striking, they make a fantastic centerpiece for any holiday gathering. I love arranging them on a large platter to create a "sea" of red hats, which always draws people in. Here are a few ways to elevate your serving game:
- Create a snowy landscape: Dust the serving platter with extra powdered sugar before placing the brownies down to mimic fresh snow around Santa's hats.
- Pair with hot cocoa: Serve these brownies alongside mugs of rich hot chocolate topped with whipped cream for the ultimate cozy winter dessert experience.
- Add fresh mint leaves: Tuck small sprigs of fresh mint around the base of the strawberries to look like holly leaves, adding a pop of green color.
- Serve with ice cream: For a plated dessert, place one Santa Hat Brownie in a bowl with a scoop of vanilla bean ice cream to balance the rich chocolate flavors.
Tips For Perfect Santa Hat Christmas Brownies
I want your holiday baking experience to be as stress-free and successful as possible. Over time, I have found that a few small adjustments can make a big difference in the final result. Whether you are a baking novice or a pro, keeping these little nuggets of wisdom in mind will help you create the cutest and tastiest treats on the block. Here are some specific tips derived from my recipe notes to help you out:
- This recipe can be easily modified using your favorite homemade brownie recipe instead of a box mix if you prefer a scratch-made taste.
- To add variety, consider using different fruits like raspberries or cherries, or even different candy toppings for a unique twist on the classic look.
- These brownies are a fun and festive way to enjoy holiday treats with family and friends, so don't worry too much about perfection!
- You can also use chocolate frosting instead of white for a different look that doubles down on the rich cocoa flavor.
- Have the kids help with the decorating for a fun holiday activity, as placing the strawberries and marshmallows is safe and exciting for little hands.
How To Store It
Because these treats involve fresh fruit and dairy-based frosting, storing them correctly is crucial to keeping them delicious. You want to avoid the strawberries making the brownie base soggy while keeping the frosting intact. Generally, these are best enjoyed fresh, but if you need to keep them for a bit, here is how to do it right:
- Refrigerate in an airtight container: Place the decorated brownies in a sealed container and keep them in the fridge to maintain the freshness of the strawberries.
- Use a single layer: Do not stack the brownies on top of each other, as the weight will crush the strawberries and ruin the hat shape.
- Assemble just before serving: For the best texture, store the brownies and frosting separately, then assemble the fresh fruit hats right before guests arrive.
- Consume within 2 days: Fresh strawberries release moisture quickly, so plan to eat these treats within 48 hours for the best quality.
Frequently Asked Questions
It is totally normal to have a few questions before you start baking, especially when you are trying a new festive recipe. I have gathered the most common questions I get about these brownies to help you troubleshoot in advance.
- Q: Can I use a homemade brownie recipe instead of the box mix listed?
A: Yes, the recipe notes state that this can be easily modified using your favorite homemade brownie recipe instead of a box mix. You would simply bake your homemade version, allow it to cool, and then follow the specific decorating instructions provided.
- Q: How do I know when the brownies are fully baked?
A: You should follow the time recommended on your specific box mix, which is usually around 20-30 minutes. To confirm they are done, perform a toothpick test by inserting a toothpick into the center of the brownies; it should come out clean or with a few moist crumbs attached.
- Q: What ingredients are required to make the frosting for this recipe?
A: The frosting is made by combining 1 cup of powdered sugar, 2-3 tablespoons of milk, and 1 teaspoon of vanilla extract. You may also add red food coloring if you desire more vibrancy, or substitute the mixture with chocolate frosting as mentioned in the notes.
- Q: Why must the brownies be cooled completely before decorating?
A: Step 5 specifies letting the brownies cool completely on a wire rack. This is crucial because applying the frosting to warm brownies would cause the mixture to melt or become runny, failing to act as the ''glue'' needed to hold the strawberry and marshmallow in place.
- Q: How should the decorated brownies be stored?
A: Once decorated with the fresh strawberries and frosting, step 12 advises storing the brownies in an airtight container in the refrigerator until you are ready to enjoy them.
- Q: How is the ''Santa Hat'' shape assembled on the brownie?
A: After cutting the cooled brownies into 2×2 inch squares, spread a thin layer of frosting on top. Place a strawberry with the pointy side up onto the frosting, then place a mini marshmallow (or half of a larger one) at the base of the strawberry to resemble the hat's pom-pom.
What Makes This Special
These Santa Hat Christmas Brownies work so well because they combine the dense, chewy texture of chocolate with the bright, juicy snap of fresh strawberries. It is that contrast between rich dessert and refreshing fruit that makes you want to reach for a second one! Plus, they are undeniably cute without requiring a degree in pastry arts. I highly encourage you to print this article or save it to your bookmarks for when the holiday baking urge strikes. If you give these a try, please leave a comment below or let me know how they turned out. I would love to hear if you stuck to the classic look or tried a fun variation! Happy baking!

Santa Hat Christmas Brownies
Description
Chewy chocolate bases support bright red strawberries and vanilla glaze for a treat that looks just like Santa’s hat. These playful bites bring a sweet, fruity crunch to your holiday spread.
Ingredients
Instructions
-
Preheat your oven to the temperature indicated on the brownie mix box. Prepare your baking pan according to package instructions (usually greased or lined with parchment paper).
-
In a large mixing bowl, combine the brownie mix with the required ingredients (oil, eggs, and water). Mix according to the package instructions until well combined, ensuring no lumps remain.
-
Pour the brownie batter into the prepared baking pan, spreading it evenly with a spatula.
-
Bake the brownies in the preheated oven for the time recommended on the box, usually around 20-30 minutes. You can perform a toothpick test for doneness: insert a toothpick into the center, it should come out clean or with a few moist crumbs.
-
Once baked, remove the brownies from the oven and let them cool completely in the pan on a wire rack.
-
While the brownies are cooling, prepare the frosting. In a medium bowl, combine the powdered sugar, milk, vanilla extract, and a few drops of red food coloring (if using). Mix until smooth and desired consistency is achieved; it should be thick but spreadable.
-
Once the brownies are cool, cut them into squares or rectangles, approximately 2x2 inches in size.
-
For each brownie, use a knife or spatula to spread a thin layer of the frosting on top. This will act as the glue for your strawberry and marshmallow.
-
Top each frosted brownie with a strawberry, pointy side up, to form the "hat."
-
Place a mini marshmallow or the cut half of a larger marshmallow at the base of the strawberry, on top of the frosting, to resemble the fluffy pom-pom of a Santa hat.
-
Repeat the process for each brownie until all are decorated.
-
Serve immediately or store in an airtight container in the refrigerator until ready to enjoy.
Note
- This recipe can be easily modified using your favorite homemade brownie recipe instead of a box mix.
- To add variety, consider using different fruits or toppings for a unique twist.
- These brownies are a fun and festive way to enjoy holiday treats with family and friends!
- You can also use chocolate frosting instead of white for a different look.
- Have the kids help with the decorating for a fun holiday activity!

