

Celebrate the arrival of spring and Easter weekend with these Puff Pastry Easter Nests! Thin layers of buttery pastry puff up into crisp golden cups that cradle colorful candy eggs, while a hint of Parmesan and fresh chives adds a savory contrast to the sweet chocolate in each bite. Perfect for beginner bakers, these playful nests will steal the show at brunch or dessert, so read on to bring some festive charm to your holiday treats!
Key Ingredients
Gather these simple components to build your flaky, golden nests:
- 1 sheet puff pastry: Provides the flaky, buttery base that puffs up into crisp golden cups.
- 1 egg: Binds and enriches the pastry while creating a rich color in the egg wash.
- 1 tbsp water: Thins the egg for a smooth, glossy egg wash finish.
- 1 tbsp grated Parmesan cheese: Sprinkles a savory, nutty kick on each nest.
- 1 tsp chopped fresh chives: Adds a fresh, herbaceous pop of green and flavor.
- 1 pinch salt: Enhances all the other flavors in the pastry.
- 1 pinch ground black pepper: Gives a subtle spicy warmth against the sweet chocolate.
- 8 candy-coated chocolate eggs: The colorful, sweet centerpieces that make these nests festive.
How To Make Puff Pastry Easter Nests
Creating these Easter nests is delightfully straightforward: you’ll shape the pastry, add flavor, and bake until golden. With just a muffin tin and a few simple steps, you’ll end up with perfectly puffed cups ready for their chocolatey filling. Follow along closely to ensure even puffing, a glossy finish, and that signature crisp texture before you fill each nest with candy-coated eggs.
1. Preheat the oven to 200°C (400°F) and lightly grease a muffin tin to prevent sticking.
2. Roll out the puff pastry on a lightly floured surface and cut out four circles to fit the muffin cups.
3. Press each pastry circle gently into the muffin tin, then use the back of a spoon to create a small well in the center for your eggs.
4. In a small bowl, whisk together the egg and water to create a smooth egg wash.
5. Lightly brush the pastry edges and wells with the egg wash, ensuring an even, glossy finish.
6. Evenly sprinkle the Parmesan cheese, chopped chives, salt, and pepper over each pastry nest.
7. Bake for 10–12 minutes, or until the pastry is puffed and golden brown around the edges.
8. Let the nests cool in the tin for 5 minutes, then carefully remove them and fill each with two candy-coated chocolate eggs.
Serving Suggestions
These nests aren’t just adorable; they’re versatile too! Whether you’re hosting brunch or gifting neighbors, presentation makes all the difference:
- Serve on a wooden board lined with fresh spring greens for a picture-perfect display.
- Pair with a bright fruit salad—think berries and citrus—to echo the sweet-and-savory contrast.
- Drizzle a light honey glaze over the chocolate eggs for extra shine and sweetness.
- Nestle each cup in pastel-colored liners to add a festive pop and make clean-up a breeze.
Tips For Perfect Puff Pastry Easter Nests
Mastering these nests is all about timing and temperature—plus a few handy swaps if you’re feeling creative. With properly thawed pastry and an even egg wash, you’ll end up with impressively puffed, golden-brown cups every time.
- Puff pastry should be fully thawed before rolling for best results.
- You can substitute candy-coated eggs with mini chocolate eggs or jelly beans.
- Make sure to brush the egg wash evenly to achieve a golden, glossy finish.
- Serve the nests within two hours of baking to keep the pastry crisp.
How To Store It
Storing these nests smartly ensures they stay crisp and delicious until serving time. Here are a few methods to keep your pastry perfect:
- Room-temperature storage: Keep nests in a single layer at room temperature in a loosely covered container for up to two hours to maintain crispness.
- Refrigeration: If you need to hold them longer (up to 24 hours), place nests in an airtight container in the fridge; re-crisp in a 180°C (350°F) oven for 2–3 minutes before filling.
- Freezing baked nests: Bake and cool completely, then freeze in a single layer inside an airtight container for up to one week; thaw at room temperature and reheat at 180°C (350°F) for 3–5 minutes.
- Separate storage: Store candy eggs in a cool, dry spot and add them just before serving to prevent pastry from softening.
Frequently Asked Questions
Wondering about timing or technique? Here are answers to your most common questions:
- Q: How do I ensure the puff pastry is fully thawed before rolling?
A: Place the frozen sheet in the refrigerator for 4–6 hours or at room temperature for 30–40 minutes, keeping it between parchment paper to prevent sticking. It should be soft enough to unroll without cracking but still cold so the butter layers remain intact.
- Q: Can I prepare the nests ahead of time and bake later?
A: Yes, assemble the pastry circles with the egg wash and sprinkle on the cheese, chives, salt, and pepper, then cover the muffin tin tightly with plastic wrap and refrigerate for up to 24 hours. When ready to bake, remove the wrap, rebrush exposed areas with egg wash if needed, and bake as directed for 10–12 minutes at 200°C (400°F).
- Q: How can I maintain a glossy golden finish on my pastry nests?
A: Use the egg wash of one beaten egg mixed with 1 tablespoon of water, brushing a thin, even layer on all exposed pastry surfaces just before baking. Avoid pooling of the wash in the wells to prevent soggy centers.
- Q: What are the best substitutions for the candy-coated chocolate eggs?
A: You can use mini chocolate eggs, chocolate-covered raisins or nuts, jelly beans, pastel-colored Turkish delight cubes, or any small candy that fits comfortably in the pastry wells while complementing the savory cheese and chive flavors.
- Q: How do I know when the pastry is perfectly baked?
A: The nests should be fully puffed with visible flaky layers and a deep golden brown color around the edges. If the centers still appear pale after 10 minutes, extend baking by 1–2 minutes, watching closely to avoid over-browning.
- Q: Can I freeze the baked nests for later use?
A: Freezing is not recommended as the crisp texture will deteriorate. If necessary, bake and cool completely, then freeze in a single layer in an airtight container for up to one week. Thaw at room temperature and re-crisp in a 180°C (350°F) oven for 3–5 minutes before filling.
- Q: What is the best way to store leftover nests and maintain crispness?
A: Store leftovers at room temperature in a single layer inside a loosely covered container for up to two hours. Just before serving, reheat in a preheated 180°C (350°F) oven for 2–3 minutes to refresh the crispness.
What Makes This Special
These Puff Pastry Easter Nests combine buttery layers with a hint of cheese and fresh chives, creating a playful savory-sweet bite that’s bound to impress at any spring gathering. Their crisp cups and colorful chocolate eggs strike the perfect balance between easy prep and showstopping presentation. Feel free to print this guide and save it for your Easter celebrations—then hop back here to let me know how they turned out or ask any questions. I can’t wait to hear your feedback!
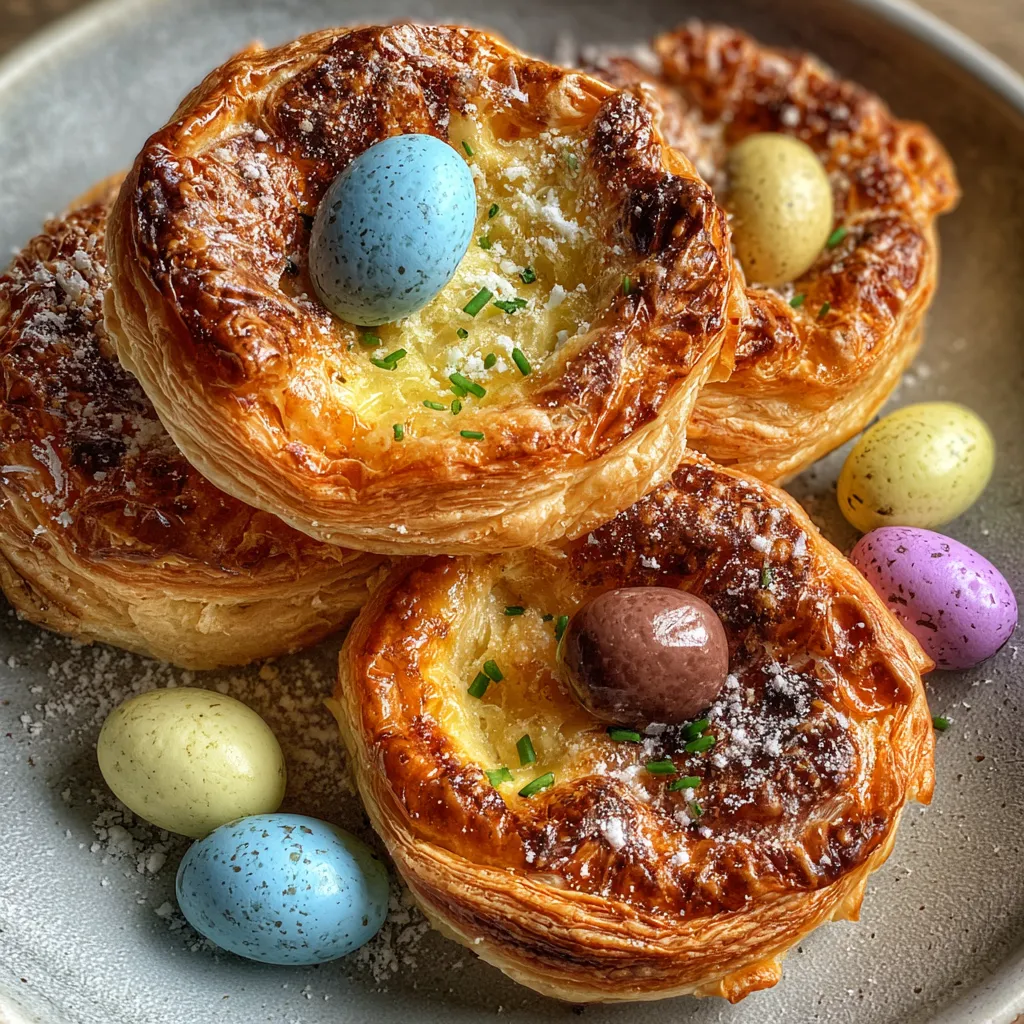

Puff Pastry Easter Nests
Description
Thin layers of buttery pastry puff up around a cheesy, herb-speckled rim, yielding crisp golden cups that nestle chocolate eggs in a playful blend of savory and sweet.
Ingredients
Instructions
-
Preheat the oven to 200°C (400°F) and lightly grease a muffin tin.
-
Roll out the puff pastry on a lightly floured surface and cut out four circles to fit the muffin cups.
-
Gently press the pastry circles into the muffin tin, then use the back of a spoon to create a small well in the center of each.
-
In a small bowl, whisk together the egg and water to make an egg wash.
-
Brush the pastry edges and wells lightly with the egg wash.
-
Sprinkle Parmesan cheese, chives, salt, and pepper evenly over the pastry nests.
-
Bake for 10–12 minutes, or until the pastry is puffed and golden brown.
-
Allow the nests to cool in the tin for 5 minutes, then carefully remove and fill each with two candy-coated chocolate eggs.
Note
- Puff pastry should be fully thawed before rolling for best results.
- You can substitute candy-coated eggs with mini chocolate eggs or jelly beans.
- Make sure to brush the egg wash evenly to achieve a golden, glossy finish.
- Serve the nests within two hours of baking to keep the pastry crisp.

