

There is something undeniably magical about the combination of rich chocolate and cooling peppermint during the colder months. These Peppermint Hot Cocoa Cheesecake Bites are my absolute favorite way to bring that cozy mug experience into a bite-sized dessert without turning on the oven. The creamy, no-bake filling sits perfectly on a buttery crust, creating a texture that melts in your mouth while the crushed candy adds just the right amount of crunch. Whether you are hosting a holiday party or just craving a sweet midnight snack, you are going to fall in love with how easy and delicious these are!
Key Ingredients
Getting the right balance of flavors is key here, and luckily, this recipe uses simple pantry staples to create something spectacular.
- 1 cup graham cracker crumbs: These form the sturdy, buttery base that holds everything together and adds a nice textural contrast to the creamy filling.
- 1/4 cup granulated sugar: Sweetens the crust just enough to complement the rich cocoa layer above it.
- 1/2 cup unsalted butter, melted: Acts as the binding agent for the crust, ensuring it packs down firmly and stays intact.
- 16 oz cream cheese, softened: The tangy, rich foundation of the cheesecake layer that needs to be room temperature for the smoothest consistency.
- 1 cup powdered sugar: Dissolves easily into the cream cheese to sweeten the filling without leaving any gritty texture.
- 1/2 cup unsweetened cocoa powder: Provides that deep, chocolatey hot cocoa flavor that defines this dessert.
- 1 teaspoon peppermint extract: Delivers the refreshing, cool minty kick that cuts through the richness of the chocolate.
- 1 cup whipped cream, plus more for topping: Folded into the batter to create a mousse-like, airy texture, with extra reserved for the garnish.
- 1/2 cup mini chocolate chips: Adds delightful pockets of solid chocolate crunch inside the creamy filling.
- Crushed peppermint candies for garnish: Provides a festive look and a satisfying crunch that mimics a candy cane garnish on hot cocoa.
- Chocolate or white chocolate melting wafers for drizzling: Used to create a professional-looking finish and add an extra layer of sweetness.
How To Make Peppermint Hot Cocoa Cheesecake Bites
Making these little treats is actually incredibly relaxing because you do not have to worry about water baths or cracking tops like you do with traditional baked cheesecake. It is really just a matter of mixing, layering, and letting the fridge do the heavy lifting for you. I love getting the kids involved with the crushing and mixing steps since there is no hot oven to worry about. The process moves fairly quickly, so having your ingredients measured and your cream cheese softened beforehand makes the whole experience smooth and enjoyable.
1. In a mixing bowl, combine the graham cracker crumbs, granulated sugar, and melted butter. Mix until well combined and has a sand-like texture.
2. Press this mixture firmly into the bottom of a silicone mini muffin tray or a lined mini muffin tin to form the crust. Place it in the refrigerator to set while you prepare the cheesecake filling.
3. In another large bowl, beat the softened cream cheese with an electric mixer until smooth and creamy.
4. Gradually add the powdered sugar and unsweetened cocoa powder to the cream cheese, mixing until fully combined.
5. Stir in the peppermint extract and mix thoroughly.
6. Gently fold in the whipped cream until no white streaks remain, creating a lighter texture for the cheesecake filling.
7. Add mini chocolate chips to the cheesecake mixture and fold in carefully.
8. Spoon the cheesecake filling over the graham cracker crust in the muffin tins, filling each cavity to the top.
9. Smooth the tops with a spatula and return the tray to the refrigerator for at least 4 hours or overnight to allow the cheesecake bites to set properly.
10. Once set, carefully pop the cheesecake bites out of the molds.
11. Melt the chocolate or white chocolate wafers according to package instructions and drizzle over the cheesecake bites.
12. Finish with a dollop of whipped cream on each bite and sprinkle with crushed peppermint candies for added decoration and flavor.
Serving Suggestions
Presentation is everything with these mini delights, and they look absolutely stunning on a dessert platter. Because they mimic a mug of hot cocoa, I like to lean into that theme when serving them to guests. They are naturally bite-sized, which makes them excellent finger food for mingling crowds. Here are a few fun ways to serve them up to make them the star of the show.
- Chilled Platter: Serve these bites straight from the fridge on a chilled slate or marble board to ensure they maintain their firm texture and do not soften too quickly during the party.
- Cocoa Bar Accompaniment: Place a tray of these bites alongside a real hot chocolate station, allowing guests to enjoy the contrast of the hot beverage with the cool, creamy cheesecake bite.
- Festive Liners: If you used a metal tin, serve them right in colorful, holiday-themed cupcake liners to add a pop of color and make them easier for guests to pick up without getting sticky fingers.
- Extra Garnish: Enhance the plate by scattering extra crushed peppermint candies and mini marshmallows around the base of the bites for an edible confetti look that ties the theme together.
Tips For Perfect Peppermint Hot Cocoa Cheesecake Bites
While this recipe is rated as beginner-friendly, a few little secrets can make the difference between a good dessert and a great one. I have made these countless times for potlucks and family movie nights, and I have learned exactly what tweaks work best. You really want to ensure you give them enough time to chill, as patience is the main ingredient here! These tips will help you customize the flavor profile to your liking and ensure you get the most out of your efforts.
- These cheesecake bites are perfect for holiday gatherings or as a sweet treat for any occasion.
- Feel free to use flavored chocolate wafers to change up the chocolate drizzle.
- You can substitute regular peppermint extract with peppermint flavoring for a more intense mint flavor.
- These bites freeze well; simply thaw in the refrigerator before serving.
How To Store It
Since these contain dairy, keeping them at the right temperature is crucial for food safety and texture. You definitely do not want to leave them out on the counter for too long, or they might lose that lovely firm consistency. Luckily, they store beautifully, so you can easily make a batch ahead of time and keep them fresh until you are ready to indulge.
- Refrigerator Storage: Place the finished bites in an airtight container in the fridge where they will stay fresh for up to 5 days, making sure they are in a single layer so the toppings do not get squished.
- Freezer Method: For longer storage, freeze the bites without the whipped cream topping in a freezer-safe bag or container for up to 2 months.
- Thawing Process: When you are ready to eat frozen bites, move them to the refrigerator to thaw slowly overnight to preserve the creamy texture before adding your fresh toppings.
- Separation: If you need to stack them in the container, place a sheet of parchment paper between layers to prevent the chocolate drizzle and crusts from sticking together.
Frequently Asked Questions
I know that trying a new recipe can sometimes raise a few questions, so I have gathered the most common inquiries I get about these cheesecake bites to help you out!
- Q: How long do the cheesecake bites need to set in the refrigerator before serving?
A: You should place the tray in the refrigerator for at least 4 hours or overnight. This allows the cheesecake filling to set properly so the bites hold their shape when removed from the molds.
- Q: Can I make these Peppermint Hot Cocoa Cheesecake Bites ahead of time?
A: Yes, these bites freeze well, making them suitable for advance preparation. If you choose to freeze them, simply thaw the bites in the refrigerator before you plan to serve them.
- Q: What creates the lighter texture in the cheesecake filling?
A: The lighter texture is achieved by gently folding in 1 cup of whipped cream into the cream cheese mixture. You should fold it in carefully until no white streaks remain, rather than beating it, to maintain the fluffiness.
- Q: What is the best way to form the crust for these bites?
A: Combine graham cracker crumbs, granulated sugar, and melted unsalted butter in a mixing bowl until the mixture resembles wet sand. Press this mixture firmly into the bottom of a silicone mini muffin tray or a lined mini muffin tin, then refrigerate it while you prepare the filling.
- Q: Is it possible to adjust the strength of the peppermint flavor in this recipe?
A: Yes, the recipe calls for 1 teaspoon of peppermint extract, but you can substitute this with peppermint flavoring if you desire a more intense mint flavor.
- Q: What kind of pan should I use to ensure the bites come out easily?
A: A silicone mini muffin tray is ideal because you can carefully pop the cheesecake bites out once they are set. If you use a metal mini muffin tin, be sure to use liners to make removing the bites easier.
What Makes This Special
These little peppermint hot cocoa cheesecake bites are honestly a lifesaver when you need a dessert that screams "holidays" but whispers "minimal effort." The way the rich cocoa blends with the cool peppermint is just chef's kiss perfect! Plus, no oven means you are not sweating in the kitchen while everyone else is having fun. Go ahead and print this article or save it for your next craving emergency, because trust me, there will be one. If you whip these up, drop a comment below and tell me how it went or if you decided to go crazy with the mint extract. I cannot wait to hear about your kitchen adventures!
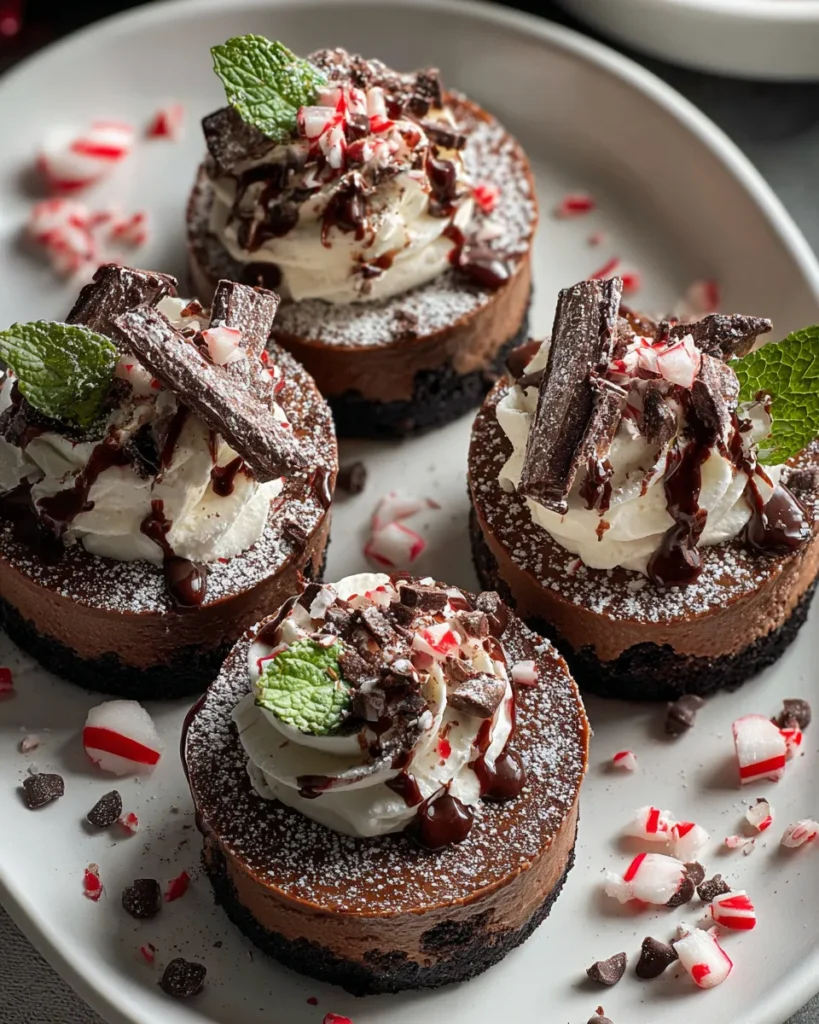

Peppermint Hot Cocoa Cheesecake Bites
Description
Rich cocoa and cool peppermint extract blend in a smooth cream cheese filling over a buttery graham cracker crust. Finished with a chocolate drizzle and candy crunch, they taste just like a frozen mug of hot cocoa.
Ingredients
Instructions
-
In a mixing bowl, combine the graham cracker crumbs, granulated sugar, and melted butter. Mix until well combined and has a sand-like texture.
-
Press this mixture firmly into the bottom of a silicone mini muffin tray or a lined mini muffin tin to form the crust. Place it in the refrigerator to set while you prepare the cheesecake filling.
-
In another large bowl, beat the softened cream cheese with an electric mixer until smooth and creamy.
-
Gradually add the powdered sugar and unsweetened cocoa powder to the cream cheese, mixing until fully combined.
-
Stir in the peppermint extract and mix thoroughly.
-
Gently fold in the whipped cream until no white streaks remain, creating a lighter texture for the cheesecake filling.
-
Add mini chocolate chips to the cheesecake mixture and fold in carefully.
-
Spoon the cheesecake filling over the graham cracker crust in the muffin tins, filling each cavity to the top.
-
Smooth the tops with a spatula and return the tray to the refrigerator for at least 4 hours or overnight to allow the cheesecake bites to set properly.
-
Once set, carefully pop the cheesecake bites out of the molds.
-
Melt the chocolate or white chocolate wafers according to package instructions and drizzle over the cheesecake bites.
-
Finish with a dollop of whipped cream on each bite and sprinkle with crushed peppermint candies for added decoration and flavor.
Note
- These cheesecake bites are perfect for holiday gatherings or as a sweet treat for any occasion.
- Feel free to use flavored chocolate wafers to change up the chocolate drizzle.
- You can substitute regular peppermint extract with peppermint flavoring for a more intense mint flavor.
- These bites freeze well; simply thaw in the refrigerator before serving.

