

No-Fry Fried Ice Cream brings a playful twist to a classic favorite, wrapping creamy vanilla scoops in a crunchy cereal coating for an unexpected ice cream adventure. With just a handful of ingredients and an air fryer or oven, you’ll get warm, crispy exteriors hugging a cold, dreamy center—no deep frying required. Ready in minutes and perfect for beginner home cooks, this dessert turns simple pantry staples into a showstopping treat you’ll want to make again and again.
Key Ingredients
Before diving in, let’s gather everything you need to create that satisfyingly crispy shell and velvety core:
- 6 scoops vanilla ice cream: Creamy foundation that stays frozen while you add the crunchy coating.
- 2 cups cornflakes cereal, crushed: Provides that signature crisp texture and golden color.
- 1/4 cup brown sugar: Adds sweetness and helps the coating caramelize beautifully.
- 1 teaspoon ground cinnamon: Infuses a warm, aromatic spice to elevate the flavor.
- 2 tablespoons melted butter: Binds the crumbs and sugar for a cohesive, crunchy crust.
How To Make No-Fry Fried Ice Cream
Crafting this playful dessert is easier than you think—just a few simple steps to freeze, coat, and crisp your ice cream scoops to golden perfection. Whether you’re using an air fryer or oven, you’ll love how the warm, crunchy exterior contrasts with the icy vanilla interior in each bite. Gather your prepared scoops and cereal mixture, and let’s get cooking!
1. Place vanilla ice cream scoops on a parchment-lined baking sheet and freeze until very firm, about 30 minutes to ensure they hold their shape when coated.
2. In a medium bowl, combine crushed cornflakes, brown sugar, ground cinnamon, and melted butter, stirring until the crumbs are evenly coated and glistening.
3. Remove ice cream scoops from the freezer and roll each scoop in the cereal mixture, pressing gently to adhere a thick, even layer; return to the baking sheet.
4. Freeze the coated scoops for another 15 minutes to let the coating set firmly before cooking.
5. Preheat an air fryer to 400°F (or oven to 450°F) so it’s hot and ready to crisp the coating instantly.
6. Arrange the coated scoops in the air fryer basket or on a parchment-lined baking tray, spacing them apart, and cook for 3–5 minutes, or until the crust is golden and crisp.
7. Serve immediately to enjoy the delightful contrast of warm, crunchy exterior and cold, creamy interior.
Serving Suggestions
Once your No-Fry Fried Ice Cream is hot and crisp, it’s time to dress it up and serve. Here are four fun ideas to make each scoop even more memorable:
- Warm chocolate sauce: Drizzle rich, melted chocolate over each scoop for a decadent finish.
- Fresh berries: Add a handful of raspberries or strawberries to cut through the sweetness with bright acidity.
- Whipped cream: Top with a light cloud of homemade or store-bought whipped cream for extra indulgence.
- Mint leaves: Garnish with a few fresh mint sprigs to brighten flavors and add a pop of color.
Tips For Perfect No-Fry Fried Ice Cream
Getting that ideal texture contrast can feel magical—but these friendly pointers will make it foolproof and fun:
- Chill the scoops thoroughly before coating to prevent melting.
- Feel free to substitute panko, cookie crumbs, or crushed nuts for the cornflakes.
- Enjoy immediately after cooking for the best texture contrast.
- Any leftovers can be refrozen for up to 1 day, but coating may soften over time.
How To Store It
To keep your No-Fry Fried Ice Cream tasting its best if you have any extras, proper storage is key. Here’s how to preserve that crunch and cream:
- Airtight container: Place coated scoops in a single layer in a sealed container to prevent freezer burn.
- Parchment layers: If stacking scoops, separate layers with parchment paper to avoid sticking.
- Refreeze quickly: Return them to the freezer immediately after serving to maintain shape and texture.
- Consume within 1 day: For the ultimate crunch, enjoy within 24 hours before the coating softens.
Frequently Asked Questions
Got some questions about No-Fry Fried Ice Cream? Let’s dive right in:
- Q: How long does it take to prepare and cook the No-Fry Fried Ice Cream?
A: It takes about 45 minutes of freezing time (30 minutes to firm up the scoops before coating and another 15 minutes after coating) plus 3–5 minutes to crisp the coating in the air fryer or oven. You’ll also need a few minutes to crush the cereal and mix the coating ingredients.
- Q: Can I use a conventional oven instead of an air fryer?
A: Yes. Preheat your oven to 450°F and place the coated scoops on a parchment-lined baking tray. Bake for 3–5 minutes, watching closely to prevent melting, until the coating turns golden and crisp.
- Q: How can I ensure the coating sticks properly to the ice cream?
A: Make sure the ice cream scoops are very firm after the initial 30-minute freeze. Press the cereal mixture gently but firmly onto each scoop so that the melted butter binds the crumbs to the ice cream. Return them to the freezer immediately after coating to set.
- Q: Are there any good substitutes for cornflakes in this recipe?
A: Absolutely. You can replace cornflakes with panko breadcrumbs, crushed cookies like graham crackers or shortbread, or even chopped nuts. Just follow the same process of mixing in brown sugar, cinnamon, and melted butter before coating.
- Q: What’s the best way to crush the cereal for the coating?
A: Place the cornflakes in a resealable plastic bag and use a rolling pin or heavy pan to gently crush them to your desired texture. Aim for mostly small pieces with a few slightly larger flakes for added crunch.
- Q: How should I serve these for the best texture contrast?
A: Serve them immediately after air frying or baking. The goal is to enjoy the warm, crisp exterior against the cold, creamy interior, so have plates ready and offer any garnishes or sauces right away.
- Q: Can I prepare these in advance and store leftovers?
A: You can refreeze any leftovers for up to 1 day, but be aware that the coating will soften over time. For the best crunch, it’s recommended to enjoy each scoop right after cooking.
What Makes This Special
This No-Fry Fried Ice Cream recipe is a delightful kitchen hack that delivers all the thrill of deep-fried sweetness without the mess or extra oil. The secret is freezing your scoops solid, then giving them a buttery, spiced cereal jacket that crisps up in minutes. It’s whimsy on a plate—and totally beginner-friendly. Feel free to print and save this article so you can recreate the magic anytime. If you whip up a batch or have questions, drop a comment below—I’d love to hear about your crispy-ice-cream adventures!
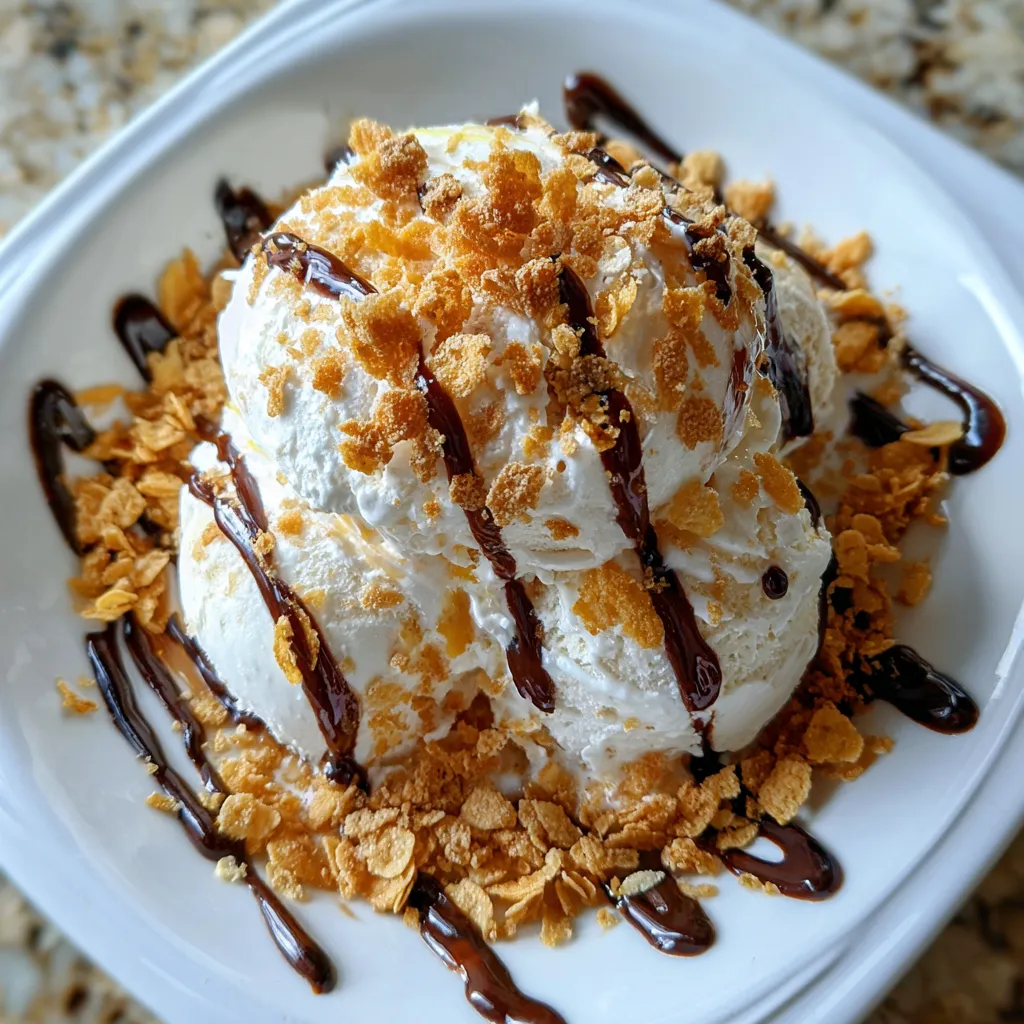

No-Fry Fried Ice Cream
Description
Warm, crispy cereal coating hugs a cold vanilla core, creating a playful contrast of textures and temperatures. Ready in just minutes with an air fryer or oven for an easy, no-fry twist on fried ice cream.
Ingredients
Instructions
-
Place vanilla ice cream scoops on a parchment-lined baking sheet and freeze until very firm, about 30 minutes.
-
In a medium bowl, combine crushed cornflakes, brown sugar, ground cinnamon, and melted butter, stirring until crumbs are evenly coated.
-
Remove ice cream scoops from the freezer and roll each scoop in the cereal mixture, pressing gently to adhere a thick layer; return to the baking sheet.
-
Freeze the coated scoops for another 15 minutes to set the coating.
-
Preheat an air fryer to 400°F (or oven to 450°F).
-
Arrange the coated scoops in the air fryer basket or on a baking tray and cook for 3–5 minutes, or until the coating is golden and crisp.
-
Serve immediately to enjoy the contrast of warm, crunchy exterior and cold ice cream interior.
Note
- Chill the scoops thoroughly before coating to prevent melting.
- Feel free to substitute panko, cookie crumbs, or crushed nuts for the cornflakes.
- Enjoy immediately after cooking for the best texture contrast.
- Any leftovers can be refrozen for up to 1 day, but coating may soften over time.

