

There’s something magical bubbling in your kitchen this season, and it comes in the form of creamy little spheres bursting with autumnal cheer. No Bake Pumpkin Cheesecake Balls take the best of fall’s favorite flavors—velvety pumpkin, rich cream cheese, fragrant spices—and transform them into bite-sized desserts that are as cute as they are delicious. With just a handful of pantry staples and zero time in the oven, this beginner-friendly dessert marries simplicity with show-stopping taste. In under 20 minutes of prep (and a cozy 2½ hours of resting time), you’ll have an irresistible platter of sweet treats that bring smiles to every face around the table.
These cheesecake balls are perfect for casual coffee dates, holiday potlucks, or a cozy night in when you’re craving that nutty, creamy goodness layered with the gentle crackle of graham crackers. They each pack only about 100 calories, making them a guilt-friendly indulgence you’ll want to keep coming back to. Whether you’re hosting a festive gathering or just seeking a quick pick-me-up, these No Bake Pumpkin Cheesecake Balls deliver on flavor, texture, and fall nostalgia—all without firing up the oven. Trust me, once you taste that smooth filling wrapped in a crisp white chocolate shell, you’ll wonder why you ever baked a cheesecake the old-fashioned way.
KEY INGREDIENTS IN NO BAKE PUMPKIN CHEESECAKE BALLS
Before we dive into the how-to, let’s chat about the superstar players in this recipe. Each ingredient brings its own magic, ensuring a perfect balance of sweetness, spice, and structure.
- Pumpkin puree: This creamy base provides vibrant color, natural sweetness, and that unmistakable autumn flavor. It also keeps the cheesecake balls moist and tender.
- Cream cheese: Softened to perfection, cream cheese delivers the tangy richness every cheesecake needs. It’s the foundation that holds our little pumpkin puffs together.
- Graham cracker crumbs: These fine crumbs add a buttery crunch to the mixture, lending a subtle toasty note that complements the pumpkin beautifully.
- Powdered sugar: Smooth and melt-in-your-mouth sweet, this sugar binds with the cream cheese to create a silky filling and prevents any graininess.
- Vanilla extract: A splash of pure vanilla enhances the overall flavor, adding floral warmth and rounding out the spices.
- Pumpkin pie spice: The quintessential fall blend (cinnamon, nutmeg, ginger, and cloves) infuses each bite with cozy, nostalgic depth.
- Cinnamon: A pinch of ground cinnamon intensifies the spice profile, giving the filling an extra layer of warmth.
- White chocolate chips: Melted down, these chips transform into a luscious coating that sets up into a sweet, glossy shell for each ball.
- Crushed graham crackers: After dipping in white chocolate, these crumbs create a crunchy outer layer, echoing the crust of a classic cheesecake.
- Salt: Even a small pinch enhances all the sweet and spicy notes, ensuring nothing tastes flat or one-dimensional.
HOW TO MAKE NO BAKE PUMPKIN CHEESECAKE BALLS
Ready to roll into the kitchen and craft these bite-sized beauties? Follow this simple step-by-step process, and you’ll have a platter of pumpkin cheesecake balls chilling in no time.
1. In a large mixing bowl, combine the softened cream cheese and pumpkin puree. Using an electric hand mixer on medium speed, beat until smooth and creamy, scraping down the sides as needed to avoid any lumps.
2. Add the powdered sugar, vanilla extract, pumpkin pie spice, cinnamon, and a pinch of salt. Continue mixing on low to medium speed until all ingredients are fully incorporated, resulting in a silky, fragrant filling.
3. Gradually fold in the graham cracker crumbs. Stir gently but thoroughly until the mixture becomes thick and holds its shape, resembling a soft dough.
4. Cover the bowl tightly with plastic wrap and refrigerate for at least 2 hours. This resting period firms up the filling, making it much easier to handle.
5. Once your mixture is chilled, scoop out small portions and roll gently between your palms to form uniform bite-sized balls. Aim for about one inch in diameter for perfect portion control.
6. Melt the white chocolate chips in a microwave-safe bowl in 20-second intervals, stirring between each, or set up a double boiler until the chocolate is completely smooth and fluid.
7. Holding each pumpkin cheesecake ball with a fork, dip it into the melted white chocolate, allowing any excess to drip off.
8. Immediately roll the coated ball in crushed graham crackers, ensuring an even coating, then place it on a baking sheet lined with parchment paper.
9. Refrigerate the balls for at least 30 minutes to let the chocolate coating set firmly. Once chilled, your No Bake Pumpkin Cheesecake Balls are ready—serve chilled and enjoy!
SERVING SUGGESTIONS FOR NO BAKE PUMPKIN CHEESECAKE BALLS
When it comes to serving these little bites of pumpkin heaven, the possibilities are endless! Whether you’re aiming for a festive dessert table or a cozy coffee break, these ideas will elevate your presentation and delight every guest.
- Autumn Dessert Platter: Arrange the cheesecake balls on a rustic wooden board alongside cinnamon sticks, dried apple slices, and fresh cranberries. The variety of textures and colors makes your spread look gorgeous and signals fall vibes at first glance.
- Cheesecake Pops: Insert decorative lollipop sticks into each chilled ball before dipping. Once coated, stand them upright in a foam block or vase filled with seasonal fillers like mini pumpkins or pinecones for a fun, handheld treat.
- Coffee Shop Pairing: Serve two or three balls on a small dessert plate next to a steaming mug of spiced latte or cappuccino. The warm spices and creamy filling play perfectly against the bitterness of rich coffee.
- Holiday Party Favor: Place one ball in a clear mini bag tied with twine and a sprig of rosemary or cinnamon stick. These adorable, personalized gifts double as decor and dessert—guests will appreciate the thoughtfulness.
HOW TO STORE NO BAKE PUMPKIN CHEESECAKE BALLS
Storing your cheesecake balls properly ensures they stay fresh, creamy, and full of flavor, whether you’re prepping a day in advance or saving leftovers for later snacking. Here are a few tried-and-true methods to keep them at their best.
- Refrigerator (Up to 5 Days): Place the chilled balls in a single layer inside an airtight container, separating layers with parchment or wax paper. The cool environment keeps the filling firm and the chocolate coating crisp.
- Freezer (Up to 2 Months): Arrange the uncoated balls on a tray lined with parchment and freeze solid. Once firm, transfer them to a freezer-safe bag. Thaw overnight in the fridge, then proceed with the white chocolate coating and graham cracker roll for freshly finished treats.
- Short-Term Counter Storage: If you plan to serve them within 3 hours, you can leave the cheesecake balls at room temperature on a covered cake stand. Just be mindful of warm environments, which can soften the chocolate shell.
- Portion Control Packs: For grab-and-go snacking, individually wrap 2–3 balls in plastic wrap or wax paper, then store in a resealable bag in the fridge. This pre-portioned approach makes healthy treats easy to reach without overindulging.
CONCLUSION
As you’ve now discovered, these No Bake Pumpkin Cheesecake Balls are the ultimate blend of effortless prep and incredible flavor, perfect for every fall occasion from casual coffee dates to festive holiday feasts. We’ve walked through all the key ingredients—pumpkin puree for silky sweetness, cream cheese for tangy richness, and a crunchy graham cracker coating—before detailing the step-by-step process that requires no baking and minimal hands-on time. Along the way, we explored creative serving ideas, convenient storage tips, and variations that help you make the recipe uniquely yours. With only about 100 calories per ball and a total prep time of 20 minutes, this beginner-friendly dessert is a real crowd-pleaser that won’t keep you tied to the oven.
Feel free to print this article or save it for later—your future self will thank you when the cravings hit or when you need a quick, showstopping dessert. Don’t forget to scroll down for a helpful FAQ section where you can find answers to common questions about swaps, troubleshooting, and more. If you whip up these cheesecake balls and love them, or if you run into any hiccups, please leave a comment below. Your feedback, questions, and personal twists are what make the kitchen community so special. Happy mixing, dipping, and indulging!
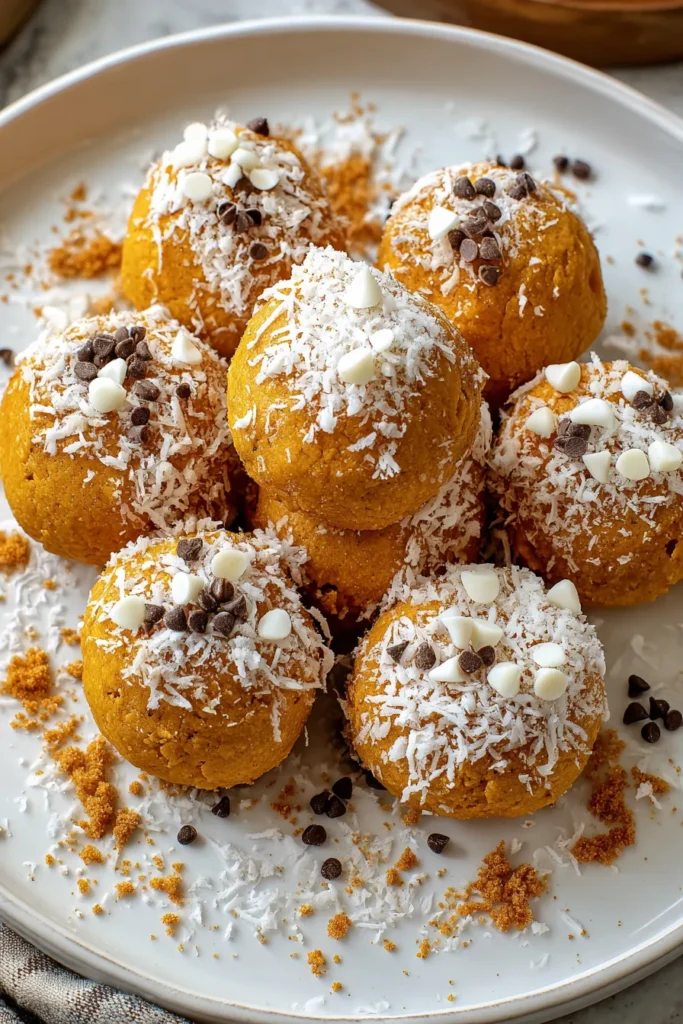

No Bake Pumpkin Cheesecake Balls
Description
Creamy pumpkin and rich cream cheese blend harmoniously in these bite-sized delights, all coated in sweet white chocolate and crunchy graham crackers.
Ingredients
Instructions
-
In a large mixing bowl, combine the softened cream cheese and pumpkin puree. Beat them together until smooth and creamy using an electric hand mixer.
-
Add the powdered sugar, vanilla extract, pumpkin pie spice, cinnamon, and a pinch of salt to the cream cheese mixture. Continue mixing until all ingredients are well incorporated.
-
Gradually add the graham cracker crumbs to the mixture. Stir until the mixture becomes thick and holds its shape.
-
Cover the bowl with plastic wrap and refrigerate for at least 2 hours to firm up the mixture, making it easier to form into balls.
-
Once chilled, take a small amount of the mixture and roll it gently between your palms to form a bite-sized ball. Repeat until all of the mixture is used.
-
Melt the white chocolate chips in the microwave or over a double boiler until smooth.
-
Dip each pumpkin cheesecake ball into the melted white chocolate, then roll it in the crushed graham crackers to coat.
-
Place each coated ball on a baking sheet lined with parchment paper. Refrigerate the balls for at least 30 minutes to allow the coating to set.
-
Serve chilled and enjoy!
Note
- These pumpkin cheesecake balls are perfect for autumn gatherings or as a delightful holiday treat.
- Substitute the white chocolate with dark chocolate for a richer taste.
- You can freeze the balls, but do so before coating them, then thaw and coat when ready to serve.
- Add a stick to each ball to turn them into cheesecake pops for a fun presentation.

