

These no bake mini Biscoff cheesecakes are bite-sized wonders that marry a crunchy cinnamon-spiced cookie crust with a smooth, airy cream cheese filling swirled with rich Biscoff spread. Perfect for parties or a cozy night in, they require no oven time and little fuss, delivering a show-stopping treat with each spoonful. You’ll love how the crisp base contrasts with the velvety filling, and they’re as fun to make as they are to devour. Dive in, follow along, and prepare to impress everyone with your newfound cheesecake prowess!
Key Ingredients
Gather these simple, flavorful ingredients to whip up your no bake mini Biscoff cheesecakes:
- 1 cup Biscoff cookies, crushed: Forms a crunchy, cinnamon-kissed base that perfectly complements the creamy filling.
- 4 tablespoons unsalted butter, melted: Binds the cookie crumbs into a sturdy crust for each mini cheesecake.
- 12 oz cream cheese, softened: Provides a smooth, velvety foundation for the light, airy cheesecake filling.
- 1 cup powdered sugar: Adds sweetness and helps achieve a silky texture in the cream cheese mixture.
- 1 cup heavy whipping cream: Whipped to stiff peaks for a fluffy, airy consistency in the cheesecake filling.
- 1 teaspoon vanilla extract: Enhances the flavor profile with a warm, aromatic note.
- 1/4 cup Biscoff spread: Infuses extra cookie butter richness and cinnamon flavor into the filling.
- Extra Biscoff cookies for garnish: Gives a playful, crunchy topping to finish each mini cheesecake.
- Optional: chocolate shavings or caramel sauce for garnish: Adds a decorative, indulgent drizzle on top of each cup.
How To Make No Bake Mini Biscoff Cheesecakes
Follow these easy steps to build your mini cheesecakes, from crafting a solid cookie crust to folding in airy whipped cream and silky Biscoff spread. Each stage focuses on simple techniques to ensure your filling remains light and your crust stays firm. Grab your mixing bowls and electric mixer, and let’s dive into dessert perfection—no baking required.
1. Combine the crushed Biscoff cookies and melted butter in a mixing bowl, stirring until the crumbs are fully coated and resemble wet sand, ensuring an even consistency.
2. Divide the cookie mixture evenly among mini dessert cups or a muffin tin lined with paper liners, pressing down firmly to create a solid, compact crust layer in each cup.
3. In another mixing bowl, beat the softened cream cheese with an electric mixer on medium-high speed for about 2 minutes, until the mixture is smooth and creamy.
4. Gradually add the powdered sugar to the cream cheese, mixing on low speed until fully incorporated and the texture is silky and lump-free.
5. In a separate bowl, whip the heavy cream and vanilla extract using an electric mixer, starting at medium speed until foam appears, then increasing speed until stiff peaks form.
6. Gently fold the whipped cream into the cream cheese mixture using a spatula, taking care to maintain the light and airy texture.
7. Fold in the Biscoff spread until it is evenly distributed throughout the cream cheese mixture, creating a swirled pattern of cookie butter flavor.
8. Spoon the filling evenly over the prepared cookie crusts in each cup, using a spatula to smooth the tops for a polished finish.
9. Refrigerate the mini cheesecakes for at least 4 hours or until fully set; for the best texture and depth of flavor, chill overnight if possible.
10. Before serving, garnish each mini cheesecake with an extra Biscoff cookie on top and drizzle with chocolate shavings or caramel sauce, if desired.
Serving Suggestions
These mini cheesecakes shine at any gathering and offer endless styling possibilities. Whether you’re hosting a brunch, serving after dinner, or looking for a sweet treat at a potluck, these bite-sized delights are sure to steal the show. Customize your presentation with colorful plates, playful garnishes, and complementary beverages to create a memorable dessert spread.
- Festive Platter: Arrange the cheesecakes on a decorative plate lined with fresh mint leaves for a pop of color and serve alongside fresh berries for contrast.
- Individual Gift Jars: Layer mini cheesecakes in small mason jars and tie a ribbon around each for charming edible gifts or party favors.
- Coffee Bar Companion: Place the cheesecakes next to a warm espresso or latte at your next brunch, letting guests alternate bites of creamy dessert with sips of coffee.
- Party Dessert Table: Highlight these treats on raised cake stands mixed with other no-bake bites; add sprinkles of crushed Biscoff crumbs around each cup for a cohesive look.
Tips For Perfect No Bake Mini Biscoff Cheesecakes
Nailing the ideal balance between crunchy crust and fluffy filling is easier than you think. By tweaking a few simple elements—like chilling times, sweetness levels, and optional flavor boosts—you’ll take these mini cheesecakes from good to unforgettable. Keep your tools and ingredients cold, fold gently to preserve airiness, and remember that practice makes perfect (and delicious).
- You can adjust the sweetness by adding more or less powdered sugar, depending on your preference.
- For added flavor, you can mix in a pinch of cinnamon or a splash of almond extract to the cream cheese mixture.
- These mini cheesecakes can be made up to three days in advance, making them great for parties.
- To make the crust gluten-free, substitute Biscoff cookies for gluten-free cookies.
How To Store It
Storing these mini cheesecakes properly ensures they stay as fresh and flavorful as the moment you plated them. Whether you need to prep in advance or save leftovers, a few simple storage methods will preserve their creamy texture and crisp crust. Follow these tips to maintain that signature Biscoff crunch and lush filling every time.
- Refrigerator: Place cheesecakes in an airtight container and store on a middle shelf to keep a consistent temperature; they’ll stay fresh for up to three days.
- Individual Wrapping: Cover each mini cheesecake with a square of plastic wrap or parchment directly on the filling before sealing in a container to prevent condensation and sogginess.
- Freezing: For longer storage, flash-freeze the cheesecakes on a tray for 1–2 hours, then transfer to a freezer-safe container; they'll keep for up to one month.
- Thawing: Move frozen cheesecakes to the refrigerator and let them thaw overnight before serving to preserve the smooth texture without making the crust soggy.
Frequently Asked Questions
Got questions? Let’s clear up the most common queries so your mini Biscoff cheesecakes turn out perfect every time.
- How long does it take to prepare and chill these no-bake mini Biscoff cheesecakes?
Active preparation time is about 20–25 minutes, which includes crushing cookies, making the crust, whipping the filling, and assembling. After that, they need at least 4 hours of refrigeration to set properly. For best texture and flavor, chilling overnight is recommended.
- Can I make the cheesecakes in advance, and how should I store them?
Yes – these mini cheesecakes can be made up to three days ahead. Store them in an airtight container in the refrigerator. Place a sheet of plastic wrap or parchment directly over the cheesecakes to prevent condensation and keep them as fresh as possible until serving.
- What’s the best way to get stiff peaks when whipping the heavy cream?
Ensure your heavy whipping cream, mixing bowl, and beaters are well chilled (you can place them in the fridge or freezer for 10–15 minutes beforehand). Start whipping on medium speed until foam appears, then increase to high. Watch closely: stiff peaks form when the cream stands straight up on the whisk without folding over.
- Can I freeze these mini cheesecakes, and how do I thaw them properly?
Yes, you can freeze them for up to one month. First, freeze uncovered on a tray for 1–2 hours to firm up, then wrap each cup tightly in plastic wrap or transfer to a freezer-safe container. Thaw overnight in the refrigerator before serving; avoid thawing at room temperature to maintain texture.
- How can I adjust the sweetness if I prefer a less sweet cheesecake?
You can reduce the powdered sugar by up to ¼ cup, tasting the cream cheese mixture as you go. You can also choose a Biscoff spread with slightly less sugar or swirl in a bit of unsweetened whipped cream to lighten sweetness without altering the texture too much.
- What substitutions can I use for the heavy whipping cream or Biscoff spread?
For dairy-free or lower-fat options, substitute chilled coconut cream for the heavy whipping cream (it whips similarly). For a different flavor, you can swap Biscoff spread with peanut butter or almond butter – but keep in mind the flavor profile will change.
- How do I prevent the crust from becoming soggy?
Press the crust firmly into the cups so it’s tightly packed, which helps repel moisture. Also, make sure your cream cheese filling is thick and not overly liquid. If you notice any excess liquid after mixing, drain it off or add a tablespoon of extra crushed cookies to firm up the filling before piping or spooning over the crust.
- Can I make these cheesecakes in a standard muffin tin without liners, and how do I remove them neatly?
You can use a nonstick muffin tin by lining each cup with parchment paper strips or silicone liners. To remove, gently pull up the parchment tabs or silicone liner. If sticking occurs, run a warm, damp towel under the muffin tin to loosen the edges before lifting.
What Makes This Special
Our no bake mini Biscoff cheesecakes are a symphony of crunchy cookie crust and velvety, Biscoff-infused filling that’s as fun to make as it is to devour. The simplicity of assembly means you’ll be whipping these up in no time, while the flavor combo of cinnamon-kissed crumbs and airy cream cheese keeps guests coming back for more. Feel free to print or save this recipe for your next dessert craving or gathering—your future self will thank you! Have questions or want to share your cheesecake creations? Leave a comment below and let’s chat about all things Biscoff cheesecake.
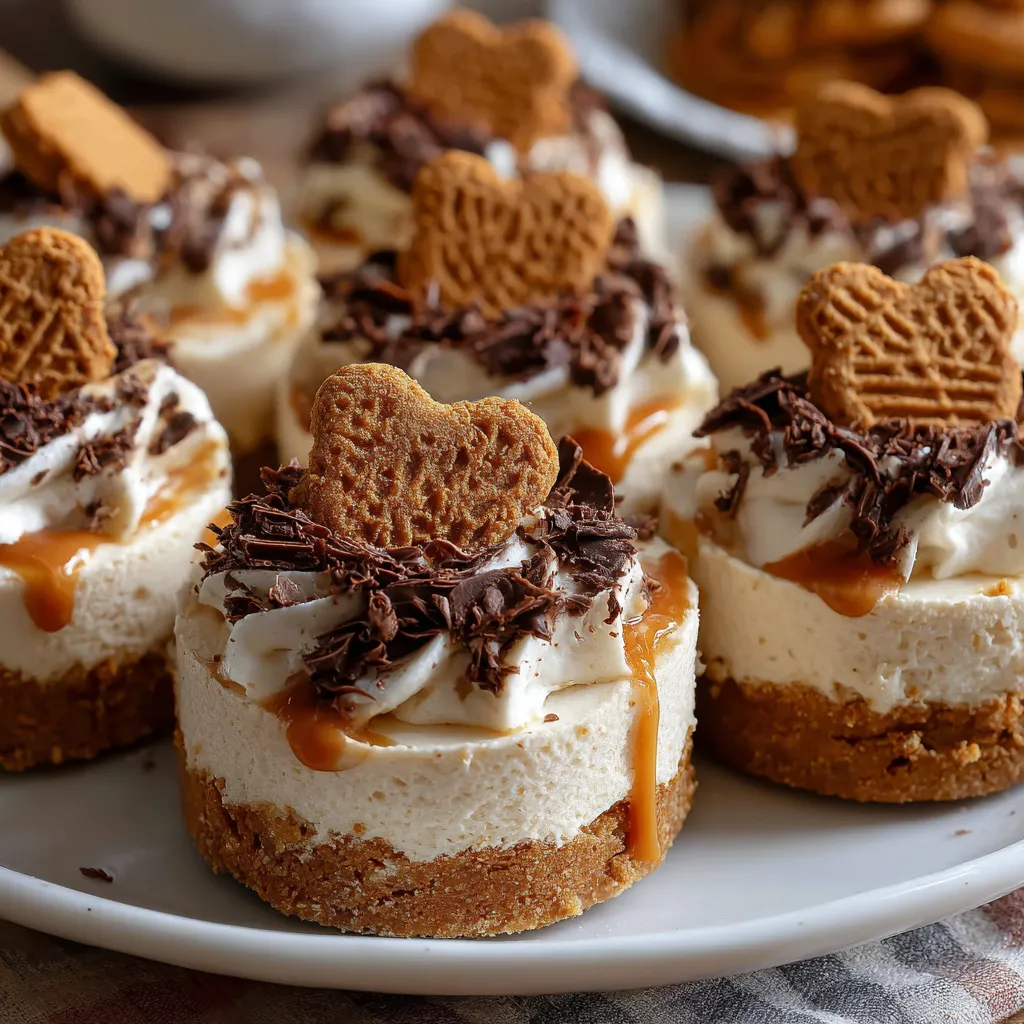

No Bake Mini Biscoff Cheesecakes
Description
Velvety cream cheese whipped with Biscoff spread sits on a crisp spiced cookie base, then chilled until perfectly set. Each bite offers smooth, airy filling and sweet cinnamon-kissed crunch.
Ingredients
Instructions
-
In a mixing bowl, combine the crushed Biscoff cookies with the melted butter. Mix until the cookies are fully coated and the mixture resembles wet sand.
-
Divide the cookie mixture evenly among mini dessert cups or a muffin tin lined with paper liners. Press the mixture down firmly to create a solid crust at the bottom of each cup.
-
In another mixing bowl, beat the softened cream cheese with an electric mixer until smooth and creamy, about 2 minutes.
-
Gradually add the powdered sugar to the cream cheese, mixing until fully incorporated and smooth.
-
In a separate bowl, whip the heavy cream and vanilla extract together using an electric mixer until stiff peaks form. Be careful not to over-whip.
-
Gently fold the whipped cream into the cream cheese mixture until fully combined, being careful to maintain the light and airy texture.
-
Add the Biscoff spread into the cream cheese mixture, folding gently until the spread is evenly distributed.
-
Spoon the cream cheese mixture evenly over the prepared cookie crusts in each cup, smoothing the top with a spatula.
-
Refrigerate the mini cheesecakes for at least 4 hours or until set. If possible, leave them overnight for the best results.
-
Before serving, garnish each mini cheesecake with an extra Biscoff cookie on top, and drizzles of chocolate or caramel sauce, if desired.
Note
- You can adjust the sweetness by adding more or less powdered sugar, depending on your preference.
- For added flavor, you can mix in a pinch of cinnamon or a splash of almond extract to the cream cheese mixture.
- These mini cheesecakes can be made up to three days in advance, making them great for parties.
- To make the crust gluten-free, substitute Biscoff cookies for gluten-free cookies.

