

There is something undeniably magical about bite-sized desserts during the holidays, especially when they combine the richness of a classic cake with festive flair. These Mini Christmas Cheesecakes are my absolute go-to when I need a treat that delivers big flavor without the stress of slicing a massive dessert or dealing with a water bath. They feature a buttery graham cracker crust topped with rich, creamy cheesecake and finished with a cool peppermint whip that tastes just like the season. Whether you are hosting a big family dinner or just need a little sweet cheer for a cozy night in, these individual delights are guaranteed to bring a smile to everyone's face.
Key Ingredients
To get started, you will need to gather a few pantry staples and fresh dairy items to ensure the best texture and flavor. It is essential to use high-quality ingredients, particularly full-fat dairy, to achieve that signature creamy consistency we all love in a cheesecake.
- 1 ½ cups graham cracker crumbs: The classic foundation that provides a crunchy, golden base to contrast the smooth filling.
- ⅓ cup granulated sugar: Adds just the right amount of sweetness to the crust to balance the buttery notes.
- ½ cup unsalted butter, melted: Acts as the delicious glue that holds the graham cracker crust together during baking.
- 16 oz cream cheese, softened: The star of the show that creates a tangy, rich, and velvety structure for the cheesecake.
- ½ cup granulated sugar: Sweetens the cream cheese filling without overpowering the natural tang of the dairy.
- 1 tsp vanilla extract: Provides a warm, aromatic background flavor that enhances the overall taste of the cheesecake.
- 2 large eggs: Essential for binding the filling together and giving the cheesecakes their lift and structure.
- 1 cup sour cream: Adds moisture and a slight tang to the batter, ensuring the final result is tender and fluffy.
- ½ cup powdered sugar: Used in the topping to provide a smooth, sweet finish that dissolves easily into the cream.
- ½ tsp peppermint extract: Infuses the topping with a cool, refreshing holiday flavor that pairs perfectly with the rich cheese.
- Red and green sprinkles for decoration: The final festive touch that adds a pop of color and holiday cheer to your dessert table.
How To Make Mini Christmas Cheesecakes
Making miniature cheesecakes is actually much more forgiving than baking a full-sized version, making this a perfect project for bakers of all skill levels. You get to skip the intimidating water bath, and the baking time is significantly shorter, which is a huge win during the busy holiday season. The key here is to not overmix your batter once the eggs are added, as this keeps the texture dense and creamy rather than airy and cracked. By layering the buttery crust, the smooth filling, and the minty topping, you create a perfectly balanced bite every time.
1. Start by getting your oven ready; preheat your oven to 325°F (165°C) and line a standard muffin tin with paper cupcake liners or grease the cups thoroughly to prevent sticking.
2. In a medium mixing bowl, bring together the graham cracker crumbs, ⅓ cup granulated sugar, and the melted butter, mixing them until the texture resembles wet sand and holds together when squeezed.
3. Scoop about 1 tablespoon of the crumb mixture into the bottom of each prepared muffin cup, then use the bottom of a small glass or your fingers to pack it down tightly to create a firm, even crust.
4. Grab a large bowl and use an electric mixer on medium speed to beat the softened cream cheese for about 2-3 minutes until it is completely smooth, creamy, and free of any lumps.
5. Slowly pour in the ½ cup granulated sugar and the vanilla extract while continuing to beat the mixture until everything is well combined and glossy.
6. Crack in the eggs, one at a time, making sure to beat the batter well after each addition so they are fully incorporated without overworking the mixture.
7. Gently mix in the sour cream until the batter transforms into a mixture that is smooth and fluffy, ensuring a tender cheesecake texture.
8. carefully divide the cream cheese mixture evenly among the muffin cups over the crusts, filling each liner about ¾ full to allow a little room for rising.
9. Place the tin in the preheated oven and bake for 18-20 minutes, or until the edges look set and dry while the centers are slightly jiggly but not wet to the touch.
10. Remove the pan from the oven and allow the cheesecakes to cool in the pan for 10 minutes, which helps them firm up gently before you transfer them to a wire rack to cool completely.
11. Once they have reached room temperature, place the cheesecakes in the refrigerator to chill for at least 2 hours or until set, which is crucial for the perfect consistency.
12. Right before you are ready to serve, whip the powdered sugar and peppermint extract into the sour cream until smooth, then top each cheesecake with a generous dollop of this mixture and garnish with festive red and green sprinkles.
Serving Suggestions
Presentation is everything when it comes to holiday desserts, and these mini cheesecakes look absolutely stunning when plated correctly. Because they are individual portions, they are perfect for buffet-style gatherings where guests can grab a treat and mingle. The contrast between the white topping and the colorful sprinkles makes them pop on any serving tray. You can serve them straight from the fridge for a refreshing bite or let them sit for ten minutes to soften slightly for a creamier mouthfeel.
- Create a Festive Platter: Arrange the cheesecakes on a dark slate or wooden board to make the white peppermint topping and colorful sprinkles visually pop against the background.
- Pair with Warm Beverages: Serve these chilled treats alongside steaming mugs of hot cocoa or peppermint mocha to create a delightful contrast of temperatures and complementary flavors.
- Add Fresh Garnishes: enhance the presentation by placing a small fresh mint leaf or a mini candy cane sticking out of the topping for an extra professional bakery look.
- Texture Contrast: For a bit of extra crunch, sprinkle some extra crushed graham crackers on the serving plate beneath the cheesecakes to echo the crust flavor.
Tips For Perfect Mini Christmas Cheesecakes
I have learned a few tricks over the years to ensure these cheesecakes come out flawless every single time. One of the biggest secrets to a smooth filling is ensuring your ingredients, especially the cream cheese and eggs, are at room temperature before you start mixing; this prevents lumps and ensures a silky batter. Also, resist the urge to open the oven door constantly while baking, as sudden temperature drops can cause the centers to sink. These little tweaks make the process stress-free and the results bakery-quality.
- Make-Ahead Magic: These mini cheesecakes can be made a day ahead of time for convenience, allowing the flavors to meld and freeing up your oven for other holiday cooking.
- Flavor Variations: Feel free to experiment with different flavors by swapping the vanilla or peppermint for almond, orange, or even eggnog extracts to suit your taste.
- Freezer Friendly: You can freeze any leftovers for up to 2 months; simply place them in an airtight container and thaw them in the refrigerator before serving.
- Dazzling Decoration: For a festive look, consider using edible glitter or themed decorations like holly leaves made of icing suitable for the holiday season.
How To Store It
Proper storage is key to maintaining the creamy texture of the cheesecake and the stability of the whipped topping. Since these desserts rely heavily on dairy, keeping them cold is non-negotiable to prevent spoilage and maintain their structure. I always recommend storing the cheesecakes without the final garnish if you plan to keep them for more than a day, adding the sprinkles right before serving so the colors don't bleed into the white cream.
- Refrigerator Storage: Keep the cheesecakes in an airtight container in the fridge for up to 5 days to ensure they stay fresh and do not absorb other fridge odors.
- Freezing Method: Place the uncoated cheesecakes on a baking sheet to freeze individually first, then transfer them to a freezer-safe bag to prevent them from sticking together for up to 2 months.
- Thawing Properly: When you are ready to eat frozen cheesecakes, move them to the refrigerator the night before to let them thaw slowly, which preserves the texture of the filling.
- Topping Storage: It is best to store the peppermint sour cream topping in a separate small container and dollop it on fresh just before serving to keep it fluffy and neat.
Frequently Asked Questions
Here are some answers to common questions I get about making these festive treats. Hopefully, this clears up any baking jitters so you can proceed with confidence!
- Q: Can these mini cheesecakes be prepared in advance for a holiday gathering?
A: Yes, these cheesecakes are very convenient for holiday planning. The recipe notes state that they can be made a day ahead of time. Additionally, you can freeze any leftovers or finished cheesecakes for up to 2 months; simply thaw them in the refrigerator before serving.
- Q: How can I tell when the cheesecakes are done baking?
A: You should bake the cheesecakes at 325°F (165°C) for 18 to 20 minutes. You will know they are ready to be removed from the oven when the edges are set and the centers are still slightly jiggly, but not wet.
- Q: What is the proper cooling method to ensure the best texture?
A: The cooling process involves three steps. First, remove the cheesecakes from the oven and let them cool in the muffin tin for 10 minutes. Next, transfer them to a wire rack to cool completely. Finally, refrigerate them for at least 2 hours to allow them to set properly before adding the topping.
- Q: How do I ensure the cream cheese mixture turns out smooth and fluffy?
A: To achieve a smooth texture, ensure your 16 oz of cream cheese is softened before starting. Beat the cream cheese with an electric mixer for 2-3 minutes until creamy. When adding the eggs, add them one at a time, beating well after each addition, and mix in the sour cream until the batter is fluffy.
- Q: How is the peppermint topping prepared and applied?
A: According to the final instruction step, you prepare the topping right before serving. Whip the ½ cup of powdered sugar and ½ teaspoon of peppermint extract into the sour cream until the mixture is smooth. Add a dollop of this mixture to each chilled cheesecake and decorate with red and green sprinkles.
What Makes This Special
Honestly, the reason this recipe works so well is that it tricks everyone into thinking you spent hours in the kitchen when you really just whipped up a quick batter and let the fridge do the heavy lifting! These Mini Christmas Cheesecakes are the perfect "oops, I ate three" size, which is hilarious but totally dangerous because they are that good. The combo of the buttery crust with that cool peppermint kick is just unmatched during the holidays. Do yourself a favor and print this article or save it to your bookmarks right now because you are going to need it come December. If you give these a whirl, drop a comment below or ask me any questions; I would love to hear how they turned out for you!
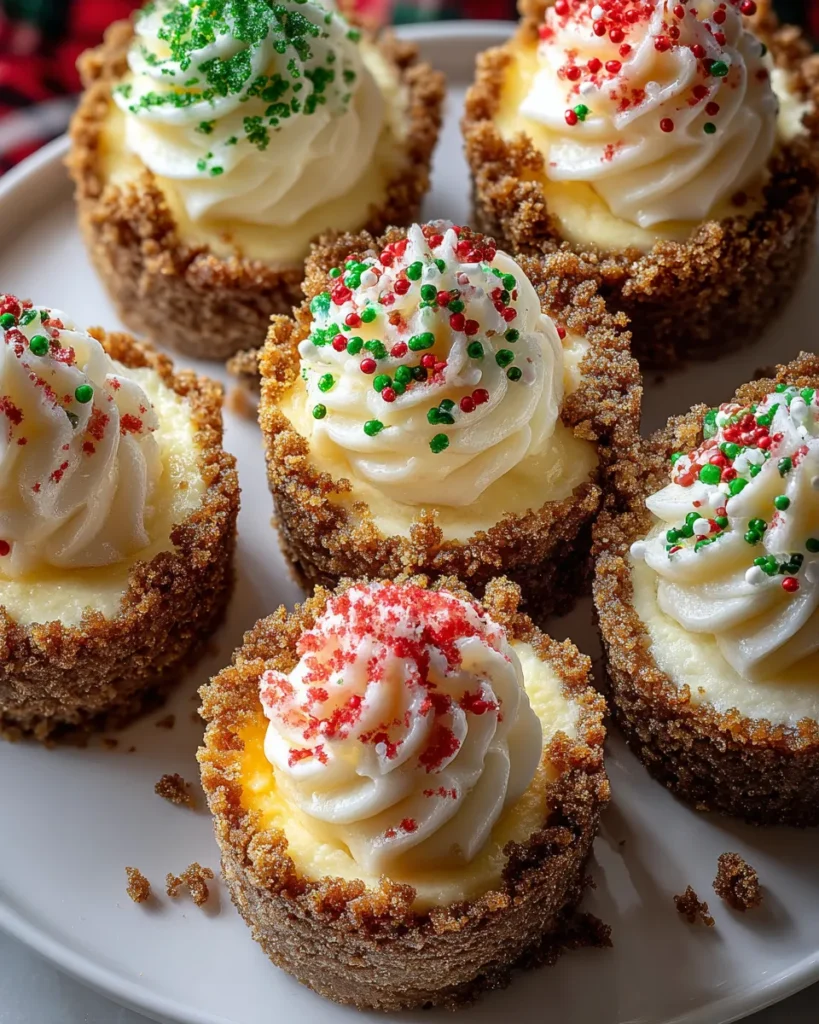

Mini Christmas Cheesecakes
Description
These individual treats feature a buttery graham cracker crust topped with rich, creamy cheesecake. Finished with a sweet peppermint cream and festive sprinkles, they bring a perfect touch of holiday cheer to your table.
Ingredients
Instructions
-
Preheat your oven to 325°F (165°C). Line a muffin tin with cupcake liners or grease it to prevent sticking.
-
In a medium bowl, combine the graham cracker crumbs, ⅓ cup granulated sugar, and melted butter. Mix until fully combined and resembles wet sand.
-
Press about 1 tablespoon of the crumb mixture into the bottom of each muffin cup to form a crust. Use a small cup or your fingers to pack it down tightly.
-
In a large bowl, beat the softened cream cheese with an electric mixer on medium speed until smooth and creamy, about 2-3 minutes.
-
Gradually add ½ cup granulated sugar and vanilla extract, continuing to beat until well combined.
-
Add the eggs, one at a time, beating well after each addition until fully incorporated.
-
Mix in the sour cream until the mixture is smooth and fluffy.
-
Divide the cream cheese mixture evenly among the muffin cups, filling each one about ¾ full.
-
Bake in the preheated oven for 18-20 minutes or until the edges are set and the centers are slightly jiggly but not wet.
-
Remove the cheesecakes from the oven and let them cool in the pan for 10 minutes before transferring them to a wire rack to cool completely.
-
Once cooled, refrigerate the cheesecakes for at least 2 hours or until set.
-
Before serving, whip the powdered sugar and peppermint extract into the sour cream until smooth. Top each cheesecake with a dollop of this mixture and decorate with red and green sprinkles.
Note
- These mini cheesecakes can be made a day ahead of time for convenience.
- Feel free to experiment with different flavors by adding various extracts or toppings.
- You can freeze any leftovers for up to 2 months; simply thaw in the refrigerator before serving.
- For a festive look, consider using edible glitter or themed decorations suitable for the holiday season.

