

Mini Cheesecake Boards are a delightful way to captivate your guests and satisfy any sweet tooth without committing to a full-size dessert. These bite-sized beauties combine a buttery, crunchy crust with a luxuriously creamy filling that’s perfect for sharing—or sneaking an extra one when no one’s looking. Each mini cheesecake sits like a tiny jewel on a serving board, waiting to be adorned with bright berries, glossy fruit preserves, bits of chocolate, or crunchy nuts. It’s a party platter that doubles as an edible centerpiece, and it practically invites people to gather around, chat, and sample a variety of decadent flavors.
What makes this recipe especially charming is how approachable it is, even for the most beginner-friendly baker. With just a handful of staples—graham cracker crumbs, cream cheese, eggs, sugar, and sour cream—you’ll be amazed at how effortlessly you can produce restaurant-quality mini cheesecakes at home. The total prep time is just 20 minutes, the bake time a mere 18 minutes, and then you let them rest in the fridge for at least 2 hours before serving. Each petite cheesecake clocks in at around 175 calories, so guests can feel free to indulge in multiple flavors without any guilt. Whether it’s a summer fête, a birthday blowout, or a cozy family brunch, these mini cheesecake boards are guaranteed to add a sweet note of celebration to any occasion.
KEY INGREDIENTS IN MINI CHEESECAKE BOARD
Before diving into the recipe, let’s gather the essentials that lay the foundation for these delightful mini treats. Each ingredient plays a unique role, ensuring the perfect balance of texture, flavor, and structure. Quality matters, so opt for full-fat cream cheese and fresh, flavorful toppings to make every bite sing.
- Graham cracker crumbs
Provide a crisp, sweet base with just the right amount of crunch. When mixed with melted butter, they form a sturdy crust that holds its shape and offers a delightful contrast to the creamy filling.
- Unsalted butter
Binds the graham crumbs together and adds rich, buttery flavor. Using unsalted butter lets you control the overall saltiness, keeping the crust perfectly balanced.
- Cream cheese
The heart and soul of any cheesecake, delivering that signature tang and silky-smooth mouthfeel. Softened to room temperature, it blends effortlessly with sugar for a luscious filling.
- Granulated sugar
Sweetens the cream cheese mixture and helps create a tender, velvety texture. The fine crystals dissolve completely, ensuring no grittiness in the final cheesecake.
- Vanilla extract
A small splash brings depth and warmth, enhancing the overall flavor profile. Pure vanilla extract adds subtle floral notes that complement both sweet and tart toppings.
- Eggs
Act as a binding agent, giving structure to the filling and helping it set perfectly in the oven. Adding them one at a time ensures a smooth, uniform batter without overmixing.
- Sour cream
Introduces a gentle tang and extra creaminess. Folded in carefully, it lightens the batter and prevents cracks, while also keeping the texture moist and tender.
- Assorted toppings
From fresh berries and fruit preserves to chocolate chips and chopped nuts, toppings allow you to customize each mini cheesecake. They add color, texture, and bursts of flavor to every bite.
HOW TO MAKE MINI CHEESECAKE BOARD
Now that we’ve lined up our ingredients, let’s walk through each step to build the perfect mini cheesecake board. This straightforward, step-by-step approach ensures consistent results, whether you’re baking for a casual gathering or an elegant celebration.
1. Preheat your oven to 325°F (163°C). This moderate temperature helps the cheesecakes bake evenly, preventing over-browning and ensuring a smooth, creamy center.
2. In a medium bowl, combine the graham cracker crumbs and melted butter until every crumb is coated. Use the back of a spoon or a flat-bottomed glass to press the mixture firmly into the bottom of a mini cheesecake pan, forming neat, compact crusts.
3. In a large mixing bowl, beat the cream cheese and sugar on medium speed until the mixture is smooth and creamy, scraping down the sides as needed to eliminate lumps.
4. Add the vanilla extract and continue mixing until it’s fully incorporated, infusing the batter with a gentle, aromatic warmth.
5. Crack the eggs one at a time into the bowl, mixing on low speed after each addition until just combined. Be careful not to overmix, as this can introduce air bubbles that lead to cracks.
6. Gently fold in the sour cream using a rubber spatula. The key is to combine fully without deflating the batter, preserving its light, airy texture.
7. Evenly pour the cheesecake batter over each crust, filling the mini cheesecake cups nearly to the top for that classic domed shape.
8. Bake for 15–18 minutes, or until the centers are set and no longer jiggly. The edges should appear slightly puffed and set, while the middle retains a gentle wobble.
9. Remove the pan and let the cheesecakes cool at room temperature for about 15 minutes. Then transfer to the refrigerator and chill for at least 2 hours to allow them to firm up and develop deeper flavor.
10. Carefully remove each mini cheesecake from the pan—gently tap or run a thin knife around the edges if needed—and arrange them artfully on a large serving board.
11. Surround the cheesecakes with assorted toppings—fresh berries, chocolate chips, nuts, or dollops of fruit preserves—for a colorful, textured presentation that invites guests to mix and match.
12. Serve each tiny masterpiece chilled, and watch as everyone delights in these perfectly portioned, melt-in-your-mouth treats.
SERVING SUGGESTIONS FOR MINI CHEESECAKE BOARD
Once your mini cheesecakes are chilled and topped, presentation becomes the final flourish that turns dessert into an experience. A well-styled board not only looks stunning but also makes it easy for friends to help themselves and discover new flavor combinations. Whether you’re hosting a backyard BBQ or an elegant brunch, these serving tips will elevate your spread and ensure every guest feels like they’re sampling something special.
- Arrange a seasonal fruit display around your cheesecakes, alternating bright red strawberries, deep blue blueberries, and vibrant kiwi slices. The pop of color not only looks gorgeous but also offers contrasting flavors and textures that highlight the creamy filling.
- Pair the board with a sparkling beverage—a crisp Prosecco or a refreshing fruit-infused soda. The effervescence cuts through the richness and cleanses the palate, making each mini cheesecake taste as delightful as the first.
- Create a flavor flight by labeling each cheesecake with small chalkboard tags or decorative toothpick flags. Guests will love identifying different toppings or crust variations, turning dessert into an interactive tasting adventure.
- Set up a DIY topping station nearby with small bowls of chopped nuts, chocolate shavings, and assorted jams. Invite everyone to customize their own mini cheesecake, encouraging creativity and playful experimentation.
HOW TO STORE MINI CHEESECAKE BOARD
Proper storage is key to maintaining the creamy texture and bright flavors of your mini cheesecakes. Whether you have leftovers or you’re prepping ahead of time, these tips will help you keep each bite just as delicious as the moment they first came out of the oven.
- Refrigeration in an airtight container: Once fully chilled, place the cheesecakes in a single layer inside an airtight container. They’ll stay fresh for up to three days without absorbing any fridge odors or drying out.
- Careful wrapping for freezing: For longer storage, wrap each mini cheesecake individually in plastic wrap, then in aluminum foil to prevent freezer burn. Freeze for up to one month, and thaw overnight in the refrigerator before serving.
- Separate toppings: If you’re making these ahead of time, store fresh berries or crunchy toppings in separate containers. Add them just before serving to maintain optimal texture and color.
- Layering with parchment paper: If you need to stack multiple layers in one container, place a sheet of parchment paper between layers to prevent sticking and preserve the pristine appearance of each cheesecake.
CONCLUSION
Bringing a Mini Cheesecake Board to your next gathering isn’t just about serving dessert—it’s about creating a memorable moment that brings people together. From the satisfying crunch of the golden crust to the dreamy silkiness of the cream cheese filling, every component works in harmony to deliver tiny bursts of indulgence. You’ve seen how simple it is to whip up this dessert vision: gather a few pantry staples, follow a clear set of steps, and personalize the final presentation to reflect your unique style. Best of all, this recipe is designed for home cooks of any skill level, with beginner-friendly instructions and a forgiving nature that allows for experimentation. Feel free to swap graham crackers for oreos, test out various jams, or even swirl chocolate into the batter for added flair. And once you’ve perfected your own version, don’t forget—you can print this article and save it for later, so you’ll always have a go-to guide when the mood for mini cheesecakes strikes.
We’ve covered everything from ingredient selection to storage hacks, and we’ve sprinkled in serving tips to make your board as Instagram-worthy as it is delicious. Below, you’ll find a FAQ section to answer any lingering questions you might have, whether you need clarification on baking times or tips for avoiding cracks. In the meantime, I’d love to hear about your experience—did the cheesecakes set perfectly? Which toppings stole the show at your party? Drop a comment with your questions, suggestions, or any fun twists you tried. Your feedback helps create an even better dessert adventure for everyone who stops by this recipe. Happy baking, and may your next celebration shine with the simple joy of miniature, creamy indulgence!
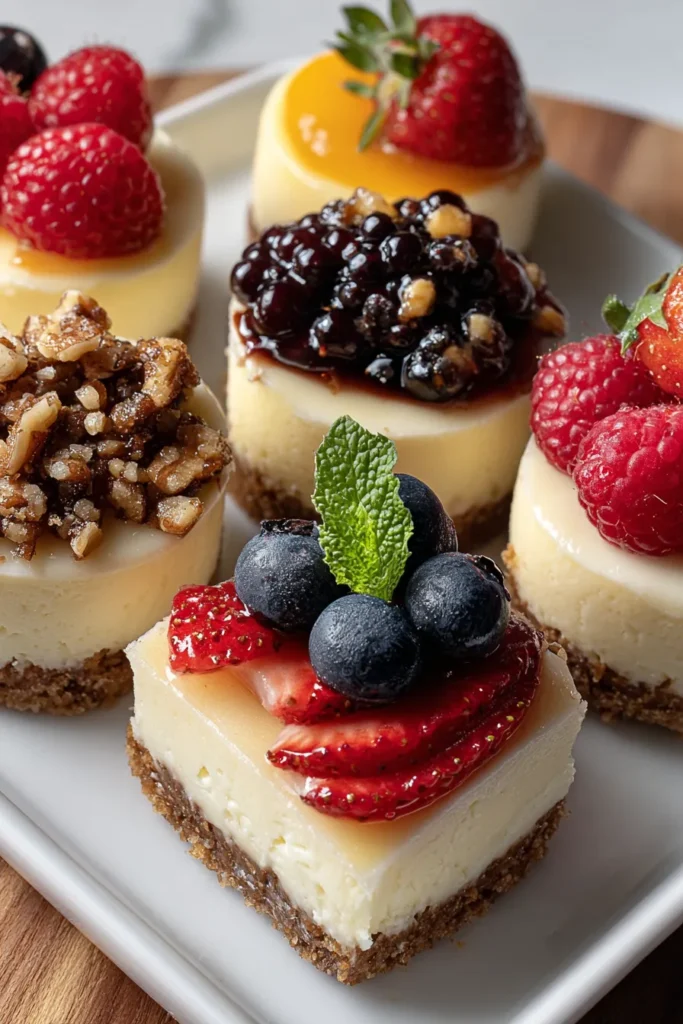

Mini Cheesecake Board
Description
Treat your guests to a delightful array of mini cheesecakes adorned with fresh berries and toppings. These bite-sized desserts make every gathering a special occasion.
Ingredients
Instructions
-
Preheat your oven to 325°F (163°C).
-
In a medium bowl, combine the graham cracker crumbs and melted butter until evenly mixed. Press the mixture into the bottom of a mini cheesecake pan to form the crusts.
-
In a large mixing bowl, beat the cream cheese and sugar until smooth and creamy.
-
Add in the vanilla extract and mix well.
-
One at a time, add the eggs, mixing on low speed until just combined. Do not overmix.
-
Fold in the sour cream gently until well incorporated.
-
Pour the cheesecake batter evenly over the crusts in the mini cheesecake pans.
-
Bake for 15-18 minutes or until the centers are set and no longer jiggly.
-
Allow the cheesecakes to cool at room temperature for about 15 minutes, then refrigerate for at least 2 hours.
-
Once cooled, remove the mini cheesecakes from the pans and arrange them on a board.
-
Add assorted toppings such as fresh berries, chocolate chips, nuts, or fruit preserves around the cheesecakes for a beautiful presentation.
-
Serve chilled and enjoy!
Note
- Mini cheesecake boards are perfect for parties as they offer a variety of flavors.
- Feel free to experiment with different crusts like Oreo or shortbread for unique variations.
- Leftover cheesecakes can be stored in the refrigerator for up to 3 days.
- The mini size allows guests to enjoy multiple flavors without feeling too full.
- You can make these a day in advance to save time on the day of your gathering.

