

Everyone loves the smell of fresh bread, but when you add punchy garlic and fresh herbs like rosemary and thyme to the mix, it becomes an absolute obsession. I still remember the first time I pulled this golden, crackling loaf out of the oven; my kitchen smelled like a rustic countryside bakery, and my family devoured nearly the whole thing before it even had a chance to fully cool. This intermediate-level recipe transforms simple ingredients into an artisan masterpiece perfect for lunch or a cozy dinner side. If you have an active bubbly starter ready, let’s get baking this chewy, flavor-packed delight together!
Key Ingredients
Creating a beautiful artisan loaf doesn't require a pantry full of obscure items. In fact, the magic of sourdough lies in how just a few basics come together to create complex flavors and textures. For this recipe, we are elevating the standard dough with aromatic additions that will make your taste buds sing. Here is exactly what you need to get that perfect rise and flavor profile.
- 500g bread flour: The strong foundation of your loaf that provides the necessary protein for structure and that signature chewy texture.
- 100g active sourdough starter: The living heart of the recipe that leavens the bread and provides that distinct, tangy flavor profile.
- 350ml water, lukewarm: Hydrates the flour and helps activate the yeast in your starter without shocking it with extreme temperatures.
- 10g salt: Essential for strengthening the gluten network and enhancing the overall flavor of the wheat and herbs.
- 4 cloves of garlic, finely chopped or minced: Adds a savory, punchy kick that infuses every slice with aromatic goodness.
- 2 tablespoons mixed fresh herbs (such as rosemary, thyme, and parsley), finely chopped: Provides an earthy, fragrant element that complements the sourness of the dough perfectly.
- 1 tablespoon olive oil: Adds a touch of tenderness to the crumb and enriches the dough with a subtle fruitiness.
- Extra flour for dusting: Prevents the dough from sticking to your hands and work surfaces during kneading and shaping.
How To Make Garlic and Herb Sourdough Bread
Making sourdough is a labor of love, but it is incredibly rewarding. The process relies on time and patience, allowing the wild yeast to do the heavy lifting. We will be mixing our dough, letting it ferment to build flavor, and then baking it at a high temperature to achieve that coveted crust. The addition of garlic and herbs happens right at the beginning, ensuring those flavors marinate throughout the entire rising process. Don't rush the steps; enjoy the tactile experience of kneading and shaping!
1. In a large mixing bowl, combine the bread flour and salt, stirring to mix well.
2. In another bowl, combine the active sourdough starter and lukewarm water, stirring until fully dissolved.
3. Slowly add the starter mixture to the flour mixture, mixing with a wooden spoon or your hands until a shaggy dough forms.
4. Add the minced garlic, chopped herbs, and olive oil to the dough. Mix well to ensure the garlic and herbs are evenly distributed.
5. Knead the dough on a floured surface for about 10 minutes until it becomes smooth and elastic. If the dough is too sticky, sprinkle a little extra flour as needed.
6. Place the dough in a lightly greased bowl, cover with a damp kitchen towel or plastic wrap, and let it rest at room temperature for about 4 to 6 hours, or until it has doubled in size.
7. After the first rise, gently deflate the dough and transfer it to a floured surface. Shape it into a round loaf or a batard (oval shape).
8. Place the shaped dough onto a parchment-lined baking sheet, cover it with a kitchen towel, and let it rise for another 1 to 2 hours, until puffy.
9. Preheat your oven to 230°C (450°F). Place a Dutch oven or a baking stone inside to preheat as well.
10. Once the dough has risen, use a sharp knife to make a few shallow slashes on the top of the loaf for decoration and to help it expand during baking.
11. Carefully transfer the dough to the preheated Dutch oven or onto the hot baking stone. If using a Dutch oven, cover it with the lid for the first 20 minutes of baking.
12. Bake the bread for 25-30 minutes total, removing the lid after 20 minutes to allow the crust to become golden brown.
13. When the bread is done, it should sound hollow when tapped on the bottom. Remove it from the oven and let it cool on a wire rack before slicing.
Serving Suggestions
There is nothing quite like slicing into a loaf you baked yourself, especially one that fills the house with the scent of roasted garlic and herbs. While I am often guilty of eating a slice plain right at the counter, this bread is versatile enough to elevate any meal. Whether you want to keep it simple to highlight the sourdough tang or use it as a vessel for other flavors, the options are endless.
- Classic Dipping Platter: Create a simple yet elegant appetizer by serving warm slices alongside a small bowl of high-quality extra virgin olive oil and aged balsamic vinegar for dipping.
- Gourmet Grilled Cheese: Elevate your lunch by using thick slices of this bread to make a grilled cheese sandwich, using sharp cheddar or gruyère which pairs beautifully with the rosemary and thyme.
- Soup Accompaniment: Serve a generous chunk of this crusty loaf alongside a creamy tomato basil soup or a rustic vegetable stew to soak up the broth and add a savory crunch.
- Savory Breakfast Toast: Toast a slice until golden and top it with smashed avocado, a pinch of red pepper flakes, and a poached egg for a hearty, herb-infused start to your day.
Tips For Perfect Garlic and Herb Sourdough Bread
Sourdough can sometimes feel a bit temperamental, but with a few insider tricks, you can ensure consistent, bakery-quality results every time. I want you to feel confident in the kitchen, so I've gathered some specific advice based on the recipe notes to help you succeed. These small adjustments can make a massive difference in the texture and flavor depth of your final loaf.
- Pairing Flavors: As noted, this bread pairs beautifully with olive oil or balsamic vinegar for dipping, so don't hesitate to serve it simply to let the garlic shine.
- Herb Variations: You should feel free to experiment with different herbs based on your taste preferences or what is available in your garden; oregano or sage are excellent alternatives.
- Flavor Development: Remember that sourdough bread improves in flavor when made a day in advance and stored properly, as the fermentation flavors continue to settle.
- Starter Health: Crucially, make sure your sourdough starter is active and bubbly for the best results; a flat starter will result in a dense, heavy loaf.
How To Store It
Proper storage is the key to enjoying your hard work for days to come. Sourdough creates its own natural preservatives through acidity, but keeping that crust crunchy and the inside soft requires the right environment. We want to avoid the bread drying out or becoming moldy, so forget about the refrigerator, which actually makes bread go stale faster!
- Paper Bag Storage: For the first 24 hours, store your loaf in a paper bag at room temperature; this allows the bread to breathe and keeps the crust crispy while protecting the interior.
- Cut Side Down: If you have cut into the loaf, simply place it cut-side down on a wooden cutting board to block air from drying out the crumb, leaving the crust exposed to stay crunchy.
- Freezing for Long Term: Slice the entire loaf, place parchment paper between slices, and store in a freezer-safe bag for up to 3 months; toast individual slices straight from frozen.
- Bread Box: If you have one, a dedicated bread box is ideal as it maintains the perfect humidity balance to keep the crumb soft without softening the crust too much.
Frequently Asked Questions
It's completely normal to have questions when working with wild yeast and fermentation! Here are the answers to the most common queries to help you navigate the process smoothly.
- Q: What condition should my sourdough starter be in before I begin this recipe?
A: To ensure the best results, your sourdough starter must be active and bubbly. You will need to dissolve 100g of this active starter in 350ml of lukewarm water before combining it with the flour mixture.
- Q: At what stage do I add the flavorings, and how should the dough feel after kneading?
A: You should add the minced garlic, chopped herbs, and tablespoon of olive oil after the initial flour, salt, starter, and water have been mixed into a shaggy dough. You must then knead the mixture for about 10 minutes until it is smooth and elastic, adding a sprinkle of extra flour if the dough remains too sticky.
- Q: How long are the proofing times for this bread?
A: This recipe requires two rise times. The first rise happens after kneading and lasts for about 4 to 6 hours at room temperature, or until the dough has doubled in size. After shaping the dough into a loaf or batard, the second rise takes 1 to 2 hours until the dough becomes puffy.
- Q: What are the specific baking instructions if I am using a Dutch oven?
A: If using a Dutch oven, you must preheat it inside the oven to 230°C (450°F). After placing the scored dough inside, keep the lid on for the first 20 minutes of the bake to trap steam. Remove the lid for the remaining time to allow the crust to turn golden brown, baking for a total of 25 to 30 minutes.
- Q: Can I customize the herbs used in this recipe?
A: Yes, while the recipe suggests using 2 tablespoons of mixed fresh herbs such as rosemary, thyme, and parsley, the notes encourage you to experiment with different herbs based on your taste preferences or whatever ingredients are available to you.
- Q: How do I know when the bread is fully baked?
A: The bread is done when the crust is golden brown and the loaf sounds hollow when you tap it on the bottom. It should take between 25 and 30 minutes total in an oven preheated to 230°C (450°F).
What Makes This Special
This Garlic and Herb Sourdough Bread isn't just another recipe; it's a trusty kitchen staple that makes you look like a pro baker with just a little patience. The combination of that chewy, tangy crumb speckled with fresh green herbs and the savory hit of garlic is honestly unbeatable. It works because it takes the intimidating world of sourdough and gives it a comforting, savory twist that pairs with literally everything. Seriously, make sure to save this page or print it out because once you taste that first slice, your family is going to demand it weekly! If you give it a try or run into any sticky situations with your dough, drop a comment below—I’d love to hear how your loaf turned out!
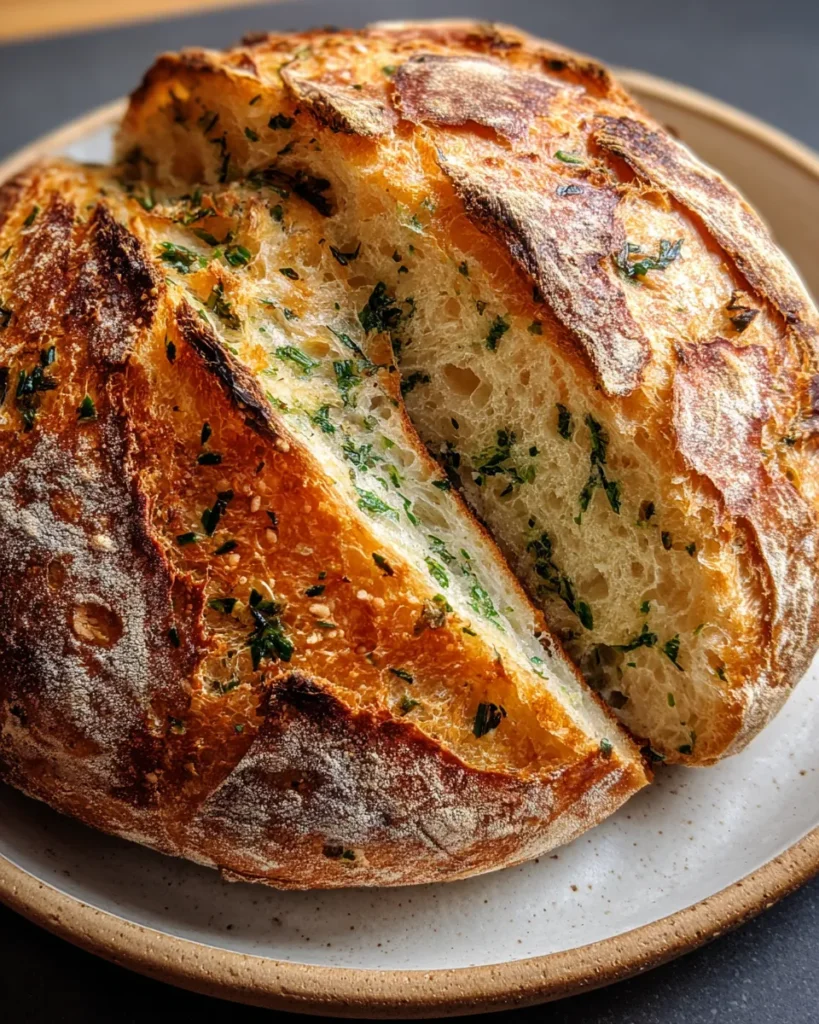

Garlic and Herb Sourdough Bread
Description
A golden, crackling crust gives way to a chewy crumb speckled with minced garlic and fresh herbs. The aroma of rosemary and thyme fills the kitchen as it bakes to perfection.
Ingredients
Instructions
-
In a large mixing bowl, combine the bread flour and salt, stirring to mix well.
-
In another bowl, combine the active sourdough starter and lukewarm water, stirring until fully dissolved.
-
Slowly add the starter mixture to the flour mixture, mixing with a wooden spoon or your hands until a shaggy dough forms.
-
Add the minced garlic, chopped herbs, and olive oil to the dough. Mix well to ensure the garlic and herbs are evenly distributed.
-
Knead the dough on a floured surface for about 10 minutes until it becomes smooth and elastic. If the dough is too sticky, sprinkle a little extra flour as needed.
-
Place the dough in a lightly greased bowl, cover with a damp kitchen towel or plastic wrap, and let it rest at room temperature for about 4 to 6 hours, or until it has doubled in size.
-
After the first rise, gently deflate the dough and transfer it to a floured surface. Shape it into a round loaf or a batard (oval shape).
-
Place the shaped dough onto a parchment-lined baking sheet, cover it with a kitchen towel, and let it rise for another 1 to 2 hours, until puffy.
-
Preheat your oven to 230°C (450°F). Place a Dutch oven or a baking stone inside to preheat as well.
-
Once the dough has risen, use a sharp knife to make a few shallow slashes on the top of the loaf for decoration and to help it expand during baking.
-
Carefully transfer the dough to the preheated Dutch oven or onto the hot baking stone. If using a Dutch oven, cover it with the lid for the first 20 minutes of baking.
-
Bake the bread for 25-30 minutes total, removing the lid after 20 minutes to allow the crust to become golden brown.
-
When the bread is done, it should sound hollow when tapped on the bottom. Remove it from the oven and let it cool on a wire rack before slicing.
Note
- This bread pairs beautifully with olive oil or balsamic vinegar for dipping.
- Feel free to experiment with different herbs based on your taste preferences or what is available.
- Sourdough bread improves in flavor when made a day in advance and stored properly.
- Make sure your sourdough starter is active and bubbly for the best results.

