

Some celebrations call for more than just your average slice of cake; they demand a delightful centerpiece that brings smiles and sparks conversations. That’s exactly where the Fruit Lion Cake shines. With its playful lion face design made of vibrant fruit slices, this cake transforms dessert time into a whimsical experience that both kids and adults adore. I remember the first time I surprised my niece with this cake at her birthday party—her eyes lit up when she saw that fruity mane, and I swear she roared louder than any toy lion we’d given her. Each bite offered a burst of mixed fruits nestled in a soft, vanilla-infused crumb, all layered together with billowy whipped cream. The fun dessert vibe, paired with an intermediate difficulty level (preparing in just 30 minutes, baking another 30 minutes, and resting for half an hour), makes this recipe a party-winning showstopper.
What makes this cake truly unforgettable is the harmony of textures and flavors. The all-purpose flour and leavening agents create a tender crumb that supports pockets of pineapple, strawberry, kiwi, and mango. A drizzle of honey in the whipped cream adds gentle sweetness, while a sprinkle of orange and lemon zest brightens every slice with a citrusy zing. At roughly 350 calories per serving, this Fruit Lion Cake feels like a special treat that’s worth savoring, whether you’re marking a milestone, planning a picnic dessert, or simply craving something cheerful for your afternoon tea. It’s a fun dessert that’s as much about presentation as it is about taste—so grab your mixing bowls and edible eyes, and get ready to craft a dessert that will leave your guests roaring for more!
KEY INGREDIENTS IN FRUIT LION CAKE
To whip up this playful cake, you’ll need a handful of pantry staples and some fresh produce to bring the lion’s mane to life. Each ingredient plays a crucial role, from building structure to adding flavor, color, and texture.
- all-purpose flour
Provides the cake’s tender structure and body. Its balanced protein content helps create a crumb that holds fruit pieces without weighing them down.
- baking powder
A primary leavening agent that generates lift, making the layers light and fluffy. It ensures the cake rises evenly.
- baking soda
Works alongside baking powder to fine-tune the rise and helps with browning, giving the cake its golden crust.
- salt
Enhances overall flavor, balancing the sweetness and accentuating the natural taste of fruits and vanilla.
- unsalted butter
Adds richness and moisture. When creamed with sugar, it traps air and sets the stage for a light, tender crumb.
- granulated sugar
Sweetens the batter and contributes to the cake’s tender texture by drawing moisture into the mixture.
- large eggs
Provide structure, moisture, and stability. Beaten in one at a time, they help emulsify the batter for a smooth finish.
- vanilla extract
Infuses a warm, aromatic flavor that complements the fruit and cream layers, rounding out the taste profile.
- buttermilk
Adds moisture and a subtle tang, tenderizing the crumb and reacting with the baking soda for extra lift.
- mixed fruits
A colorful medley—think chopped pineapples, strawberries, kiwis, and mangos—folded into the batter to create juicy pockets in every slice.
- heavy cream
Whipped into a luscious frosting, it envelops the layers in silky sweetness and forms the canvas for the lion design.
- honey
Sweetens the whipped cream naturally, adding depth and a hint of floral undertones.
- orange and lemon zest
Offers vibrant pops of citrus flavor and color, perfect for garnishing the lion’s mane and brightening each bite.
- edible eyes or berries
Bring the lion’s face to life. These simple decorations turn your cake into a playful masterpiece.
HOW TO MAKE FRUIT LION CAKE
Let’s dive into the step-by-step process that turns simple ingredients into an enchanting dessert. Whether you’re an aspiring baker or someone who loves kitchen adventures, these instructions will guide you through creating beautiful, fruit-studded cake layers and the whimsical lion design.
1. Preheat your oven to 350°F (175°C). Grease and flour two 9-inch round cake pans, ensuring the edges and bottoms are lightly coated to prevent sticking.
2. In a medium bowl, whisk together the flour, baking powder, baking soda, and salt. This dry mix ensures even distribution of leavening agents.
3. In a large bowl, cream the softened butter and granulated sugar until the mixture is light and fluffy—about 3–4 minutes with an electric mixer on medium speed.
4. Beat in the eggs one at a time, ensuring each egg is fully incorporated before adding the next. Stir in the vanilla extract until the batter is smooth and aromatic.
5. Alternately add the flour mixture and buttermilk to the butter-sugar-egg mixture, beginning and ending with the flour. Mix on low speed and stop as soon as ingredients are just combined to avoid overmixing.
6. Fold in the mixed fruits gently using a spatula. This delicate technique helps keep the fruit pieces intact and evenly distributed.
7. Divide the batter evenly between the prepared cake pans, smoothing the tops with a spatula for uniform layers.
8. Bake in the preheated oven for 25–30 minutes, or until a toothpick inserted into the center of each cake comes out clean.
9. Let the cakes cool in their pans for 10 minutes. Then, carefully turn them out onto a wire rack to cool completely before frosting.
10. In a chilled bowl, whip the heavy cream with the honey until soft peaks form, creating a stable yet airy frosting.
11. Place one cake layer on your serving plate and spread a generous layer of whipped cream on top. Set the second layer on and cover the entire cake with a thin crumb coat of whipped cream to seal in crumbs.
12. Create a lion’s face design on top using fruit slices for the mane, orange and lemon zest for accents, and edible eyes or berries to bring your lion to life.
13. Refrigerate the assembled cake for at least 30 minutes before serving. This allows the frosting to set and makes slicing neater.
SERVING SUGGESTIONS FOR FRUIT LION CAKE
Once your cake is perfectly chilled and the lion’s face is proudly displayed, it’s time to think about how to present and serve slices that highlight its charm and flavors. Whether you’re hosting a birthday bash, a sunny picnic, or a cozy family gathering, these suggestions will elevate every slice.
- Serve each slice chilled on a colorful dessert plate, garnishing with extra citrus zest for a fresh, eye-catching touch. The contrast between the whipped cream and fruit will pop beautifully against vibrant dishware.
- Create a dessert buffet station by placing the cake on a rustic wooden board alongside bowls of fresh berries, mint sprigs, and mini spoons. Guests can customize their plates with additional fruit.
- Pair slices with a scoop of vanilla ice cream or a dollop of Greek yogurt on the side. The creamy accompaniments balance the cake’s sweetness and add an indulgent flair.
- Offer bite-sized cake squares by trimming the edges and cutting the cake into uniform cubes. Serve them on decorative toothpicks for an easy, crowd-pleasing finger food.
HOW TO STORE FRUIT LION CAKE
After the applause and camera flashes fade, you’ll want to know how to keep your creation tasting its best. Proper storage preserves the cake’s moisture, fruit quality, and whipped cream stability, so each slice feels freshly made.
- Refrigerate in an airtight container for up to three days. This helps retain moisture and flavor while preventing the whipped cream from absorbing other odors.
- Wrap individual slices in plastic wrap before storing in the fridge. This double protection keeps the fruit from drying out and makes grab-and-go portions simple for busy mornings.
- Freeze for longer storage by placing the cake (or slices) on a baking sheet until firm, then wrapping in foil and plastic wrap. Thaw in the refrigerator overnight before serving to maintain texture.
- Bring to room temperature for 15–20 minutes before enjoying. This step revives the cake’s softness and ensures the flavors are fully expressed.
CONCLUSION
This Fruit Lion Cake has taken us on a delightful journey from mixing bowls to show-stopping dessert table. We’ve crafted tender, fruit-studded vanilla layers, whipped up a cloudlike honey-infused cream, and arranged a playful lion’s face that’s both adorable and delicious. With a preparation time of just 30 minutes, baking for another 30, and a final 30-minute rest in the fridge, you’ll have a crowd-pleasing masterpiece ready in no time. Whether you’re celebrating a birthday, hosting a summer barbecue, or simply craving a fun treat, this cake brings joy and flavor to any occasion. Don’t forget to sprinkle a little extra citrus zest for added zing, and experiment with different fruit combinations to put your own twist on the mane.
Feel free to print this article or save it for later—it’s your go-to guide for recreating this showstopper whenever inspiration strikes. Below, you’ll find a handy FAQ section to answer any lingering questions, from altitude adjustments to fruit substitutions. If you try the recipe or have any thoughts, questions, or feedback, I’d love to hear from you! Sharing your experiences not only helps fellow home cooks, but it also inspires new ideas for making the Fruit Lion Cake even more spectacular. Happy baking, and may your next gathering be filled with roars of delight!
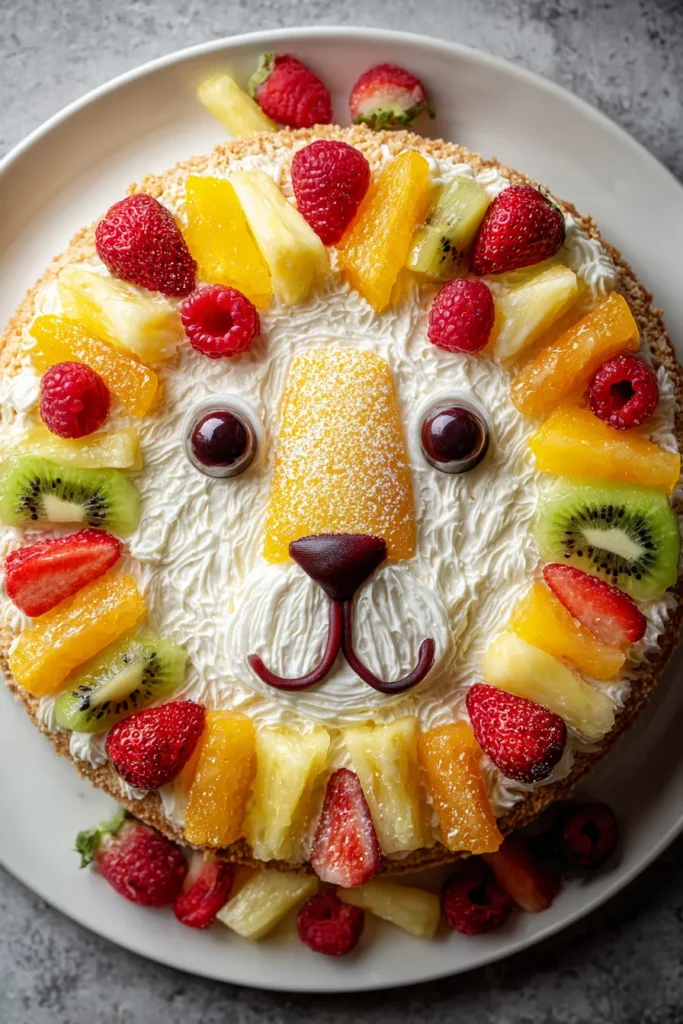

Fruit Lion Cake
Description
This playful cake combines fluffy layers of fruit-studded vanilla cake, whipped cream frosting, and a stunning lion design. Perfect for celebrations and all ages!
Ingredients
Instructions
-
Preheat your oven to 350°F (175°C). Grease and flour two 9-inch round cake pans.
-
In a medium bowl, whisk together flour, baking powder, baking soda, and salt.
-
In a large bowl, cream the softened butter and sugar until light and fluffy.
-
Beat in the eggs one at a time, then add the vanilla extract and mix well.
-
Alternately add the flour mixture and buttermilk to the butter mixture, beginning and ending with the flour.
-
Fold in the mixed fruits gently into the batter to avoid breaking them.
-
Divide the batter evenly between the prepared cake pans.
-
Bake in preheated oven for 25-30 minutes, or until a toothpick inserted into the center comes out clean.
-
Let the cakes cool in their pans for 10 minutes, then turn them onto a wire rack to cool completely.
-
Whip the heavy cream with the honey until soft peaks form for the frosting.
-
Once the cakes have cooled, spread a layer of whipped cream on top of one cake, place the second cake on top, and cover the entire cake with a thin layer of whipped cream to seal.
-
Create a lion's face design on top of the cake using fruit slices for the mane, orange and lemon zest for added color, and the edible eyes or berries for eyes.
-
Refrigerate the cake for at least 30 minutes before serving to ensure it is set properly.
Note
- The cake can be stored in the refrigerator for up to 3 days.
- You can use canned fruits if fresh fruits are not available.
- Add a fun touch by shaping additional pieces of fruit to form the lion’s nose, mouth, and ears.
- Experiment with different fruit combinations for unique flavors.

