

There’s something so satisfying about starting your morning with a breakfast that feels indulgent yet is as practical as it is delicious. Freezer breakfast sandwiches have quickly become my secret weapon for battling those chaotic mornings when you’re juggling time, coffee, and everyone’s “Where’s my lunch?” queries all at once. These handheld delights are a symphony of fluffy eggs, melty cheese, and savory protein, all sandwiched between lightly toasted English muffins. Whether you’re heading off to work, shuttling the kids to school, or simply craving a no-fuss brunch at home, having these tucked away in your freezer transforms your breakfast routine into a five-minute masterpiece.
When life is moving at lightning speed, knowing that you can grab a sandwich, pop it in the microwave or toaster oven, and savor a warm, flavorful meal without breaking a sweat truly feels like a superpower. The simplicity is heavenly: whisk eggs, bake them in one pan, assemble with cheese and bacon (or ham, or sausage—your call!), wrap in foil, and stow away. The moment you unwrap that familiar foil, the cheese stretches, the muffin gives you that perfect crunch, and suddenly you’re not just eating; you’re savoring every bite. It’s the kind of recipe that makes you feel like you’ve got your act together, even when you’re running a little late. Plus, the customization options are endless—spinach, avocado, tomato—name it, you can make it yours.
KEY INGREDIENTS IN FREEZER BREAKFAST SANDWICHES
Before we dive into the step-by-step, let’s spotlight the stars of our show. Each ingredient plays a crucial role in building layers of texture and flavor, ensuring every bite is more exciting than the last. You’ll find that these humble staples, when combined, create a breakfast that’s greater than the sum of its parts.
- Eggs
The foundation of our sandwiches, eggs provide protein and a tender, custardy texture once baked. They soak up seasoning and pair beautifully with all your favorite add-ins, making them endlessly adaptable.
- Salt and pepper
Simple seasonings that elevate the eggs from bland to brilliant. Salt enhances natural flavors, while pepper adds a gentle kick and aromatic warmth.
- Cooking spray or oil
A light coating prevents sticking and ensures your egg layer slides right out of the pan in perfect squares. This small touch saves cleanup time, too!
- English muffins
These slightly sweet, nooks-and-crannies beauties toast up golden brown and provide the perfect vehicle for all those delicious fillings. Their texture holds up well, even after freezing.
- Cheese slices
Whether you opt for sharp cheddar, classic American, or a specialty cheese, the melting layer adds creamy richness and pulls everything together.
- Cooked bacon, ham, or sausage patties
Your choice of protein brings savory depth and satisfying heft. It’s fully cooked ahead of time so you can customize flavors and doneness exactly to your liking.
- Foil or parchment paper
Wrapping each sandwich individually locks in moisture, keeps the layers intact, and makes reheating a breeze without any mess.
HOW TO MAKE FREEZER BREAKFAST SANDWICHES
Let’s walk through the process of creating a batch of these grab-and-go wonders. From whisking the eggs to stashing your wrapped sandwiches in the freezer, each step is simple, straightforward, and perfect for kitchen novices or seasoned cooks in need of a quick breakfast solution.
1. Preheat your oven to 350°F (175°C). This temperature ensures the eggs set evenly without drying out, giving you a soft but fully cooked texture that’s easy to cut into squares.
2. Crack the eggs into a large bowl, add salt and pepper to taste, and whisk until the mixture is pale and homogenous. Whisking well incorporates air, leading to fluffier baked eggs.
3. Lightly spray a 9×13-inch baking dish with cooking spray or grease it with a small amount of oil. This creates a nonstick surface for your egg layer, making removal and cleanup effortless.
4. Pour the whisked eggs into the prepared baking dish, spreading them out evenly. A uniform layer guarantees consistent cooking and perfect square shapes later on.
5. Bake the eggs in the preheated oven for about 20–25 minutes, or until they are fully set and cooked through. The top should feel springy to the touch and have a gentle golden hue at the edges.
6. Let the eggs cool slightly—this brief rest time helps them firm up, so they cut more cleanly. Then use a sharp knife to cut the egg sheet into 12 equal squares, each ready to become a sandwich centerpiece.
7. While the eggs are baking, prepare your protein if it isn’t already cooked. Whether you fry up bacon strips, heat ham slices, or brown sausage patties, make sure they’re fully cooked and slightly crisp for the best texture.
8. To assemble the sandwiches, place one slice of cheese, one egg square, and a slice of your chosen protein between each English muffin half. Layering hot or warm ingredients helps the cheese melt gently.
9. Wrap each sandwich individually in foil or parchment paper. This keeps everything snug, prevents freezer burn, and makes reheating a breeze—just unwrap, reheat, and dive in.
10. Place the wrapped sandwiches in a freezer-safe bag or container and store them in the freezer. Label with the date so you know they’ll stay at peak freshness for up to two months.
SERVING SUGGESTIONS FOR FREEZER BREAKFAST SANDWICHES
Now that your sandwiches are frozen and ready for action, let’s talk about the fun part—how to serve them so they feel special, no matter how rushed your morning might be. These make-ahead meals don’t have to be plain; a little garnish or side can turn a quick bite into a memorable breakfast experience.
- Select the perfect reheat method
For a soft muffin and fully melted cheese, wrap your foil-enclosed sandwich in a damp paper towel and microwave for 1–2 minutes, checking halfway. For a crisper exterior, slip it into a toaster oven at 350°F for about 5–7 minutes.
- Add fresh greens
Tuck in a handful of baby spinach or arugula right as you’re unwrapping your sandwich. The slight earthiness and crisp texture complement the warm, savory layers and add a nutritional boost.
- Complement with a dipping sauce
Elevate each bite by serving your sandwich alongside a small ramekin of sriracha mayo, honey mustard, or pesto. The extra zing or herbal note makes every mouthful feel gourmet.
- Pair with a side of fruit or yogurt
A cup of mixed berries, melon cubes, or a dollop of Greek yogurt balances out the savory flavors and keeps your meal colorful, vibrant, and refreshing.
HOW TO STORE FREEZER BREAKFAST SANDWICHES
Proper storage keeps these breakfast sandwiches tasting just-picked, even after weeks in the freezer. Giving them the right environment prevents freezer burn, locks in moisture, and maintains ideal texture. Let’s explore a few straightforward methods to keep your make-ahead meals in tip-top shape.
- Individual foil or parchment wrapping
Wrapping each sandwich tightly seals in freshness. Be sure to press out excess air before sealing the foil or parchment to prevent ice crystals from forming around the sandwich.
- Freezer-safe resealable bags
Slide your wrapped sandwiches into a large bag, squeeze out extra air, and seal. This extra layer of protection helps maintain consistent freezer temperature around the sandwiches and protects them from stray odors.
- Vacuum sealing
If you have a vacuum sealer, use it for the ultimate barrier against moisture loss and freezer burn. These sealed packs can last the full two months easily while keeping flavor and texture intact.
- Label and date all packages
Create a simple system by jotting the preparation date on each bag or package with a permanent marker. This way you’ll always know which sandwiches to grab first and can enjoy them before they reach their two-month peak window.
CONCLUSION
Creating a stash of freezer breakfast sandwiches is like giving yourself a gift for future you. These two paragraphs wrap up everything we’ve covered and remind you that you’ve now got a foolproof plan for those hectic mornings. From combining the right ingredients and mastering the bake-and-assemble routine to storing your sandwiches effectively, you have all the tools to make your breakfast routine joyful and stress-free. You can print this article and pin it on your fridge or save it in your favorite recipe folder—either way, it’s an excellent reference any time you want to whip up a batch.
Don’t forget, below this article you’ll find a handy FAQ section that answers all the nitty-gritty questions—though I have a feeling you’re already feeling pretty confident about making these on repeat. If you try this recipe, share how it went in the comments! Did you experiment with spinach or avocado? Need advice on reheating times? I’d love to hear your feedback, questions, or creative twists. Your experiences help our kitchen community grow and inspire others to dive into the world of make-ahead breakfasts.
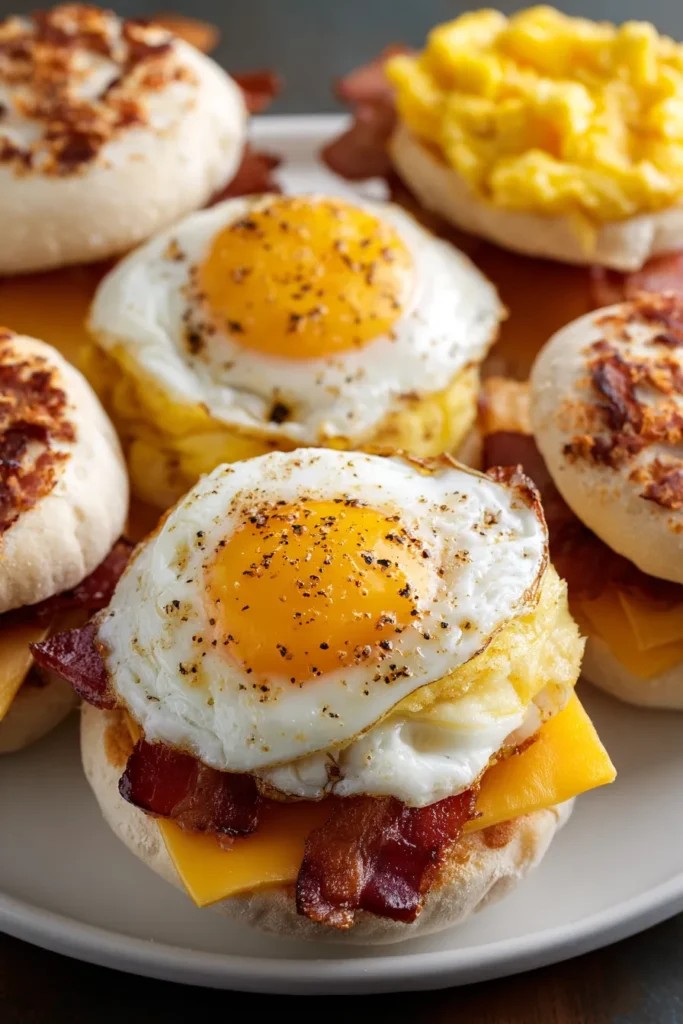

Freezer Breakfast Sandwiches
Description
These scrumptious breakfast sandwiches feature fluffy eggs, melted cheese, and your choice of savory protein, all tucked into warm English muffins. Perfect for meal prep and ready in minutes!
Ingredients
Instructions
-
Preheat your oven to 350°F (175°C).
-
Crack the eggs into a large bowl, add salt and pepper to taste, and whisk until well blended.
-
Lightly spray a 9x13-inch baking dish with cooking spray or grease it with a small amount of oil.
-
Pour the whisked eggs into the prepared baking dish.
-
Bake the eggs in the preheated oven for about 20-25 minutes, or until they are fully set and cooked through.
-
Let the eggs cool slightly, then cut them into 12 equal squares.
-
While the eggs are baking, prepare your protein (bacon, ham, or sausage) if it isn't already cooked.
-
To assemble the sandwiches, place one slice of cheese, one egg square, and a slice of your chosen protein between each English muffin half.
-
Wrap each sandwich individually in foil or parchment paper.
-
Place the wrapped sandwiches in a freezer-safe bag or container and store them in the freezer.
Note
- These sandwiches can be stored in the freezer for up to 2 months.
- Reheat the sandwiches in the microwave for about 1-2 minutes or in a toaster oven until heated through.
- Feel free to customize with different types of cheese or add spinach, tomatoes, or avocado.
- This recipe is perfect for meal prep, saving time on busy mornings.
- You can make a double batch for larger families or gatherings.

