

Cocoa-studded dough turned ruby and emerald meets a snowy coat of powdered sugar for playful holiday cookies that crackle with every bite. These Festive Red & Green Crinkle Cookies blend a soft, cocoa-tinged center with a crisp sugar shell, making each morsel feel like a tiny celebration. Whether you’re baking with family or gifting a jar to friends, this beginner-friendly recipe brings color and joy to any gathering—so grab your mixing bowl and let’s get festive!
Key Ingredients
Before we dive into baking, gather these simple pantry staples and a touch of food coloring to get started.
- 1 cup granulated sugar: Sweetens the dough and helps create a crisp exterior.
- 1/2 cup vegetable oil: Keeps cookies moist and tender while allowing for easy mixing.
- 2 large eggs: Bind ingredients together and add richness.
- 1 teaspoon vanilla extract: Enhances flavor with warm, sweet notes.
- 2 teaspoons baking powder: Leavening agent that gives a light, crackled texture.
- 1/2 teaspoon salt: Balances sweetness and brings out deeper cocoa flavor.
- 2 cups all-purpose flour: Provides structure for the cookie base.
- 1/4 cup unsweetened cocoa powder: Adds a rich chocolate taste and deep color contrast.
- 1/2 cup powdered sugar (for rolling): Creates a snowy outer shell that cracks beautifully.
- Green and red food coloring: Transforms plain dough into festive holiday hues.
How To Make Festive Red & Green Crinkle Cookies
Ready to roll up your sleeves? This recipe walks you through mixing, chilling, shaping, and baking bright red and green crinkle cookies that pop with chocolate flavor and snowy sugar cracks.
1. Preheat the oven to 350°F (175°C) and line two baking sheets with parchment paper to ensure easy cleanup.
2. In a large mixing bowl, combine the granulated sugar and vegetable oil, whisking until they form a smooth, homogenous mixture.
3. Add the eggs one at a time, mixing thoroughly after each addition, then stir in the vanilla extract for extra warmth.
4. In a separate bowl, sift together the baking powder, salt, flour, and cocoa powder to remove lumps and evenly distribute leavening.
5. Gradually fold the dry ingredients into the wet mixture until just combined—resist the urge to overmix for a tender crumb.
6. Divide the dough into two equal portions; add red food coloring to one and green to the other, mixing until you reach your desired shades.
7. Wrap each colored dough portion in plastic wrap and refrigerate for about 30 minutes so they’re firm enough to handle.
8. Once chilled, scoop roughly 1-tablespoon portions from each color, roll them into balls, then coat completely in powdered sugar.
9. Arrange the coated dough balls on the prepared baking sheets, spacing them at least 2 inches apart to allow for even spreading.
10. Bake for 10–12 minutes or until the edges are set but the centers remain soft. Let them rest on the sheets for a few minutes.
11. Transfer the cookies to wire racks to cool completely before enjoying them with a cup of coffee or tea.
Serving Suggestions
These colorful crinkle cookies are more than just tasty bites—they’re a holiday statement. Serve them fresh from the oven or package them up for friends, and watch the smiles bloom.
- Holiday Platter: Arrange cookies on a decorative plate surrounded by evergreen sprigs for a festive centerpiece.
- Warm Beverage Pairing: Serve alongside hot cocoa or spiced tea to balance the sweet cocoa notes with a cozy drink.
- Gift Jar: Layer cookies in a mason jar with parchment paper between each row, tie with ribbon, and gift to neighbors.
- Cookie Exchange: Mix red and green crinkles with other holiday treats on a buffet table—guests will love the pop of color.
Tips For Perfect Festive Red & Green Crinkle Cookies
These crinkle cookies are super forgiving, but a few friendly pointers make sure yours look and taste their best. Keep your dough chilled, measure carefully, and embrace the festive colors for a flawless crackle every time.
- Store in an airtight container for up to one week to maintain chewiness and flavor.
- Feel free to experiment with colors—swap in blue and yellow for birthdays or pink and purple for a themed party.
- For added texture, fold in chocolate chips or chopped nuts before chilling to boost crunch and richness.
- Don’t skip the powdered sugar coat—it’s essential for that iconic crinkle pattern and snowy finish.
How To Store It
Proper storage keeps your crinkle cookies fresh and full of flavor. Whether you’re saving extras for later or preparing gifts in advance, these tips will help maintain their signature texture and appearance.
- Room Temperature: Let cookies cool completely, then layer in an airtight container with parchment paper between layers to prevent sticking.
- Freezing: Place cooled cookies on a baking sheet in a single layer, freeze until firm, then transfer to a sealed freezer bag for up to three months.
- Thawing: Remove the desired number of cookies from the freezer and let them come to room temperature on the counter—no microwave needed.
- Avoid Refrigeration: Storing in the fridge can dry out cookies; stick to airtight containers at room temperature or the freezer.
Frequently Asked Questions
Curious about timing, techniques, or tweaks? Here are the answers to your most pressing crinkle cookie questions.
- How long does it take to prepare and bake these festive crinkle cookies?
A: Preparing the dough and dividing it into red and green portions takes about 15 minutes, plus a 30-minute chilling period. Baking each batch for 10–12 minutes adds up to about 12 minutes per sheet. In total, from start to finish you’ll need under an hour, excluding cooling time.
- Why is it important to chill the dough before rolling and baking?
A: Chilling firms up the dough, making it much easier to handle and roll into uniform balls. It also helps control spreading in the oven, so the cookies maintain a nice crinkled appearance rather than becoming too flat.
- What role does rolling in powdered sugar play in achieving the signature crinkle look?
A: The powdered sugar coating dries and cracks as the cookie expands in the oven. Wherever the dough stretches through the sugar layer, it creates contrasting white lines against the colored dough, giving you that classic crinkle pattern.
- My dough feels too sticky to roll into balls. What should I do?
A: If the dough is tacky after chilling, dust your hands lightly with flour or refrigerate it for an additional 10–15 minutes. Working with slightly cooler dough prevents sticking and helps you form neat, smooth balls for coating in powdered sugar.
- Can I customize the flavor or texture of these cookies?
A: Absolutely. You can swap the vanilla extract for almond or mint extract for a different flavor profile. Folding in up to a quarter cup of mini chocolate chips or chopped nuts before chilling adds extra texture and taste without affecting the crinkle effect.
- How should I store these cookies to keep them fresh?
A: Let the cookies cool completely on a wire rack, then store them in an airtight container at room temperature for up to one week. If you want to freeze them, place cooled cookies in a single layer on a baking sheet, freeze until firm, then transfer to a freezer bag for up to three months.
- Is it possible to use natural food coloring or skip the cocoa powder altogether?
A: You can use natural colorings like beet or spinach powder, but the hue may be softer. Omitting cocoa powder will alter the texture and the crinkle contrast, as the dark cocoa is crucial for highlighting the powdered sugar cracks. A small amount of dark chocolate or carob powder can be a substitute if needed.
What Makes This Special
This recipe truly shines by combining a simple cocoa-spiked dough with festive red and green hues and a snowy layer of powdered sugar that cracks perfectly as it bakes. The result is chewy, chocolatey centers wrapped in a delicate crisp shell—ideal for bakers of any skill level. Feel free to print and save this guide for stress-free holiday baking, and drop a comment below if you give these crinkle cookies a try or have any questions along the way!
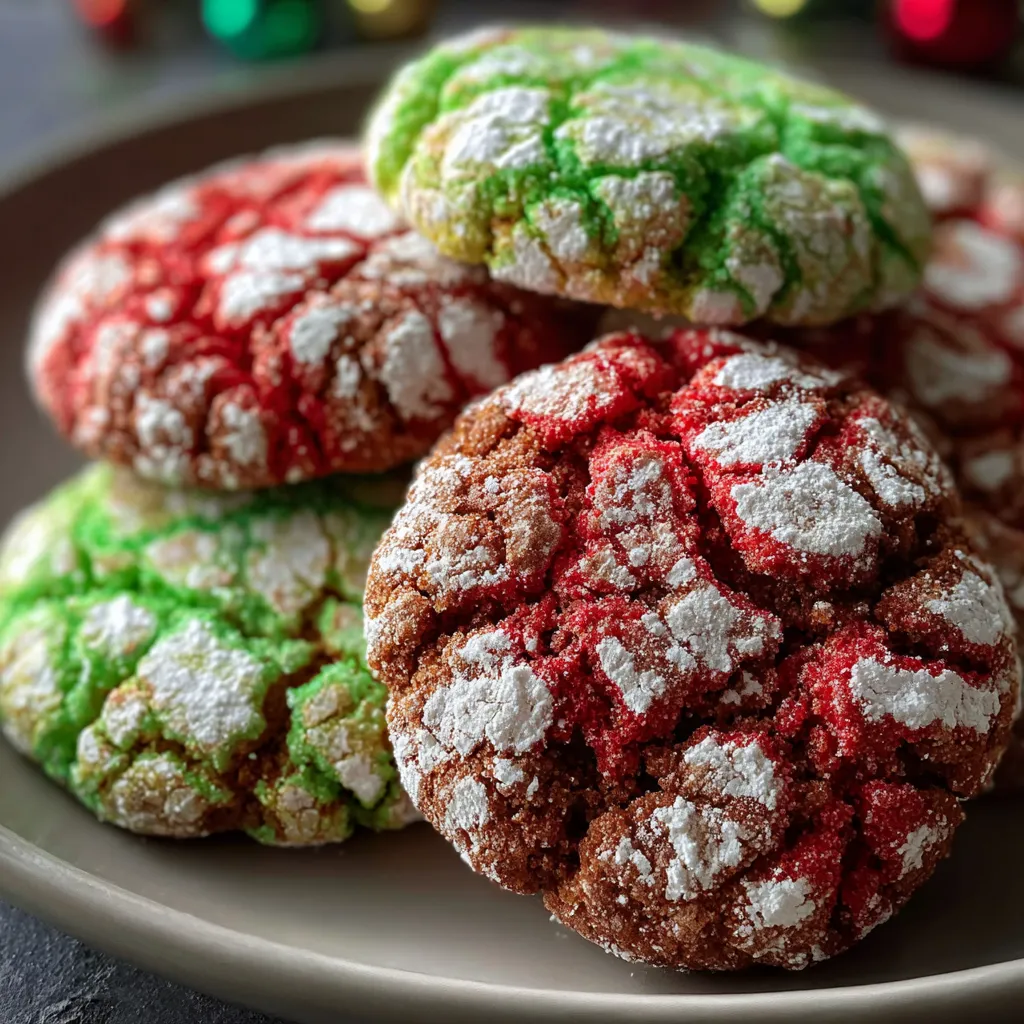

Festive Red & Green Crinkle Cookies
Description
Crackle through a crisp sugar shell into a soft, cocoa-tinged center. Each red and green morsel feels festive, with a sweet cocoa aroma and a delicate powdering that melts as you bite.
Ingredients
Instructions
-
Preheat your oven to 350°F (175°C) and line two baking sheets with parchment paper.
-
In a large mixing bowl, combine the granulated sugar and vegetable oil. Mix well until fully blended.
-
Add the eggs, one at a time, mixing thoroughly after each addition. Then stir in the vanilla extract.
-
In a separate bowl, sift together the baking powder, salt, flour, and cocoa powder.
-
Gradually add the dry ingredients to the wet mixture, mixing until just combined. Do not overmix.
-
Divide the dough into two equal portions. For one half, add red food coloring until your desired color is achieved, and for the other half, add green food coloring.
-
Wrap each dough portion in plastic wrap and chill in the refrigerator for about 30 minutes to make it easier to handle.
-
Once chilled, take small portions of the red and green dough (about 1 tablespoon each) and roll them into balls. Then, roll each ball in powdered sugar, ensuring they are coated well.
-
Place the coated dough balls onto the prepared baking sheets, spacing them about 2 inches apart to allow for spreading.
-
Bake in the preheated oven for 10-12 minutes, or until the edges appear set but the centers are still soft. Allow the cookies to cool on the baking sheets for a few minutes before transferring to wire racks to cool completely.
-
Enjoy your colorful and festive cookies with a nice cup of coffee or tea!
Note
- These cookies can be stored in an airtight container for up to one week.
- Feel free to experiment with different colors for special occasions or holidays.
- For added texture, mix in some chocolate chips or chopped nuts into the dough.
- The combination of cocoa and powdered sugar gives the cookies their signature “crinkle” look, so don’t skip this step!

