

Easter Egg Cake Pops are your ticket to a pastel-filled spring celebration! These charming little treats bring together moist yellow cake and rich buttercream, all molded into perfect egg shapes. Dip them in silky pastel candy melts and dot with playful sprinkles for a sweet bite that’s as fun to make as it is to eat. Whether you’re hosting Easter brunch or just craving a cheerful dessert, these pops are guaranteed to brighten your day.
Key Ingredients
Before you dive in, gather these essentials to ensure smooth baking and dipping:
- 1 box (15.25 oz) yellow cake mix: Provides the golden base with sweet, fluffy crumbs perfect for shaping.
- 1 cup water: Hydrates the cake mix for a tender, well-textured cake crumb foundation.
- 1/2 cup vegetable oil: Adds richness and moisture to keep the cake from drying out.
- 3 large eggs: Bind the batter and contribute to a light, airy crumb.
- 1/2 cup unsalted butter, softened: Forms the creamy buttercream that helps cake crumbs stick together.
- 2 cups powdered sugar: Sweetens the buttercream to the ideal consistency for binding and flavor.
- 3 tablespoons milk: Loosens the buttercream for a smooth, easy-to-fold filling.
- 12 oz white candy melts: Creates the glossy pastel shells around each cake pop.
- Food coloring, pastel pink: Tints the candy melts to a soft, Easter-inspired hue.
- Food coloring, pastel blue: Offers a gentle sky-blue shade for one set of pops.
- Food coloring, pastel yellow: Gives a sunny pastel color to brighten each bite.
- 1 package lollipop sticks: Holds each cake pop securely for easy dipping and serving.
- Sprinkles for decoration: Adds cheerful texture and whimsical designs to the finished pops.
How To Make Easter Egg Cake Pops
Ready for a fun baking adventure? You’ll start by whipping up a tender yellow cake, transforming it into buttery crumbs, and then molding those crumbs into cute egg shapes. From melting candy into dreamy pastel dips to mastering the perfect sprinkle topping, each step is designed to guide you toward picture-perfect Easter Egg Cake Pops. Grab your mixing bowls and let’s get started!
1. Preheat your oven to 350°F. Grease a 9×13-inch baking pan or line it with parchment. In a large bowl, combine the cake mix, water, oil, and eggs. Stir until smooth, then pour into the pan and bake according to package directions. Let the cake cool completely on a wire rack.
2. Transfer the cooled cake to a large mixing bowl and crumble into fine, uniform crumbs, ensuring there are no large chunks.
3. In a separate bowl, use electric beaters to cream the softened butter until it’s light and fluffy. Gradually add the powdered sugar and milk, beating until the mixture is smooth and free of lumps.
4. Gently fold the buttercream into the cake crumbs, mixing until the dough holds together when pressed—you should be able to roll a small ball without it falling apart.
5. Shape the mixture into egg forms using your hands or press into an egg-shaped silicone mold. Firmly insert a lollipop stick about halfway into each egg. Arrange on a baking sheet and freeze for 15–20 minutes until firm.
6. Divide the white candy melts into three microwave-safe bowls. Add a drop or two of pastel pink, pastel blue, and pastel yellow food coloring to each bowl. Melt in 30-second bursts, stirring between intervals until completely smooth.
7. Holding a chilled cake pop by the stick, dip it into one color of melted candy, rotating to coat evenly. Gently tap off any excess coating against the bowl’s edge, then place back on the sheet. Immediately decorate with sprinkles or drizzle a contrasting color on top.
8. Stand the cake pops upright in a styrofoam block or cake pop stand. Allow the coating to set fully, about 30 minutes, before serving or packaging.
Serving Suggestions
Easter Egg Cake Pops aren’t just adorable—they’re versatile, too! Whether you’re planning a festive buffet or a cozy tea party, these ideas will make your treats shine.
- Display on a tiered dessert stand to create a colorful focal point at your Easter brunch.
- Pair with a pot of chamomile or green tea for a light, springtime pairing that balances sweetness.
- Wrap each pop in a clear cellophane bag, tie with a pastel ribbon, and use as cute party favors.
- Arrange alongside fresh fruit skewers or mini yogurt parfaits for a balanced, festive spread.
Tips For Perfect Easter Egg Cake Pops
Baking and decorating cake pops can be a breeze when you follow a few simple pointers. These insider tricks will help you achieve smooth shells, sturdy shapes, and cheerful finishes every time:
- Make sure the cake is completely cooled before crumbling to avoid a gummy texture
- Chill shaped cake pops until firm to ensure smooth dipping without cracking
- Stir candy melts frequently while melting to prevent scorching
- Store decorated cake pops in an airtight container at room temperature for up to 2 days
How To Store It
Preserving the freshness and flavor of your cake pops is easy when you know the right methods. Follow these guidelines to keep your creations looking and tasting their best:
- Room Temperature: Store in an airtight container away from direct sunlight for up to 2 days to maintain a tender crumb and crisp shell.
- Refrigeration: Seal in a container and chill for up to 4 days; bring back to room temperature before serving to ensure the cake is soft and the coating isn’t too hard.
- Freezing: Freeze undecorated pops flat on a baking sheet; once solid, transfer to a freezer bag for up to 1 month. Thaw overnight in the fridge before dipping and decorating.
- Display Stand: Keep pops upright in a cake pop stand or foam block if you plan to serve within hours—this prevents smudges and keeps sprinkles in place.
Frequently Asked Questions
Here are quick answers to common questions about making and storing your Easter Egg Cake Pops:
- How long should I let the baked cake cool before crumbling it?
You should cool the cake completely at room temperature, usually about 1 to 1½ hours, before crumbling. If it’s still warm, the crumbs will become gummy and won’t combine properly with the buttercream, making it difficult to shape the cake pops.
- My cake pop mixture is too wet or falls apart when I press it. How can I fix this?
If the mixture is too wet, add a tablespoon of powdered sugar at a time until it holds together when pressed. If it’s too dry and crumbly, stir in a teaspoon of milk or softened butter until you achieve the right consistency. The ideal mixture should be moist enough to form smooth shapes without cracking.
- I don’t have an egg-shaped silicone mold. What’s an alternative for shaping?
You can shape the mixture by hand into ovals or use a small ice cream scoop to portion the mixture, then roll it between your palms into an egg-like shape. Chilling smaller sections at a time in the freezer helps maintain a uniform shape and makes handling easier.
- Why is freezing the shaped cake pops important before dipping?
Freezing for 15–20 minutes firms up the cake pop cores so they won’t crack or fall apart when you dip them into the warm candy melts. A chilled interior also helps the coating set quickly and evenly, giving you smoother, more professional-looking results.
- How do I achieve pastel pink, blue, and yellow candy coatings without the colors bleeding?
Divide the white candy melts into separate bowls and add one to two drops of pastel food coloring per bowl. Melt the candy in 30-second intervals, stirring gently each time. Tap off excess coating on the edge of the bowl and let each color set fully before drizzling a contrasting color to avoid bleeding.
- What’s the best way to store finished cake pops, and how long will they stay fresh?
Store decorated cake pops upright in an airtight container at room temperature, away from direct sunlight or heat, for up to 2 days. If you need to keep them longer, you can refrigerate them for up to 4 days, but bring them back to room temperature before serving to restore optimal texture.
- Can I make these cake pops ahead of time for an event?
Yes. After decorating, store them in an airtight container at room temperature for up to 48 hours. If you need to prepare even earlier, you can freeze undecorated cake pops for up to a month. Thaw them in the refrigerator overnight, then bring to room temperature before dipping and decorating.
What Makes This Special
What really sets these Easter Egg Cake Pops apart is that perfect balance of moist golden cake crumbs, creamy buttercream, and that satisfyingly glossy pastel shell dotted with sprinkles. The egg shape is festive, the colors are whimsically bright, and the whole process—from crumbling cake to dipping the final pop—is pure springtime joy. Feel free to print this guide and tuck it into your recipe binder for future celebrations. I can’t wait to hear how yours turn out—drop a comment or question below if you give them a whirl!
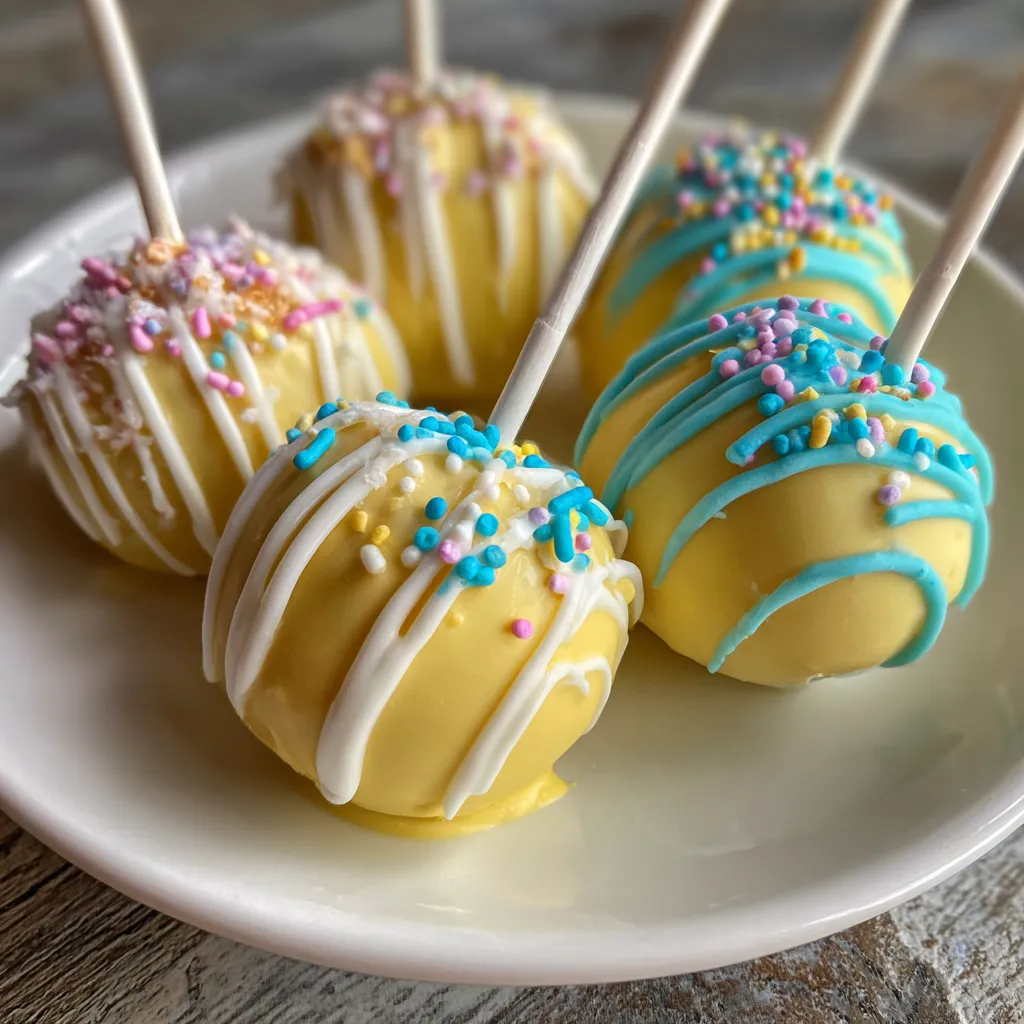

Easter Egg Cake Pops
Description
Moist crumbs of golden cake blend with sweet buttercream, then are molded into eggs, dipped in silky pastel candy melts, and finished with playful sprinkles for a charming Easter treat.
Ingredients
Instructions
-
Preheat the oven to 350°F. Prepare and bake the cake according to package directions using the cake mix, water, oil, and eggs. Allow cake to cool completely.
-
Crumble the cooled cake into fine crumbs in a large mixing bowl.
-
In a separate bowl, beat the softened butter until creamy. Gradually add powdered sugar and milk, continuing to beat until smooth and well combined.
-
Fold the buttercream into the cake crumbs until the mixture holds together when pressed.
-
Shape the mixture into egg shapes using your hands or an egg-shaped silicone mold. Insert a lollipop stick into each egg and place on a baking sheet. Chill in the freezer for 15–20 minutes until firm.
-
Divide the white candy melts into three microwave-safe bowls. Add a drop or two of each pastel food coloring to each bowl and melt in 30-second intervals, stirring until smooth.
-
Dip each chilled cake pop into a colored melt, tapping off excess. Place back on the baking sheet and immediately add sprinkles or drizzle with a contrasting color.
-
Stand the cake pops upright in a styrofoam block or a cake pop stand until fully set, about 30 minutes.
Note
- Make sure the cake is completely cooled before crumbling to avoid a gummy texture
- Chill shaped cake pops until firm to ensure smooth dipping without cracking
- Stir candy melts frequently while melting to prevent scorching
- Store decorated cake pops in an airtight container at room temperature for up to 2 days

