

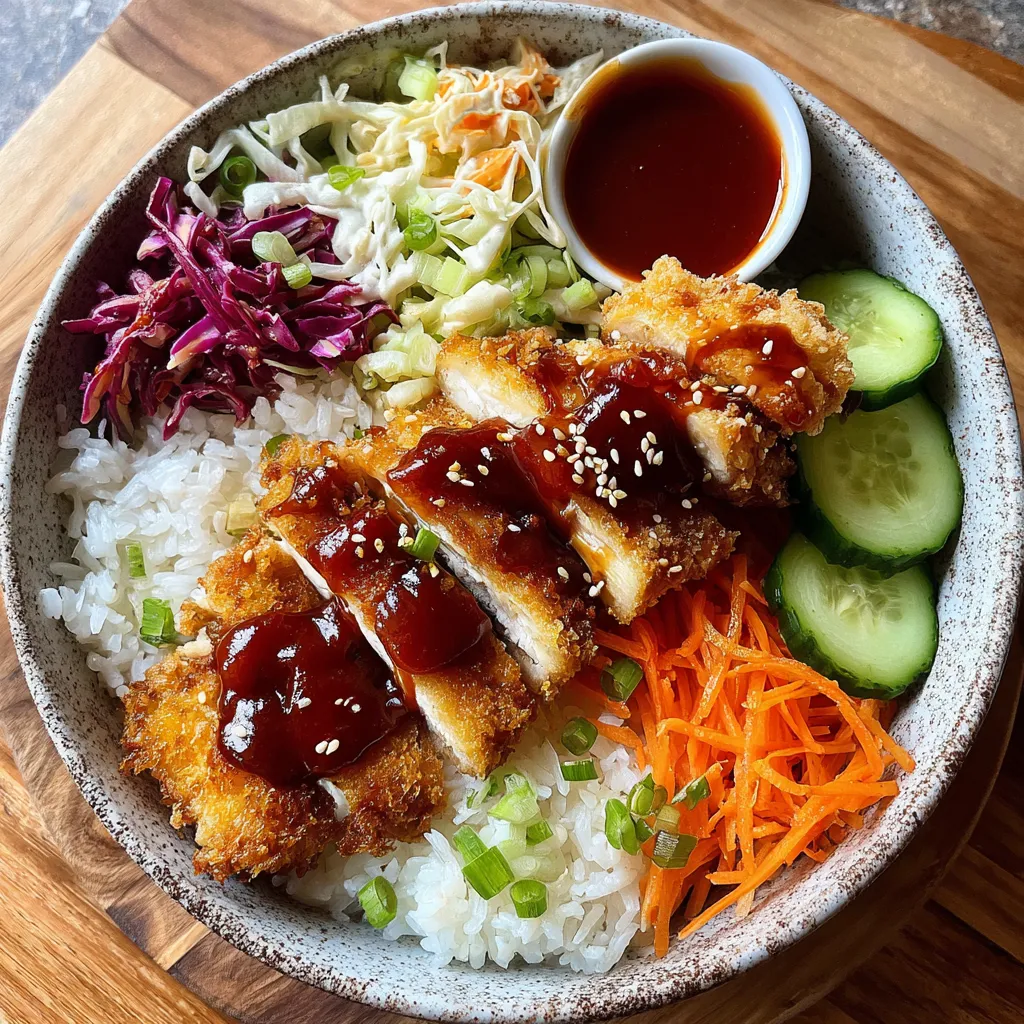
Crispy Japanese Katsu Bowls bring together golden panko-crusted chicken, fluffy short-grain rice, and a rainbow of fresh veggies all drizzled with a tangy-sweet katsu sauce. Whether you’re craving a fun weeknight dinner or an impressive meal for friends, this bowl delivers crunch, color, and comfort in every bite. It’s simple enough for an intermediate cook yet exciting enough to earn rave reviews at the table—so let’s get crispy!
Key Ingredients
Before you start cooking, let’s gather everything you need to build these bowls:
- 1 cup short-grain rice: Tender, slightly sticky foundation that soaks up the savory katsu sauce.
- 1¼ cups water: Ensures perfectly cooked rice with just the right moisture.
- 1 pound chicken breasts: Lean protein that crisps beautifully under a panko crust.
- ½ teaspoon salt: Brings out the natural flavors of the chicken and rice.
- ¼ teaspoon black pepper: Adds a subtle kick to each bite.
- ½ cup all-purpose flour: Creates a dry base for the egg wash to cling to.
- 1 large egg: Acts as the glue that holds breadcrumbs firmly in place.
- ½ cup panko breadcrumbs: Ultra-crispy coating that turns golden in the skillet.
- ¼ cup vegetable oil: Neutral oil perfect for frying the katsu to a light crisp.
- 2 cups shredded cabbage: Adds refreshing crunch and vibrant color.
- ½ cup thinly sliced carrots: Bright texture and natural sweetness.
- ½ cup sliced cucumber: Cool, crisp contrast to the warm chicken.
- 2 tablespoons ketchup: Base for the tangy, sweet katsu sauce.
- 1 tablespoon Worcestershire sauce: Delivers depth and umami punch.
- 1 teaspoon soy sauce: Brings salty richness to the sauce.
- 1 teaspoon sugar: Balances acidity with a hint of sweetness.
- 1 teaspoon sesame seeds: Toasty garnish for extra nuttiness.
- 1 scallion, thinly sliced: Fresh, aromatic finish for each bowl.
How To Make Crispy Japanese Katsu Bowls
Let’s walk through the full process, from cooking the rice to frying the chicken and assembling your bowls. You’ll learn how to achieve that perfect golden panko crust, build layers of fresh veggies, and whisk together a zesty sauce that ties every component together. Follow each step closely for tender rice, juicy chicken, and vibrant toppings.
1. Rinse the rice under cold water until the water runs clear, then combine with 1¼ cups water in a pot or rice cooker. Cook according to package directions, then let it rest off the heat for 10 minutes before fluffing with a fork.
2. Pat the chicken breasts dry with paper towels and season both sides evenly with salt and black pepper.
3. Set up a dredging station: place flour in one shallow dish, beat the egg in a second dish, and spread panko breadcrumbs in a third.
4. Dredge each chicken breast first in flour (shake off excess), dip into the beaten egg, then press into panko to achieve a complete, even coating.
5. Heat vegetable oil in a large skillet over medium heat until shimmering.
6. Fry the breaded chicken for 3 to 4 minutes per side, turning once, until the exterior is deep golden brown and an instant-read thermometer reads 165°F at the thickest part.
7. Transfer chicken to a paper-towel-lined plate and let it rest for 2 minutes to lock in juices. Then slice into ½-inch strips on the bias.
8. Whisk together ketchup, Worcestershire sauce, soy sauce, and sugar in a small bowl until smooth—this is your katsu sauce.
9. Divide the cooked rice among serving bowls and top with shredded cabbage, carrots, cucumber, and sliced chicken.
10. Drizzle the katsu sauce evenly over the chicken and finish with a sprinkle of sesame seeds and sliced scallion.
Serving Suggestions
These bowls are flexible and fun to personalize. Consider these ideas to make your meal shine:
- Serve alongside miso soup for a comforting Japanese-inspired dinner spread.
- Add a soft fried egg on top for extra richness and creamy yolk goodness.
- Offer a side of pickled ginger or kimchi to introduce a tangy, spicy kick.
- Drizzle with spicy mayo (mix mayo with sriracha) for a creamy heat contrast.
Tips For Perfect Crispy Japanese Katsu Bowls
Let’s level up your katsu game with some friendly pro tips to ensure each bite is a triumph:
- Use pork cutlets instead of chicken for a classic tonkatsu variation.
- Make the sauce spicier by adding a dash of sriracha or chili flakes.
- Store leftover components separately and reheat chicken in the oven to maintain crispiness.
- Substitute brown rice or quinoa for a higher fiber alternative.
How To Store It
Got leftovers? Here’s how to keep every element fresh and ready for reheating:
- Separate containers: Store rice, fried chicken, veggies, and sauce in individual airtight containers.
- Rice: Refrigerate in a tightly sealed container to retain moisture—reheat with a damp paper towel.
- Chicken: Reheat in a 350°F oven for 5–7 minutes on a baking sheet to revive the crisp crust.
- Sauce: Keep in a small jar or container in the fridge for up to 5 days and stir before drizzling.
Frequently Asked Questions
Here are answers to some common questions to keep your katsu bowls on point:
- How do I ensure the rice has the ideal texture for these katsu bowls?
Rinse the short-grain rice under cold water until the water runs clear to remove excess starch. Combine 1 cup of rinsed rice with 1¼ cups of water in a tight-fitting pot or rice cooker. If using a pot, bring to a gentle boil, then lower the heat to simmer for about 15 minutes without lifting the lid. Let it rest off the heat for 10 minutes before fluffing with a fork. This method yields tender, slightly sticky rice that holds up under the toppings.
- What’s the best way to achieve extra crispy chicken katsu?
Pat the chicken dry and season it well with salt and pepper. Use a three-step dredging station: flour first (to help the egg adhere), beaten egg next, and panko breadcrumbs last. Press the panko firmly onto the chicken to avoid bare spots. Heat the oil to medium (around 350°F if you have a thermometer) so the exterior crisps quickly without overcooking the interior. Fry 3–4 minutes per side until golden brown, then transfer to a paper-towel-lined plate to drain and rest for 2 minutes. Resting locks in juices and keeps the coating crisp.
- Can I prepare parts of this recipe ahead of time?
Yes. Cook and cool the rice, shredded cabbage, carrots, and cucumber separately, storing each in airtight containers in the refrigerator for up to 2 days. You can also bread and refrigerate the chicken for a few hours before frying. Make the katsu sauce in advance and store it in the fridge for up to 5 days. When ready to serve, reheat the chicken in a 350°F oven for about 5–7 minutes to restore crispiness, and warm the rice in the microwave or on the stove.
- How can I customize the katsu sauce to match different flavor preferences?
The base sauce of ketchup, Worcestershire, soy sauce, and sugar is sweet-savory. For heat, stir in a teaspoon of sriracha or a pinch of chili flakes. To add tang, mix in a teaspoon of rice vinegar. If you prefer a richer umami profile, add a teaspoon of miso paste or a dash of fish sauce. Taste and adjust sugar or soy sauce to balance sweetness and saltiness before serving.
- What are some healthy substitutions or variations for this dish?
For more fiber, swap short-grain rice for brown rice or quinoa and cook per package instructions. Use skinless pork cutlets instead of chicken breasts for a classic tonkatsu experience. Replace panko with ground almonds or crushed cornflakes for a gluten-free crust. For a lower-fat option, bake the breaded chicken at 425°F for 15–20 minutes, flipping halfway through, until golden and cooked through.
- How should I store and reheat leftovers without losing texture?
Store the leftover rice, fresh vegetables, sliced chicken, and sauce separately in airtight containers in the refrigerator for up to 3 days. When reheating the chicken, preheat your oven to 350°F and arrange the slices on a baking sheet for 5–7 minutes to restore crispiness. Warm the rice in the microwave with a damp paper towel over the bowl. Reassemble bowls just before serving and drizzle with cold or room-temperature sauce to avoid sogginess.
- Are there any tips for uniformly slicing the chicken after frying?
Let the fried chicken rest for 2 minutes on a cutting board to retain juices. Use a sharp chef’s knife and make diagonal cuts against the grain, about ¼-inch thick. Cutting on the bias maximizes tenderness and creates bite-sized strips that layer beautifully over the rice. Wipe the knife clean between long cuts to maintain clean edges and prevent tearing the crust.
What Makes This Special
Every component of these Crispy Japanese Katsu Bowls—from the golden panko coating to the tangy-sweet sauce and bright ribbons of cucumber and carrot—works together in perfect harmony. The contrast of textures and flavors makes this bowl a winner every time. Feel free to print and save this recipe for your next culinary adventure, and don’t hesitate to share your thoughts or ask for help in the comments if you give it a try!

Crispy Japanese Katsu Bowls
Description
Golden panko-crusted chicken meets fluffy rice and crunchy cabbage, all brought together by a tangy-sweet katsu sauce. Bright ribbons of carrot and cucumber add freshness, while scallions and sesame seeds finish the dish.
Ingredients
Instructions
-
Rinse the rice under cold water until the water runs clear then combine with water in a pot or rice cooker and cook according to package directions.
-
Pat chicken breasts dry and season both sides with salt and black pepper.
-
Place flour in one shallow dish, beat the egg in a second dish, and place panko breadcrumbs in a third dish.
-
Dredge each chicken breast in flour, shaking off excess, then dip into the beaten egg and press into panko to coat evenly.
-
Heat vegetable oil in a skillet over medium heat.
-
Fry the breaded chicken for 3 to 4 minutes per side until golden brown and cooked through.
-
Transfer the chicken to a paper towel lined plate and let rest for 2 minutes, then slice into strips.
-
Whisk together ketchup, Worcestershire sauce, soy sauce, and sugar to make the katsu sauce.
-
Divide the cooked rice among bowls and top with shredded cabbage, carrots, cucumber, and sliced chicken.
-
Drizzle the katsu sauce over the chicken and garnish with sesame seeds and sliced scallion.
Note
- Use pork cutlets instead of chicken for a classic tonkatsu variation.
- Make the sauce spicier by adding a dash of sriracha or chili flakes.
- Store leftover components separately and reheat chicken in the oven to maintain crispiness.
- Substitute brown rice or quinoa for a higher fiber alternative.

