

There’s something undeniably magical about the first bite of a warm, freshly baked scone. Tender on the inside with just the right amount of crisp on the outside, these gluten-free air-fryer scones bring that comforting sensation into your kitchen without turning on a huge oven. The convenience of the air fryer means you can savor flaky layers and a golden-brown exterior in under half an hour—perfect for those mornings when you crave something homemade but time is tight. When you break into one of these little wedges, you’ll notice that delightful contrast: a slight crunch gives way to a pillowy interior that practically melts on your tongue. Adding a handful of dried cranberries or a sprinkle of chocolate chips transforms each bite into a mini celebration of sweet-tart or rich cocoa notes, making breakfast, brunch, or an afternoon pick-me-up feel a bit more extraordinary. Whether you’re entertaining friends over coffee or simply sneaking a quick treat before the day really kicks into gear, these air-fryer scones deliver big flavor with minimal fuss.
Beyond their irresistible taste and texture, these buttery, gluten-free scones are a reminder that dietary needs shouldn’t compromise the joy of baking. I remember the first time I whisked together that dairy-free milk, lifted the cold butter chunks into the flour mix, and watched them magically transform into coarse crumbs. My heart did a little happy dance at that moment—there’s a sense of achievement in mastering a recipe that caters to food sensitivities without sacrificing richness or mouthfeel. As the air fryer hummed away, filling the kitchen with a gentle warmth, I couldn’t help but chat with my roommate about how we were about to enjoy “real” scones again. From that moment on, these crispy gluten-free air-fryer scones became my go-to for hosting weekend brunch or surprising a friend with a homemade treat. Their simplicity—just one bowl for dry ingredients, one for wet—means anyone can whip them up, whether you’re a seasoned baker or a curious beginner. So grab your mixing bowls and preheat your air fryer: this recipe is about to become your new favorite shortcut to blissful bites.
KEY INGREDIENTS IN CRISPY GLUTEN-FREE AIR-FRYER SCONES
Before diving into the mixing and air-frying magic, let’s talk about what goes into these delightful scones. Each ingredient plays a crucial role in creating that perfect balance of crisp edges, tender crumb, and an aroma that will have everyone at the table asking for more. From the foundation of gluten-free flour to the optional bursts of fruity or chocolatey goodness, here’s what you’ll need and why.
- Gluten-Free All-Purpose Flour
This blend of rice flour, starches, and sometimes xanthan gum serves as the backbone of our scones. It mimics traditional wheat flour’s structure, giving the dough enough elasticity and body to hold together while keeping it light and tender.
- Baking Powder
Acting as the leavening agent, baking powder introduces tiny pockets of air into the dough, ensuring the scones rise beautifully in the hot air fryer and develop an inviting fluffy interior.
- Salt
A small but mighty ingredient, salt amplifies the flavors of the other components and balances the sweetness, preventing your scones from tasting flat or one-dimensional.
- Granulated Sugar
Sugar contributes sweetness and aids in browning, helping to create that golden crust. It also tenderizes the dough by interacting with the proteins and fats.
- Unsalted Butter (Cold and Cubed)
Cold butter is essential for those signature flaky layers. As the butter melts during cooking, it creates steam pockets that translate into airiness and flakiness in every bite.
- Milk of Choice (Dairy or Non-Dairy)
The liquid provides moisture to bring the dough together and helps dissolve the sugar and activate the baking powder. You can use cow’s milk, almond milk, oat milk, or any favorite alternative.
- Egg
The egg binds the ingredients, adds richness, and contributes to a tender crumb. It also helps in browning, giving the scones a beautiful sheen.
- Vanilla Extract
Just a hint of vanilla elevates the overall flavor profile, adding a cozy, aromatic note that makes each scone taste lovingly homemade.
- Dried Fruits or Chocolate Chips (Optional)
Whether you prefer chewy raisins, tart cranberries, or melty chocolate chips, these mix-ins add pops of flavor and fun texture, turning a simple scone into a personalized treat.
HOW TO MAKE CRISPY GLUTEN-FREE AIR-FRYER SCONES
Ready to bring these ingredients together? In just a few straightforward steps, you’ll be on your way to enjoying crunchy-on-the-outside, tender-on-the-inside scones that require minimal effort and deliver maximum satisfaction.
1. In a large bowl, whisk together the gluten-free flour, baking powder, salt, and sugar until the dry mixture is uniformly combined. This ensures even leavening and flavor throughout the dough.
2. Add the cold cubed butter to the flour mixture. Using a pastry cutter or your fingertips, cut in the butter until the mixture resembles coarse crumbs with pea-sized pieces of butter still visible. These pockets of butter will create those delightful layers when they melt.
3. In a separate bowl, whisk together the milk, egg, and vanilla extract until fully blended and smooth. This wet mixture will hydrate the dry ingredients and help bind the dough.
4. Pour the wet ingredients into the dry ingredients and stir until just combined. Be careful not to overmix; the dough should be slightly sticky and hold together without becoming tough.
5. If you’re adding mix-ins, fold in the dried fruits or chocolate chips gently, ensuring an even distribution without deflating the dough.
6. Lightly dust a clean work surface with gluten-free flour and turn the dough out onto it. Use your hands to gently pat the dough into a circle about 1 inch thick; avoid overworking to maintain tenderness.
7. With a sharp knife, cut the dough into 6–8 wedges, rotating the circle as you slice to achieve even pieces.
8. Preheat the air fryer to 350°F (175°C) so it’s hot and ready when your scones go in.
9. Place a piece of parchment paper in the air fryer basket and arrange the scone wedges with a bit of space between each to allow for air circulation and even browning.
10. Air-fry the scones for 12–15 minutes, or until their edges turn golden brown and the centers are cooked through. You’ll know they’re done when the tops spring back slightly to the touch.
11. Carefully remove the hot scones from the air fryer and let them cool slightly on a wire rack before serving, allowing the interior to set and the exterior to crisp up further.
SERVING SUGGESTIONS FOR CRISPY GLUTEN-FREE AIR-FRYER SCONES
After the warm, flaky scones come out of the air fryer, the fun really begins: serving them in ways that highlight their flavor and texture. Whether you’re hosting a leisurely brunch or treating yourself to a cozy afternoon snack, these ideas will make each scone moment extra special and ensure every bite is a delight.
- Classic Butter and Jam
Slather a freshly cooled scone with room-temperature butter and a generous swirl of your favorite fruit preserves. The creamy richness of the butter paired with sweet-tart jam creates a timeless combo that enhances the scone’s natural flavors.
- Lemon Zest and Honey Drizzle
Sprinkle a bit of fresh lemon zest over the scone, then finish with a delicate honey drizzle. The bright citrus notes cut through the richness, while the honey adds a silky sweetness that complements the crispy edges.
- Whipped Cream and Fresh Berries
Top each scone with a dollop of lightly sweetened whipped cream and a handful of fresh berries such as strawberries, blueberries, or raspberries. The contrast between the airy cream, juicy fruit, and sturdy scone makes for a decadent yet balanced treat.
- Savory Herb Spread
For a savory twist, blend softened butter with chopped fresh herbs like chives, rosemary, or thyme. Spread this fragrant compound butter over warm scones for a sophisticated snack that works beautifully with tea or a cup of soup.
HOW TO STORE CRISPY GLUTEN-FREE AIR-FRYER SCONES
Once the batch of scones has landed in your stomach, you might find yourself daydreaming about leftovers—but storing them properly is key to preserving that fresh-baked taste and perfect texture. Whether you want to enjoy them the next morning or freeze some for a busy day ahead, follow these guidelines to keep your scones tasting their best.
- Room-Temperature Airtight Container
Allow the scones to cool completely, then place them in a sealed container or zip-top bag. Store at room temperature for up to 2 days. This method maintains crisp edges while keeping the interior tender—just be sure the container is airtight to prevent dryness.
- Refrigeration for Extended Freshness
If you need to keep scones longer, wrap each one individually in plastic wrap or parchment paper, then store them in an airtight container in the refrigerator for up to 4 days. Bring them back to room temperature or warm them briefly in the air fryer before enjoying.
- Freezing for Make-Ahead Convenience
Place cooled scones on a baking sheet in a single layer and flash-freeze for about an hour. Once solid, transfer them to a freezer-safe bag or container. They’ll keep for up to 3 months. To reheat, pop frozen scones directly into the air fryer at 350°F for 3–5 minutes until warmed through and crisp.
- Reheating Tips
For that fresh-out-of-the-oven crunch, reheat scones in the air fryer at 350°F for 2–3 minutes. If using a microwave, warm for just 10–15 seconds on a microwave-safe plate, then finish with a quick air-fryer crisp-up if you have the time.
CONCLUSION
From the moment you stir together gluten-free flour, baking powder, and a hint of sugar, to the satisfying crunch as you bite into a perfectly golden scone, this recipe delivers a homemade experience that’s as simple as it is delicious. Using just two bowls and an air fryer, you’ll achieve that classic flaky texture without heating up your entire kitchen—ideal for busy mornings, cozy afternoons, or impromptu gatherings. The flexibility of choosing dairy or non-dairy milk, plus optional mix-ins like dried cranberries or chocolate chips, makes this recipe a wonderful canvas for personal creativity. And with prep time of about 15 minutes, plus 15 minutes in the air fryer and a short 5-minute rest, you’ll have freshly baked treats in under an hour. At approximately 200 calories per scone, these are an indulgence you can enjoy guilt-free, whether served with butter, jam, clotted cream, or even a savory herb spread.
Feel free to print this article and save it in your favorite recipe collection for effortless bake-offs any day of the week. You can also refer to the FAQ section below for answers to common questions, from achieving the fluffiest rise to troubleshooting air fryer temperature quirks. If you try these Crispy Gluten-Free Air-Fryer Scones or have any moments of curiosity—like wondering whether a dash of cinnamon might make them even more irresistible—please leave a comment, question, or feedback. I’d love to hear how your batch turned out, learn about your favorite mix-in combos, and help make your scone-making journey as joyful and delicious as possible. Happy baking!
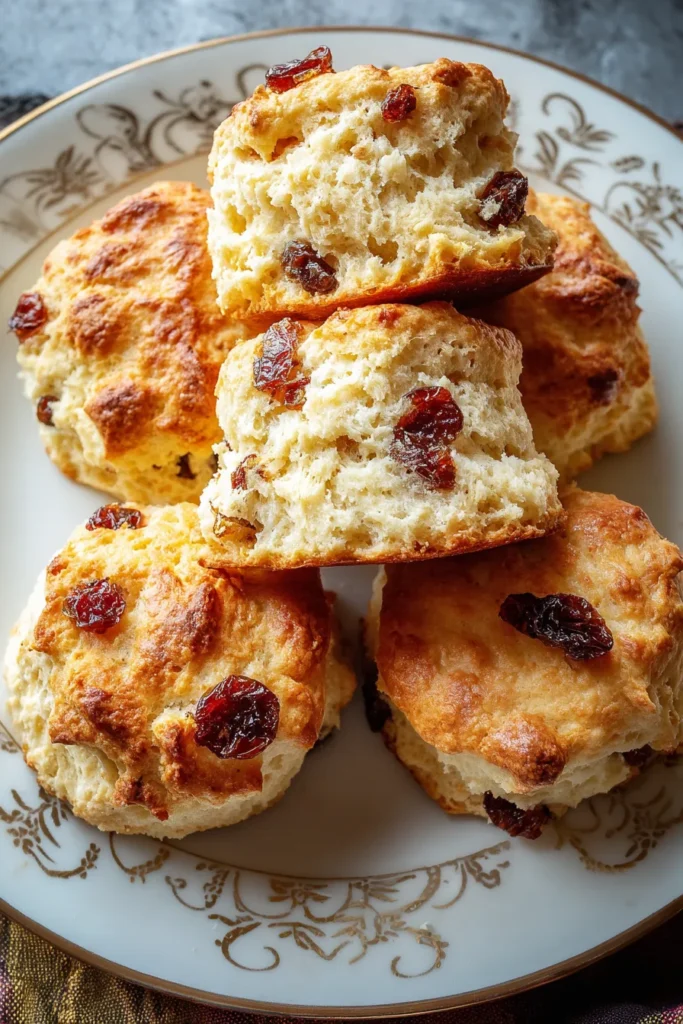

Crispy Gluten-Free Air-Fryer Scones
Description
These crispy gluten-free air-fryer scones boast a buttery, flaky texture and an irresistible crunch. Perfect for breakfast or an afternoon snack, they can be customized with your favorite mix-ins!
Ingredients
Instructions
-
In a large bowl, whisk together the gluten-free flour, baking powder, salt, and sugar.
-
Add the cold cubed butter to the flour mixture. Using a pastry cutter or your fingers, cut in the butter until the mixture resembles coarse crumbs.
-
In a separate bowl, whisk together the milk, egg, and vanilla extract until well combined.
-
Pour the wet ingredients into the dry ingredients and stir until just combined. Do not overmix; the dough should be slightly sticky.
-
If using, fold in the dried fruits or chocolate chips gently.
-
Lightly dust a clean surface with gluten-free flour and turn the dough out onto the surface. Gently pat the dough into a circle about 1 inch thick.
-
Using a sharp knife, cut the dough into 6-8 wedges.
-
Preheat the air fryer to 350°F (175°C).
-
Place a piece of parchment paper in the air fryer basket and arrange the scone wedges on the paper, leaving some space between each piece.
-
Air-fry the scones for 12-15 minutes or until they are golden brown and cooked through.
-
Carefully remove the scones from the air fryer and let them cool slightly on a wire rack before serving.
Note
- These scones can be served with a spread of butter, jam, or clotted cream.
- For a different flavor, consider adding lemon zest or cinnamon to the dough.
- They can be stored in an airtight container for up to 2 days.
- To reheat, simply place them back in the air fryer for 2-3 minutes.

