

There’s something truly special about rolling up your sleeves, dusting your countertop with flour, and hearing the gentle whisper of a sticky dough as it comes together. Classic Homemade Ciabatta Bread is one of those magical projects that feels like an art form, yet offers a warm, rustic payoff that makes your kitchen smell like an artisan bakery. This crusty-on-the-outside, soft-and-chewy-on-the-inside loaf is a weekend treat you’ll keep coming back to. With simple pantry staples—yeast, water, flour, salt, sugar, and olive oil—you’ll create those iconic big air pockets that give ciabatta its trademark openness. The process is straightforward enough for beginners, making this loaf perfect if you’re looking to dip your toes into the world of artisan bread without feeling intimidated. Plus, it’s versatile for both lunch and dinner: think hearty sandwiches, side dishes for soups and salads, or just a slice drizzled with extra-virgin olive oil and a sprinkle of sea salt.
Beyond being delicious, there’s a real sense of satisfaction that comes from mastering the gentle art of working with a wet, sticky dough. During the 1 to 2 hours of rising time, you’ll notice the dough double in size and develop character—bubbles forming beneath the surface like tiny memories of the yeast at work. Then, after shaping and the second proof, you’ll bake at 425°F (220°C), complete with that little water dish for steam that creates a golden, crackly crust. Overall prep time is about 15 minutes, with 25 minutes in the oven and roughly 2 hours 30 minutes of rest time. Each slice clocks in around 480 calories, making it a hearty but worthwhile indulgence. Get ready to bake up a storm with this rustic ciabatta bread that’s crusty on the outside and soft on the inside!
KEY INGREDIENTS IN CLASSIC HOMEMADE CIABATTA BREAD
Before we dive into the knead-and-rise routine, let’s talk about the simple yet vital ingredients that will come together to give this ciabatta its signature flavor and texture. Each component plays a unique role—from activating the yeast to building that chewy crumb and crisp crust we all love.
- Active dry yeast
This is the little powerhouse that ferments the dough, producing carbon dioxide bubbles that make the loaf light and airy. Ensuring it’s fresh and properly “bloomed” will set the stage for a successful rise.
- Warm water
Around 110°F (45°C) hits the sweet spot for activating yeast without killing it. The water also hydrates the flour proteins, helping gluten strands form for that chewy interior.
- Sugar
This tiny sweet boost gives the yeast something to feed on, helping it become more active and creating a better rise. It also contributes to a lightly golden crust as the loaf bakes.
- Bread flour
With its higher protein content, bread flour develops strong gluten networks that trap gas bubbles and give ciabatta its characteristic open crumb. Extra flour is used for dusting during shaping.
- Salt
More than just a flavor enhancer, salt helps control yeast activity so the dough doesn’t overproof, and it strengthens the gluten structure for better chewiness.
- Olive oil
A simple coating of olive oil on your bowl prevents sticking and keeps the dough’s exterior soft. It can also be drizzled on top for extra flavor before baking.
HOW TO MAKE CLASSIC HOMEMADE CIABATTA BREAD
Now that you’ve gathered your ingredients and prepped your workspace, let’s get those hands floury and dive into the transformational journey from sticky batter to mouthwatering loaves.
1. In a large mixing bowl, combine the active dry yeast, warm water, and sugar. Stir gently until the yeast and sugar are fully dissolved. Let this mixture sit for about 5 minutes until it becomes foamy, indicating that the yeast is alive and kicking.
2. Add 2 cups of the bread flour and the salt to the yeast mixture. Use a sturdy spoon or spatula to mix until a smooth, thick batter forms—this is the beginning of your dough’s structure.
3. Gradually incorporate the remaining flour, continuing to stir. Keep going until the dough starts to pull away from the bowl’s sides and loosely gathers into a sticky ball. Resist the urge to add extra flour—this sticky stage is essential for a light, airy crumb.
4. Lightly oil a large bowl with olive oil. Transfer your dough into the bowl, turning it so every surface is coated and protected from drying out. Cover the bowl with plastic wrap or a damp kitchen towel and let it rise in a warm spot for 1 to 2 hours, or until it has doubled in volume.
5. Once the dough has risen, line two baking sheets with parchment paper and generously dust your work surface with flour. Gently turn the dough onto the surface, being careful not to deflate it too much. Cut the dough in half and shape each piece into a flat, elongated loaf, using extra flour on your hands to prevent sticking.
6. Transfer the shaped loaves to the prepared baking sheets. Cover them with a damp kitchen towel and let them proof for about 30 minutes, or until they appear puffy and slightly expanded.
7. Preheat your oven to 425°F (220°C). Place a shallow baking dish filled with water on the bottom rack to create steam, which is crucial for developing a crisp, golden crust.
8. Bake the loaves on the middle rack for 20 to 25 minutes, or until they turn golden brown and sound hollow when tapped on the bottom.
9. Remove the ciabatta from the oven and let the loaves cool completely on a wire rack before slicing to preserve that beautiful crumb structure.
SERVING SUGGESTIONS FOR CLASSIC HOMEMADE CIABATTA BREAD
Ciabatta’s versatility shines when paired with a range of flavors and dishes. Whether you’re entertaining friends, enjoying a casual family meal, or simply savoring a quiet evening at home, these serving ideas will elevate your freshly baked loaves into showstopping bites.
- Herbed Olive Oil Dip
Tear off rustic pieces of ciabatta and dunk them into a shallow bowl of high-quality extra-virgin olive oil seasoned with freshly chopped rosemary, thyme, or crushed red pepper flakes. The porous crumb soaks up the oil beautifully, making every bite fragrant and flavorful.
- Grilled Panini Sandwiches
Slice your ciabatta loaf horizontally and fill with layers of mozzarella, prosciutto, and roasted vegetables. Brush the exterior with a touch of olive oil and grill in a panini press until the cheese is gooey and the crust is irresistibly crispy.
- Tomato Basil Bruschetta
Cut the loaf into ½-inch slices and toast them under the broiler. Rub each toast with a clove of garlic, then top with a mixture of diced tomatoes, basil, olive oil, and a pinch of salt. Serve immediately for a bright, summery appetizer.
- Soup and Stew Companion
Serve thick slices of ciabatta alongside hearty bowls of minestrone, butternut squash soup, or beef stew. The sturdy crust and spongy interior are perfect for soaking up flavorful broths and adding textural contrast to warming dishes.
HOW TO STORE CLASSIC HOMEMADE CIABATTA BREAD
Ensuring your ciabatta retains its delightful crust and soft crumb long after it comes out of the oven requires a bit of know-how. Whether you’re saving slices for the next day’s breakfast or freezing extra loaves for future use, these storage methods will help maintain the bread’s quality.
- Room Temperature in a Paper Bag
For short-term storage (up to 2 days), place the loaf in a breathable paper bag or loosely wrapped in a clean kitchen towel. This allows the crust to stay crisp while preventing the interior from drying out too quickly.
- Airtight Container or Zip-Top Bag
If you prefer a softer crust, slice the loaf and store it in an airtight container or resealable plastic bag with minimal air. Keep at room temperature for up to 2 days—but note that the crust will lose its crunch.
- Freezing for Long-Term Storage
Slice the ciabatta loaf and place parchment or wax paper between slices. Seal in a double layer of freezer-safe bags or wrap tightly in plastic and then foil. Freeze for up to 3 months. To thaw, leave slices at room temperature or pop them in a toaster or warm oven.
- Reviving Stale Ciabatta
To refresh slightly stale slices, lightly moisten the crust with a mist of water and reheat in a preheated 350°F oven for 5–8 minutes. The steam generated will revive the chewy interior and crisp the crust again.
CONCLUSION
What a delightful journey it has been, transforming humble pantry staples into a loaf of Classic Homemade Ciabatta Bread that sings with crisp crust and airy crumb. You’ve discovered how simple ingredients like active dry yeast, bread flour, and olive oil come together with basic techniques—mixing, proofing, shaping, and steaming—to create a rustic artisan bread worthy of any café display. Whether you’re a beginner feeling excited by your first bubbling proof or a seasoned home baker experimenting with herbs and different flours, this recipe offers a reliable framework for success. Don’t forget that you can print this article and save it for later baking sessions, and be sure to check out the FAQ below for answers to common questions about dough stickiness, rising times, and flavor variations. Your feedback is vital, so please leave comments or questions if you try the recipe or need help tweaking it to suit your kitchen environment.
Baking ciabatta is more than just following a list of steps; it’s about tuning into the yeast’s activity, respecting the dough’s texture, and developing patience as the flavors deepen over each rise. When you finally slice into that golden loaf, hearing the satisfying crust give way beneath your knife and catching that first whiff of toasty aroma, you’ll know every minute of waiting was worth it. Share your stories—did you try adding rosemary for an herbal twist? How did you serve your loaf? We’d love to hear about your experiences, tips, or any creative twists you introduced. Leave your thoughts below so we can all celebrate the joys of homemade ciabatta together!
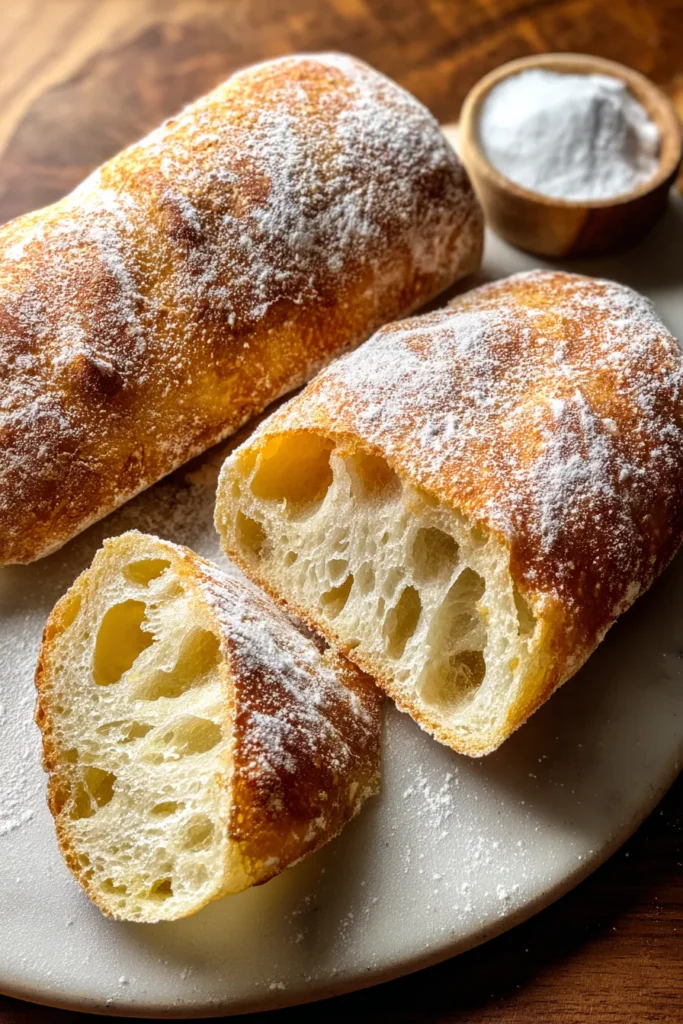

Classic Homemade Ciabatta Bread
Description
You'll love the aroma of freshly baked ciabatta wafting through your kitchen. With its airy, chewy texture and delightful crust, this bread is perfect for sandwiches or dipping in olive oil.
Ingredients
Instructions
-
In a large mixing bowl, combine the active dry yeast, warm water, and sugar. Stir gently until the yeast and sugar are dissolved. Let the mixture sit for about 5 minutes until it becomes foamy, indicating the yeast is active.
-
Add 2 cups of the bread flour and the salt to the yeast mixture. Mix until you have a smooth, thick batter.
-
Gradually add the remaining flour while continuing to stir, until the dough begins to pull away from the sides of the bowl and forms a sticky ball.
-
Lightly oil a large bowl with the olive oil. Transfer the dough to this bowl, turning it to coat with the oil. Cover the bowl with plastic wrap or a damp kitchen towel. Allow it to rise in a warm place for 1 to 2 hours until it has doubled in size.
-
Once risen, prepare two baking sheets lined with parchment paper. Generously dust the work surface with flour and gently turn the dough onto the surface. Cut the dough in half, and shape each half into a flat, elongated loaf. Use more flour on your hands to prevent sticking.
-
Carefully transfer the shaped dough onto the prepared baking sheets. Cover the loaves with a damp kitchen towel and let them rise again for about 30 minutes, or until puffy.
-
Preheat the oven to 425°F (220°C). Place a shallow baking dish filled with water on the bottom rack of the oven to create steam, which helps develop a crispy crust.
-
Bake the loaves in the preheated oven for 20 to 25 minutes, or until they are golden brown and sound hollow when tapped on the bottom.
-
Remove the loaves from the oven and let them cool on a wire rack before slicing.
Note
- The dough for ciabatta is typically very wet and sticky. Do not add extra flour, as this will affect the texture of the bread.
- Creating steam in the oven helps achieve the crusty exterior that is characteristic of ciabatta bread.
- You can experiment by adding herbs like rosemary or thyme for a flavored ciabatta.
- Ciabatta is perfect for dipping in olive oil or making delicious sandwiches.
- Ensure the water used is not too hot to avoid killing the yeast. Warm to the touch is adequate.

