

There is something undeniably magical about slicing into a chilled log of dough to reveal perfect, vibrant swirls. These Christmas Pinwheel Cookies have been a staple in my kitchen for years, bringing a pop of festive color to every holiday tray. They might look impressive and slightly complicated, but trust me, they are surprisingly manageable and fun to assemble. The soft, buttery layers of red, white, and green dough spiral together to create a treat that tastes just as nostalgic as it looks. You simply have to bake a batch this season!
Key Ingredients
To get that perfect melt-in-your-mouth texture and vibrant swirl, we need a classic lineup of pantry staples that transform into something spectacular.
- 2 3/4 cups all-purpose flour: The structural base of the cookie that provides the right amount of tenderness without being too heavy.
- 1 teaspoon baking powder: A leavening agent that gives the cookies a slight lift and a softer bite.
- 1/2 teaspoon salt: Essential for balancing the sweetness and enhancing the buttery flavor profile.
- 1 cup unsalted butter, softened: Provides the rich flavor and tender crumb that makes these sugar cookies irresistible.
- 1 cup granulated sugar: Sweetens the dough and aids in creating crisp edges while keeping the center soft.
- 1 large egg: Acts as the binder to hold all the ingredients together and adds moisture.
- 1 teaspoon vanilla extract: Adds a classic, warm aromatic flavor that pairs perfectly with the butter.
- 1/2 teaspoon almond extract: Gives a distinct, sweet nuttiness that elevates the flavor beyond a standard sugar cookie.
- 1/2 cup red food coloring: Provides the vibrant crimson hue needed for the festive holiday spiral effect.
- 1/2 cup green food coloring: Creates the deep emerald color to contrast with the red and plain dough layers.
- 1/2 cup confectioners' sugar (for dusting): Adds a snowy, sweet finish to the baked cookies for a professional presentation.
How To Make Christmas Pinwheel Cookies
Making these cookies is like doing a little holiday craft project that you get to eat. The process involves making a simple sugar cookie dough, coloring portions of it, and then rolling them up jelly-roll style. It is an intermediate level recipe, but don't let that scare you; the hardest part is just waiting for the dough to chill! The chilling step is absolutely crucial because it solidifies the butter, ensuring your swirls stay tight and don't spread too much in the oven. Once you master the rolling technique, you will feel like a professional baker.
1. Begin by preheating your oven to 350°F (175°C) and line two baking sheets with parchment paper.
2. In a medium bowl, whisk together the flour, baking powder, and salt. Set this mix aside.
3. In a large bowl, cream the softened butter and granulated sugar together using an electric mixer until the mixture is light and fluffy, about 3-4 minutes.
4. Add the egg, vanilla extract, and almond extract to the butter mixture and beat until well combined.
5. Gradually add the dry flour mixture to the wet ingredients, mixing just until combined. The dough should be thick and slightly sticky.
6. Divide the dough into three equal portions. Leave one portion plain, then to one portion, add the red food coloring and mix until the color is evenly distributed. To the other portion, add the green food coloring and mix until evenly colored.
7. On a lightly floured surface, roll out each colored portion of the dough into rectangles about 1/4 inch thick. Aim for similar sizes for all three rectangles.
8. Layer the colored doughs on top of each other in this order: plain, red, and green. Start with the plain dough on the bottom and place the red dough on top of it, followed by the green dough.
9. Using the parchment paper as a guide, roll the layered dough tightly from one long end to the other, forming a log. Make sure to roll it smoothly so the colors stay intact. Wrap the log in plastic wrap and chill in the refrigerator for at least two hours, or until firm.
10. Once chilled, remove the log from the refrigerator and slice it into 1/4 inch thick rounds. Place the cookies cut-side down onto the lined baking sheets, spacing them about 2 inches apart.
11. Bake in the preheated oven for 10-12 minutes, or until the edges are just lightly golden. Keep an eye on them to avoid over-baking.
12. Allow the cookies to cool on the baking sheets for about 5 minutes before transferring them to wire racks to cool completely.
13. Once cooled, dust the cookies with confectioners' sugar before serving.
Serving Suggestions
When it comes to serving these festive spirals, presentation is everything. The vibrant colors naturally draw the eye, making them the star of any dessert table. I love arranging them on a white platter to make those red and green swirls pop, or pairing them with a warm beverage for a cozy night in. Whether you are hosting a grand holiday party or just treating your family after dinner, these cookies offer versatile serving options that enhance the holiday spirit. Here are a few favorite ways to present and enjoy these buttery treats during the festive season.
- Classic Hot Cocoa Pairing: Serve two or three cookies on a saucer alongside a steaming mug of rich hot chocolate topped with marshmallows, as the buttery almond flavor complements the cocoa perfectly.
- Festive Gift Boxes: Line a decorative tin with parchment paper and stack the cookies in neat rows, tying the box with a red ribbon for an impressive homemade edible gift for neighbors or teachers.
- Ice Cream Sandwich: Place a small scoop of vanilla or peppermint ice cream between two cooled cookies and press gently to create a fun, holiday-themed frozen treat that kids will absolutely adore.
- Holiday Dessert Board: Arrange the pinwheels in a spiral pattern on a wooden board surrounded by candy canes, pretzels, and fresh strawberries for a stunning grazing platter that guests can nibble on throughout the evening.
Tips For Perfect Christmas Pinwheel Cookies
Achieving those perfect, hypnotic swirls can feel a bit intimidating the first time you try it, but don't worry, I have got your back. The key to success with icebox cookies usually comes down to patience and temperature control. If the dough gets too warm, the colors might bleed, so keeping things cool is your secret weapon. Over the years, I have gathered a few helpful tricks that turn a good cookie into a great one. These insights will help you customize the recipe to your liking and ensure that your baking experience is stress-free and fun. Here are some specific tips derived from my recipe notes to ensure your pinwheels come out looking bakery-perfect every single time.
- Gift Giving: These cookies are structurally sturdy and visually stunning, making them absolutely perfect for holiday gift baskets or participating in your local cookie exchanges.
- Natural Coloring: If you are trying to avoid artificial dyes, you can substitute the food coloring with natural alternatives like beet powder or matcha, though the colors may be more pastel.
- Texture Boost: For added crunch and flavor variation, consider mixing in some crushed nuts or mini chocolate chips into the dough before rolling it out.
- Family Fun: Remember that these nostalgic cookies bring joy and color to your holiday celebrations and are an activity that is enjoyable for kids and adults alike to bake together.
How To Store It
Since this is a "slice and bake" style recipe, it is incredibly convenient for planning ahead during the busy holiday season. You do not have to bake the entire log at once, which means you can have fresh cookies on demand! Proper storage is vital to keeping that buttery texture soft and the flavors fresh. Nobody likes a stale cookie, especially after putting in the effort to create those beautiful layers. Whether you want to eat them over the next few days or save them for a party next month, here is how to keep them tasting their best.
- Room Temperature: Store baked and cooled cookies in an airtight container on the counter for up to 5 days, separating layers with wax paper to prevent sticking.
- Refrigerator Storage: Keep the unbaked dough log wrapped tightly in plastic wrap in the fridge for up to 3 days before slicing and baking.
- Freezing Dough: Wrap the unbaked dough log in plastic wrap and then foil; store in the freezer for up to 3 months, allowing it to thaw slightly before slicing.
- Freezing Baked Cookies: Place completely cooled cookies in a freezer-safe bag or container for up to 3 months, thawing them at room temperature when you are ready to serve.
Frequently Asked Questions
I know that trying a new recipe, especially one with steps like rolling and chilling, can bring up a few questions. I have compiled the most common queries I get about these pinwheels to help you troubleshoot before you even start!
- Q: How should the dough be prepared to create the different colors?
You must divide the prepared dough into three equal portions. Leave one portion plain, add the red food coloring to the second portion, and add the green food coloring to the third portion, mixing each until the color is evenly distributed.
- Q: What is the correct order for layering the dough rectangles before rolling?
After rolling out the three portions into rectangles of similar sizes, place the plain dough on the bottom, stack the red dough on top of it, and finally place the green dough on top.
- Q: How long does the dough log need to be chilled before slicing?
Once the dough is rolled into a log and wrapped in plastic wrap, it should be chilled in the refrigerator for at least two hours, or until it is firm enough to slice into rounds.
- Q: How do I know when the cookies are done baking?
Bake the cookies in a preheated 350°F (175°C) oven for 10 to 12 minutes. They are ready when the edges are just lightly golden, and you should watch them closely to avoid over-baking.
- Q: Can I add extra ingredients to the dough for more texture?
Yes, according to the recipe notes, you can consider mixing in crushed nuts or chocolate chips into the dough to add texture to the cookies.
What Makes This Special
Let's be honest, the holidays are mostly about eating butter and sugar in various adorable shapes, and these Christmas Pinwheel Cookies are the undisputed champions of that category. They are slice-and-bake magic that makes you look like a pastry genius without requiring a culinary degree. The combination of almond and vanilla hits you right in the childhood nostalgia, and the red, white, and green swirls are just begging to be posted on your social feed. Go ahead and print this article or save it to your favorites so you don't panic-search for it on Christmas Eve. If you give these a whirl (pun intended!), please drop a comment below to let me know how they turned out or if you have any questions. Happy baking!
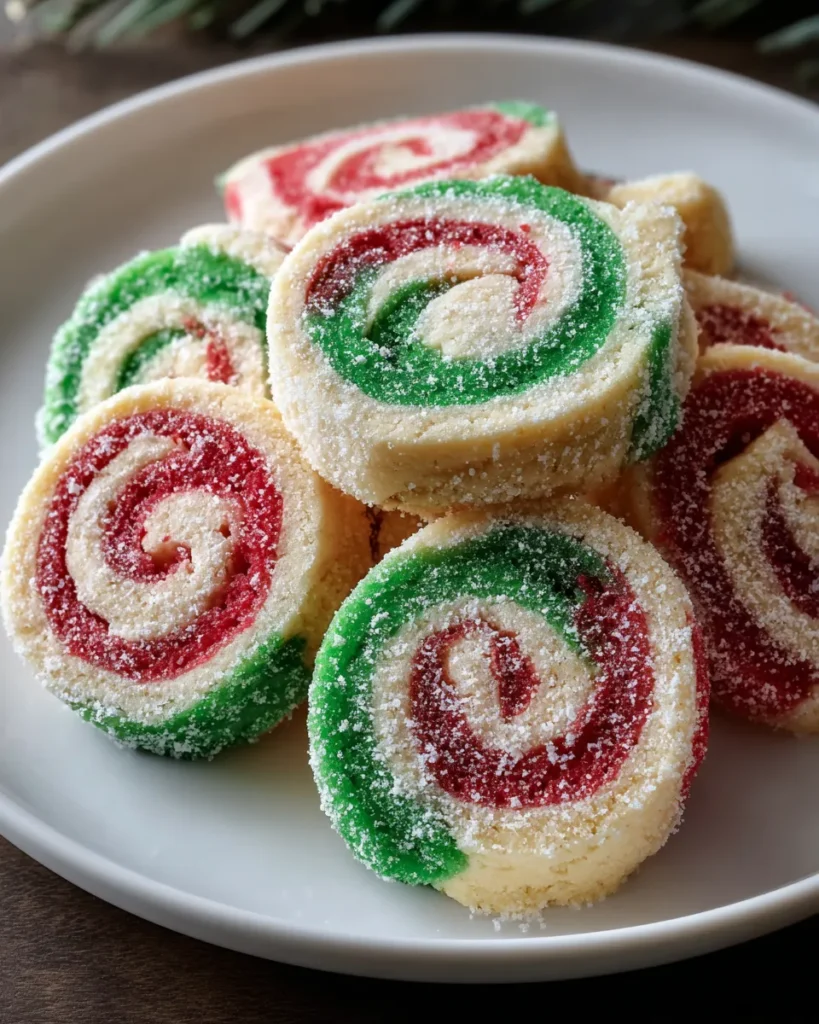

Christmas Pinwheel Cookies
Description
Soft, buttery layers of red, white, and green dough spiral together in these classic treats. Almond and vanilla extracts add a warm aroma, while the vibrant colors bring instant cheer to your baking spread.
Ingredients
Instructions
-
Begin by preheating your oven to 350°F (175°C) and line two baking sheets with parchment paper.
-
In a medium bowl, whisk together the flour, baking powder, and salt. Set this mix aside.
-
In a large bowl, cream the softened butter and granulated sugar together using an electric mixer until the mixture is light and fluffy, about 3-4 minutes.
-
Add the egg, vanilla extract, and almond extract to the butter mixture and beat until well combined.
-
Gradually add the dry flour mixture to the wet ingredients, mixing just until combined. The dough should be thick and slightly sticky.
-
Divide the dough into three equal portions. Leave one portion plain, then to one portion, add the red food coloring and mix until the color is evenly distributed. To the other portion, add the green food coloring and mix until evenly colored.
-
On a lightly floured surface, roll out each colored portion of the dough into rectangles about 1/4 inch thick. Aim for similar sizes for all three rectangles.
-
Layer the colored doughs on top of each other in this order: plain, red, and green. Start with the plain dough on the bottom and place the red dough on top of it, followed by the green dough.
-
Using the parchment paper as a guide, roll the layered dough tightly from one long end to the other, forming a log. Make sure to roll it smoothly so the colors stay intact. Wrap the log in plastic wrap and chill in the refrigerator for at least two hours, or until firm.
-
Once chilled, remove the log from the refrigerator and slice it into 1/4 inch thick rounds. Place the cookies cut-side down onto the lined baking sheets, spacing them about 2 inches apart.
-
Bake in the preheated oven for 10-12 minutes, or until the edges are just lightly golden. Keep an eye on them to avoid over-baking.
-
Allow the cookies to cool on the baking sheets for about 5 minutes before transferring them to wire racks to cool completely.
-
Once cooled, dust the cookies with confectioners' sugar before serving.
Note
- These cookies are perfect for holiday gift baskets or cookie exchanges.
- You can substitute the food coloring with natural alternatives if preferred.
- For added texture, consider mixing in some crushed nuts or chocolate chips into the dough.
- These nostalgic cookies bring joy and color to your holiday celebrations and are enjoyable for kids and adults alike.

