

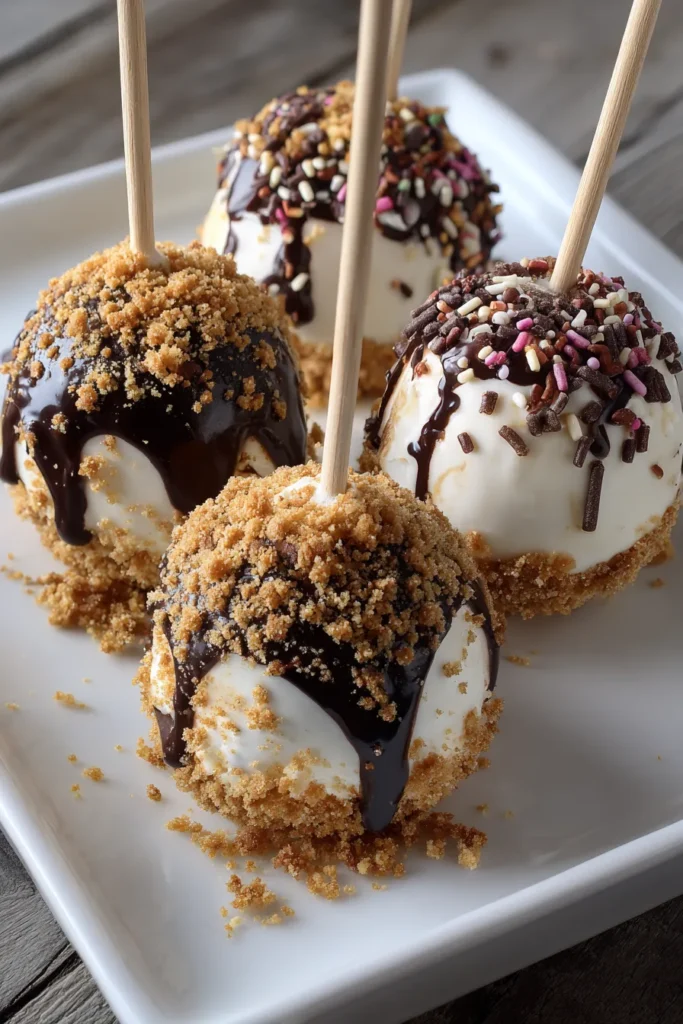
There’s something genuinely uplifting about treats that feel like a miniature celebration in every bite, and these no-bake cheesecake pops deliver exactly that. Sweet and Fun No-Bake Cheesecake Pops Perfect for Any Celebration! blend creamy cheesecake with a crunchy graham cracker crust, then wrap it all up in a decadent chocolate coat. Whether you’re planning a casual afternoon picnic, a kid’s birthday bash, or simply craving an easy dessert fix, these pops rise to the occasion. Best of all, as a beginner-friendly dessert, you’ll spend only about 20 minutes on the prep – no oven required – and then let the freezer work its magic for approximately 2 hours and 30 minutes. Each pop clocks in at around 120 calories, making portion control a breeze without skimping on flavor.
I still remember the first time I whipped up this recipe for a small gathering of friends: everyone was instantly drawn to those colorful sprinkles and the promise of creamy cheesecake on a stick. They were gone in minutes! The beauty of this recipe lies not just in the taste, but in its versatility. Want to match your team’s colors for game day? Swap sprinkles for tinted sugar crystals. Hosting a sophisticated soirée? Use finely chopped pistachios or toasted almonds instead of rainbow sprinkles. And the best part? Since there’s no baking involved, cleanup is a breeze. Stick around as I take you through every delicious detail, from the basics of softening cream cheese to the art of dipping and decorating – let’s make dessert time your favorite part of any event!
KEY INGREDIENTS IN CHEESECAKE POPS NO-BAKE
To craft perfect no-bake cheesecake pops, you’ll only need a handful of straightforward ingredients that you probably already have on hand. Each component plays a vital role, contributing unique textures and flavors that come together in harmony. Let’s break down why these elements are so essential:
- Cream Cheese
This is the heart of the cheesecake pops, offering that signature velvety base. Softened to room temperature, it blends easily with sugar to create a luxuriously smooth and creamy texture.
- Powdered Sugar
Also known as icing sugar, it sweetens the cheesecake mixture without leaving any grainy traces. Its fine consistency ensures a silky mouthfeel and helps stabilize the cream cheese.
- Vanilla Extract
A splash of vanilla adds warmth and depth to the cheesecake flavor, elevating the sweetness with its fragrant, floral notes.
- Graham Cracker Crumbs
These crumbs provide the quintessential crunch and subtle honey flavor of a classic cheesecake crust. Mixed with butter, they bind into a “wet sand” texture, adding a delightful contrast to the creamy center.
- Melted Butter
Acting as the binder for the graham cracker crumbs, the melted butter helps create that firm, crust-like component that holds everything together.
- Chocolate Chips
Once melted, these chips create a glossy, rich coating that crisps slightly when set, sealing in the cheesecake center and adding a luscious chocolate layer.
- Sprinkles or Nuts
These toppings let you customize texture, color, and flavor. Choose rainbow sprinkles for playful pops or chopped nuts for a more sophisticated crunch.
- Lollipop Sticks
Essential for the “pop” presentation, these sticks make the cheesecake balls easy to handle and offer fun, mess-free eating.
HOW TO MAKE CHEESECAKE POPS NO-BAKE
Preparing these cheesecake pops is straightforward and fun, requiring just a few mixing, rolling, and chilling steps. Gather your ingredients, line up your bowls and utensils, and let’s dive into the process:
1. In a large mixing bowl, blend the softened cream cheese using a hand mixer or stand mixer until completely smooth. Scrape down the sides as needed to avoid any lumps.
2. Gradually add the powdered sugar, mixing on low speed at first to prevent a sugary cloud. Once incorporated, crank up the mixer and blend until the mixture is fully incorporated and velvety.
3. Stir in the vanilla extract by hand, ensuring it is evenly distributed, which imparts a lovely aroma and flavor boost.
4. In another medium bowl, combine the graham cracker crumbs with the melted butter. Stir until the mixture resembles wet sand, meaning it clumps slightly when pressed but remains loose enough to mix.
5. Fold the graham cracker “sand” into the cream cheese mixture until everything is well blended, creating a uniform dough-like consistency.
6. Scoop out portions and roll them into small balls, about one inch in diameter. Aim for consistent sizing so they chill and set evenly.
7. Insert a lollipop stick into the center of each ball. Place them on a tray lined with parchment paper, then freeze for at least 2 hours or until firm.
8. Once the cheesecake balls are solid, dip each one into the melted chocolate chips, ensuring a full coat. Allow excess chocolate to drip off before moving on.
9. Immediately roll or sprinkle the freshly dipped pops with your choice of toppings—sprinkles, chopped nuts, or even colored sugar—for a festive finish.
10. Arrange the coated pops back on the parchment-lined sheet and refrigerate for about 30 minutes, or until the chocolate has fully set.
SERVING SUGGESTIONS FOR CHEESECAKE POPS NO-BAKE
When it comes to presenting these little flavor bombs, a thoughtful display can elevate your gathering and make your guests smile. Whether you’re serving at a birthday party, a casual family get-together, or a seasonal celebration, these four ideas will help you showcase your pops in style. Remember: presentation is part of the fun, so don’t be afraid to play with color, height, and serving vessels to create a truly eye-catching dessert table!
- Elegant Tiered Stand
Arrange the pops on a multi-level dessert stand, allowing guests to admire the assortment of toppings. Use white or pastel stands to highlight the vibrant sprinkles and create a sophisticated layered display.
- Mason Jar Bouquet
Fill wide-mouth mason jars with colored sugar, small candies, or even edible flower petals. Stick the pops into the jars at varying heights for a whimsical bouquet effect that doubles as a centerpiece.
- Themed Serving Platter
Choose platters or trays that match your event’s color palette—think gold-rimmed dishes for an upscale affair or bright plastic trays for a picnic vibe. Line the platter with doilies or parchment paper and fan out the pops for a polished look.
- Individual Gift Boxes
Package one or two pops in small, clear gift boxes or organza bags tied with ribbon. These make for adorable party favors that guests can take home, sealing in the memory of a delightful evening.
HOW TO STORE CHEESECAKE POPS NO-BAKE
Storing these cheesecake pops correctly ensures they maintain their creamy texture and vibrant coatings, so you can enjoy them guilt-free for days. Whether you’re prepping treats in advance or saving leftovers, follow these tips to keep each pop tasting just as fresh as the first bite.
- Airtight Container in the Fridge
Place pops in a single layer or separated by parchment paper in an airtight container. Refrigerate for up to 3 days. This method preserves the creamy interior and prevents the chocolate shell from sweating.
- Freezer Storage for Longer Shelf Life
If you want to keep pops longer, freeze them in a tightly sealed container or freezer bag for up to one month. Thaw in the refrigerator for about 30 minutes before serving to maintain texture without melting the chocolate.
- Avoid Temperature Fluctuations
Store pops away from the fridge door and any areas that might be subject to opening and closing. Consistent temperature helps prevent condensation on the chocolate coating.
- Separate Decorations
For pops with delicate toppings like colorful sprinkles that might bleed color when chilled, consider adding these right before serving. Keep any extra sprinkles or chopped nuts in a small container at room temperature for quick decorating.
CONCLUSION
Feeling inspired? These no-bake cheesecake pops bring together creamy, dreamy cheesecake and buttery graham cracker crust, all coated in luscious melted chocolate and personalized with your favorite toppings. From their super-simple preparation—just 20 minutes of hands-on time—to their show-stopping presentation, they’re the perfect beginner-friendly dessert. Whether you’re planning a birthday party, a bridal shower, or a quiet weekend indulgence, these pops adapt to any theme or palette and will have everyone asking for your secret.
Go ahead and print this article or save it for later reference, and don’t forget you can find a FAQ below to help troubleshoot any questions that pop up. If you’ve given this recipe a whirl, I would love to hear how it turned out! Share your comments, questions, or any tweaks you tried—maybe you discovered a new topping combo or a clever storage hack. Your feedback not only helps fellow home cooks but also makes this cozy cooking community richer. Happy dipping and decorating!

Cheesecake Pops No-Bake
Description
These no-bake cheesecake pops are a delightful treat, blending creamy cheesecake with crunchy graham cracker crust and coated in rich chocolate. Perfect for sharing!
Ingredients
Instructions
-
In a large mixing bowl, blend the softened cream cheese until smooth.
-
Gradually add in the powdered sugar and continue blending until fully incorporated and smooth.
-
Stir in the vanilla extract.
-
In another bowl, mix the graham cracker crumbs and melted butter until it resembles wet sand.
-
Combine the graham cracker mixture with the cream cheese mix until well blended.
-
Roll the mixture into small balls, about 1 inch in diameter.
-
Insert a lollipop stick into the center of each ball and freeze them for at least 2 hours or until firm.
-
Once the cheesecake balls are firm, dip each one into the melted chocolate, allowing the excess to drip off.
-
Immediately roll or sprinkle the pops with your choice of coatings such as sprinkles or chopped nuts.
-
Place the coated pops on a parchment-lined baking sheet and refrigerate for about 30 minutes until the chocolate is set.
Note
- To ensure easy blending, make sure your cream cheese is at room temperature.
- Feel free to experiment with different flavors of coatings and toppings.
- These cheesecake pops are a fun party treat and can be customized to match the color theme of your event.
- Store any leftovers in an airtight container in the refrigerator for up to 3 days.

